

Build a forecast input app that writes to your data warehouse
Requirements
To follow the steps in this guide, you’ll need:- A table upload schema on a Postgres, Snowflake, Databricks, BigQuery, Redshift, Databricks Lakebase, or SQL Server connection. Omni creates the input column’s table in this schema. Refer to the setup guide for your database for instructions.
- Restricted Querier, Querier, or Connection Admin permissions to create the input column. Viewers can enter values after the column exists.
- The Upload data ability enabled for the organization and in the document’s settings.
- A topic that contains the data people plan against, such as actuals and budget.
How it works
The app reads a workbook query on your topic and writes only through the input column. Omni stores the entered values in a table in the upload schema and joins them back to the query on the key columns. Your modeled data stays read-only.Build the forecast input app
Model the grain people plan at
The input column needs one row for each combination that people enter a value for. In this example, that is one row for each market, business, and month, with measures for actuals, budget, and the same month last year.
- Build a table at that grain in your database, or as a query view, and add it to a topic.
- If different people own different markets, add an access filter on the market field and connect it to a user attribute. The last step of this guide depends on this filter.
- In a workbook, create a query on the topic that contains the key fields and the measures to show next to the forecast. Filter it to the months people forecast.
- Give the tab a name, such as
Forecast input. The app refers to the query by this name.
Add the input column
Add an input column to the query with these settings:
Each input column is stored in its own table. To collect a reason with each number, add a second input column with the Text data type and the same key columns. This example uses
Forecast comment, with the table name fc1_2027_forecast_comment.Publish the document when both columns exist.Check the table in your data warehouse
Enter a value in the input column and save it. Then query the table in your upload schema:The table contains these columns:Anyone with access to the schema can query this table without Omni. For example, you can join it to actuals in a dbt model or load it into a planning system.In Omni, the input column is a field in the query, next to the measures from your topic. It stays editable in each query that contains the key columns. In a query at a different grain, such as market by quarter, it is read-only.
Read the forecast table
Omni creates the table and column names in lower case. In a database that changes unquoted names to upper case, such as Snowflake, put the names in double quotes.
Build the app
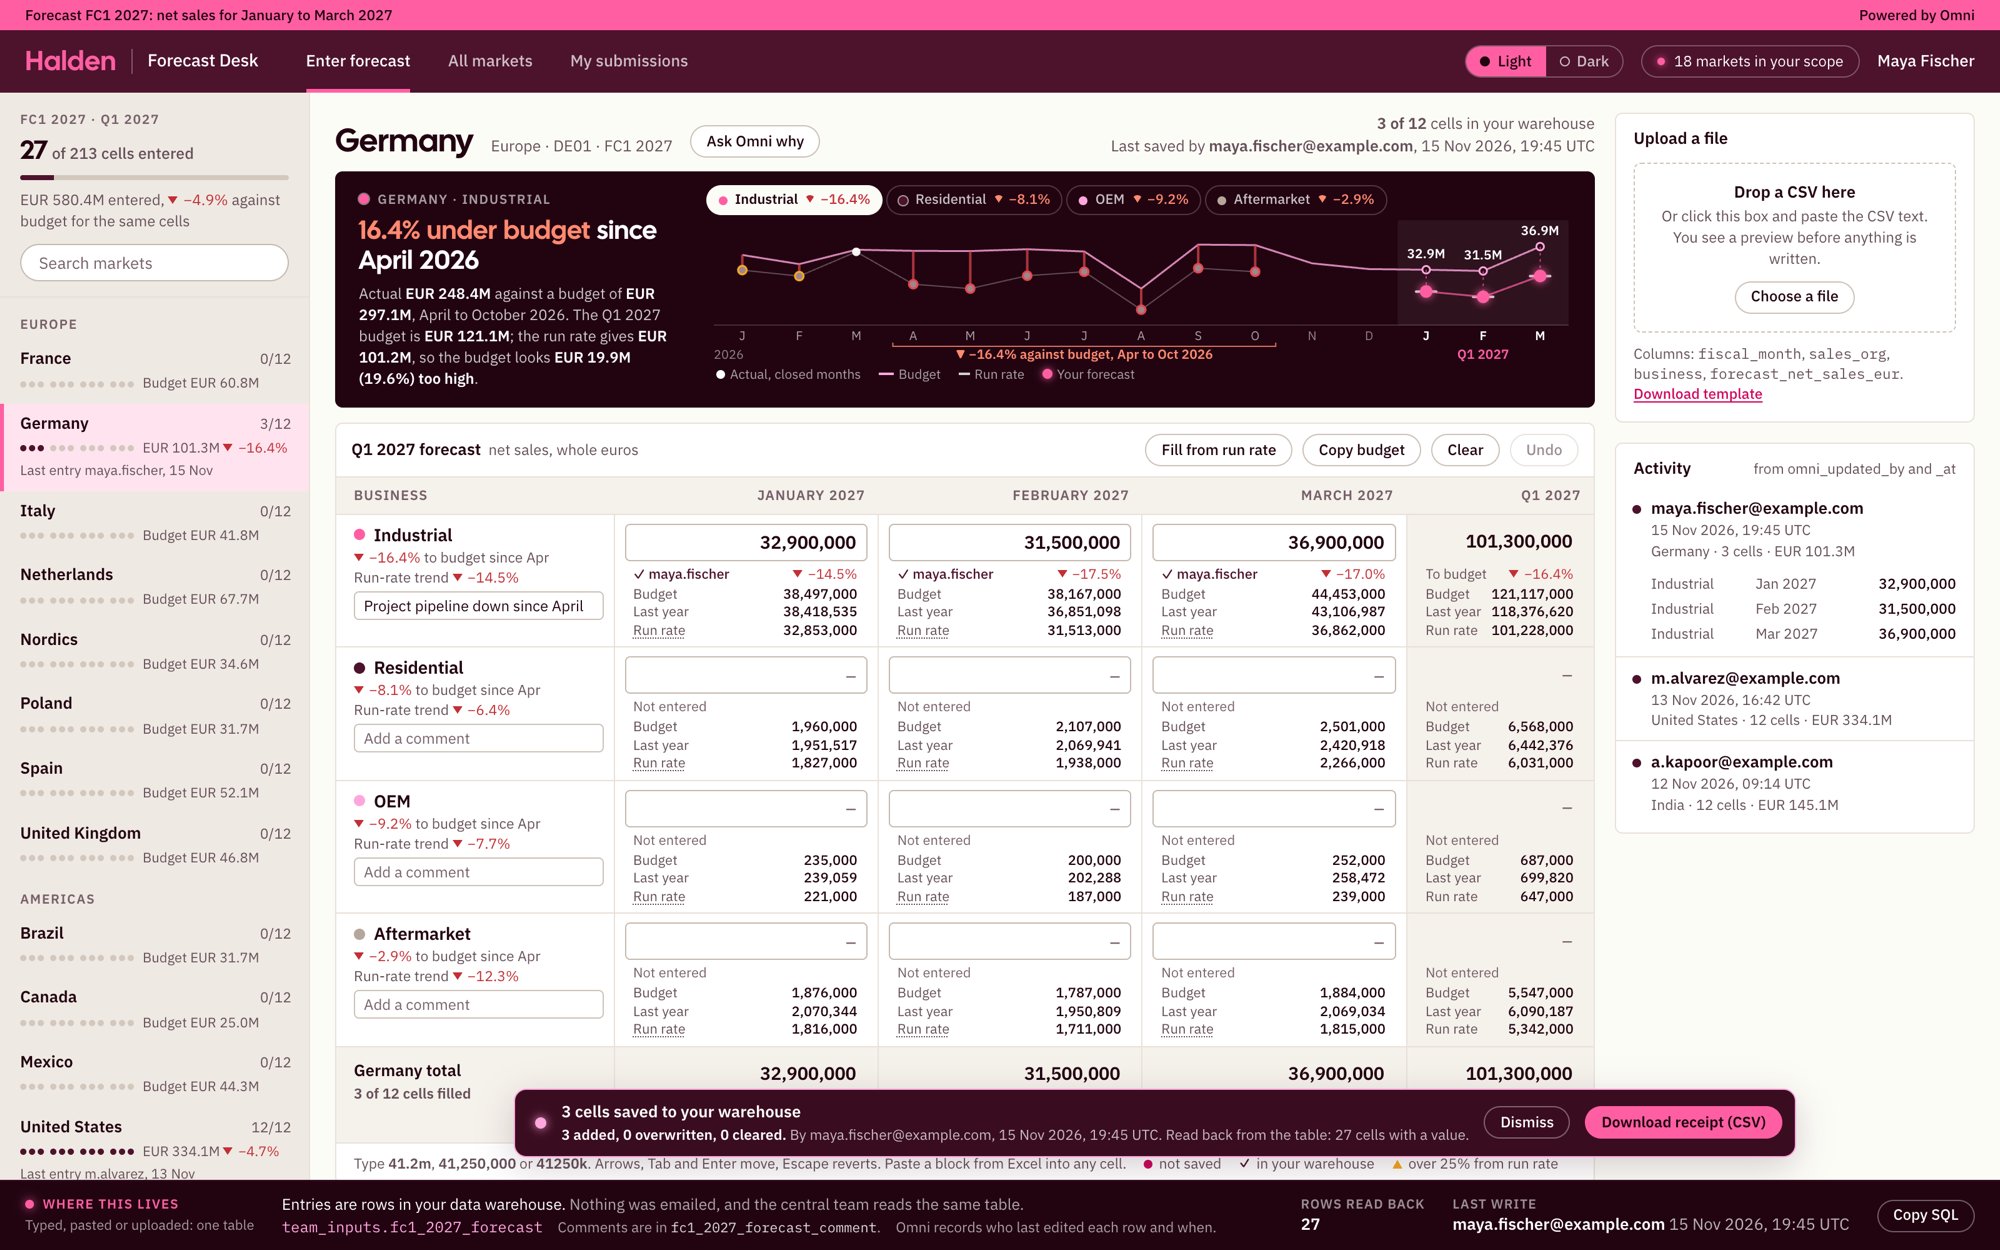
People can enter values in the workbook or on a dashboard. For a planning cycle with many contributors, an app gives them a screen made for the task.Create an app in the same document. To start from the app in this guide, open Forecast Desk in the app library. Copy its rebuild prompt into the Omni Agent, or copy its HTML, then follow its setup notes.To build your own app, describe it to the Omni Agent or edit the HTML yourself. In both cases, the app must do the following:When you write to an input column from an app:
- Read the
Forecast inputquery and show one editable cell for each row. - Write each changed cell to the input column, with the key values of its row.
- After a write, run the query again and show the value as saved only when it reads back.
- Tell the person when a write fails.
omni_updated_at and omni_updated_by fields to the Forecast input query.If you edit the HTML yourself, a write is one call. The example below writes one value for Germany, Industrial, January 2027:Write a value to the input column
- Send the key fields with each row. Use the field names and the values that the query returned.
- Write
nullto clear a cell. There is no separate delete call. - Don’t send the edit history fields. Omni sets them.
- Send many rows in one call.
upserttakes a list of rows. - Send only rows that the person can access. If one row in the call is outside the person’s row-level access, Omni refuses the whole call.
- Wait for the value to read back. A query run that starts immediately after a write can return the earlier value. Run the query again until the new value appears.
Add CSV upload
Some people already have their numbers in a spreadsheet. The app can read a CSV file in the browser and write its rows with the same 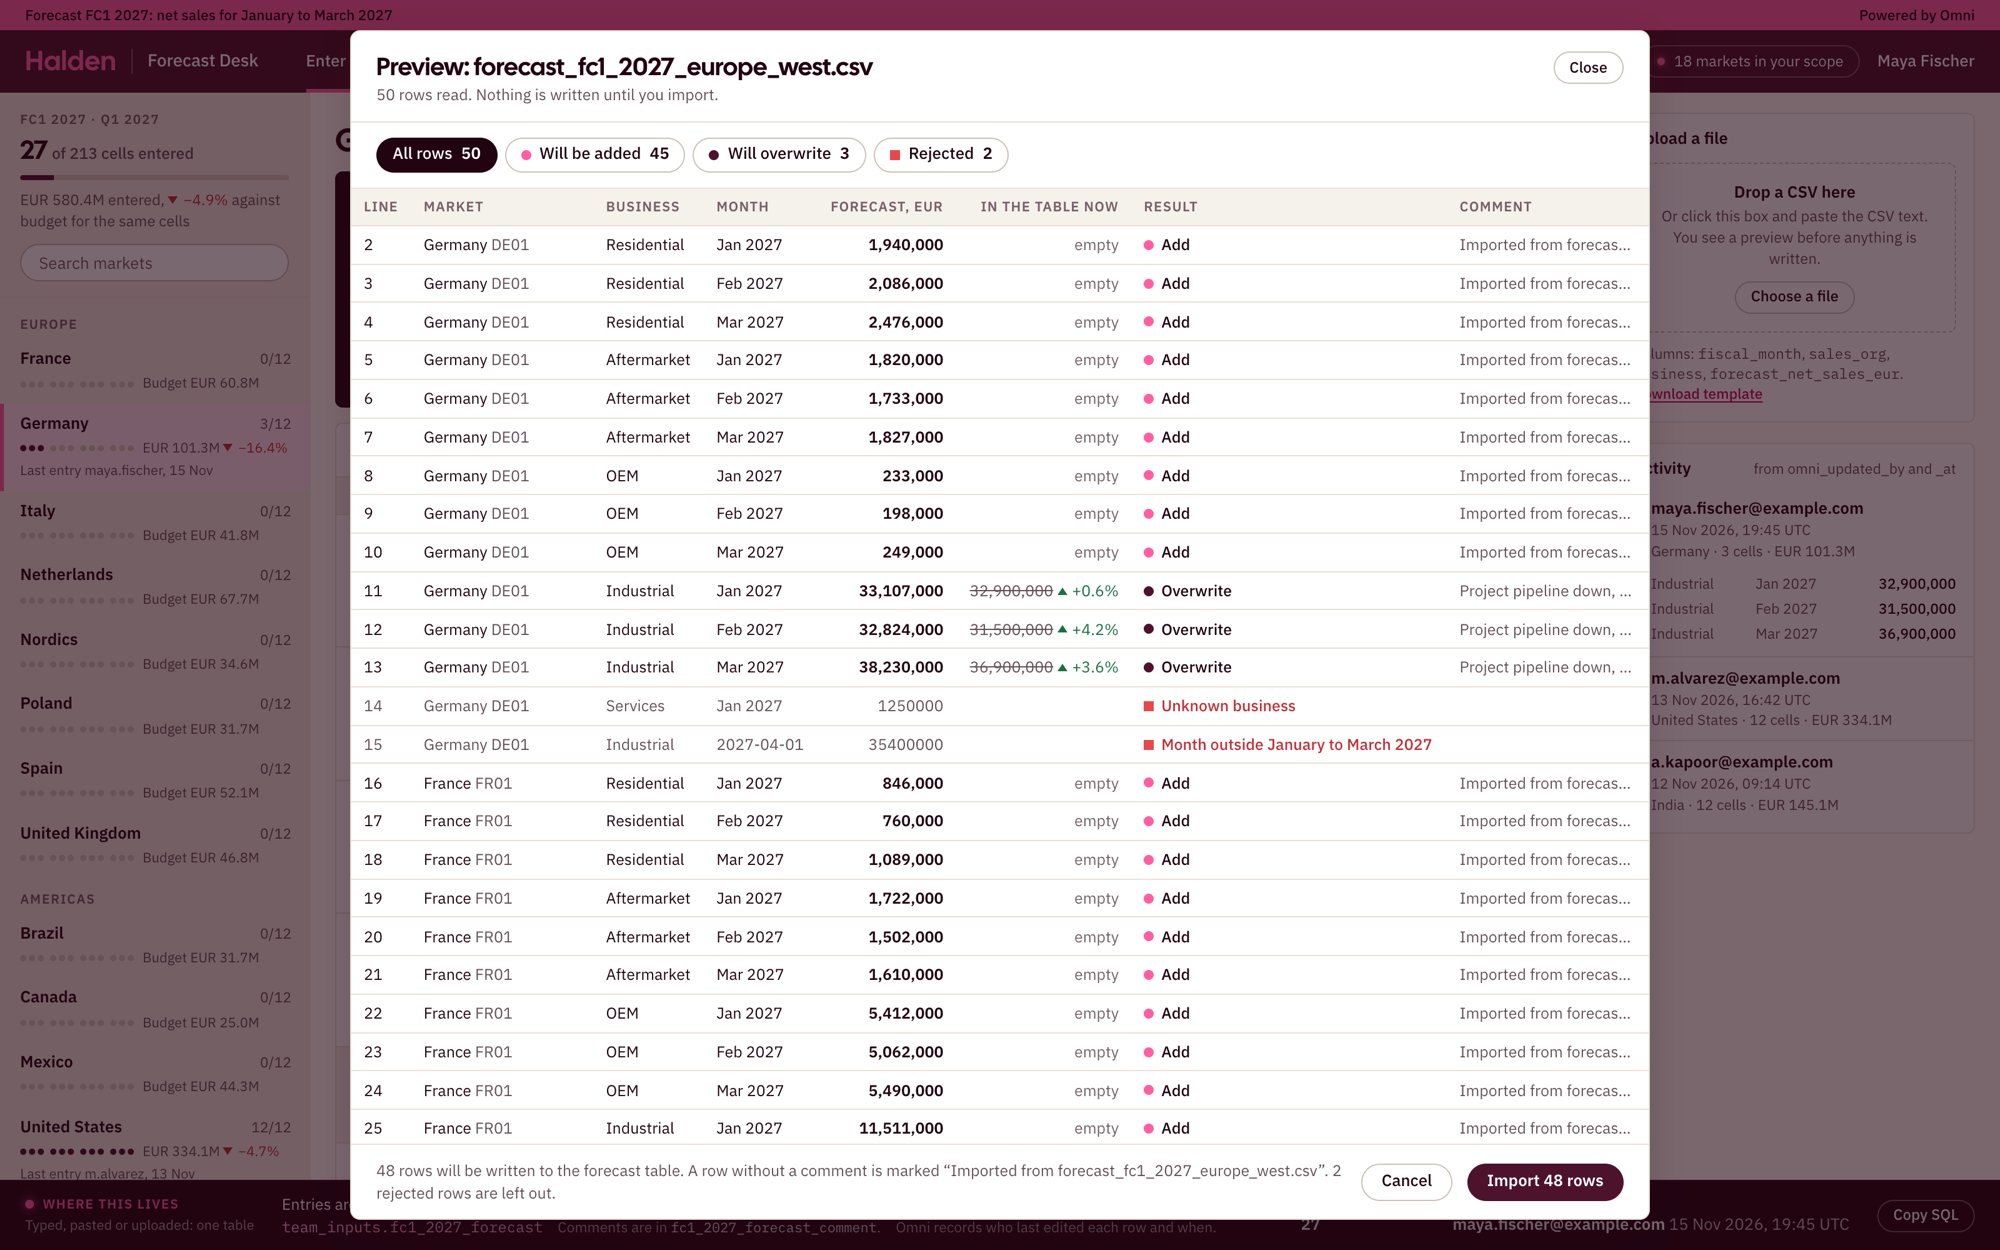
upsert call as typed values.Before the app writes anything, show a preview with three groups of rows:- Rows to add, where no value exists.
- Rows to overwrite, with the saved value and the new value side by side.
- Rows to reject, each with a reason: a market the person can’t access, an unknown business, a month outside the forecast period, or a value that isn’t a number.
upsert call. Test with the largest file you expect before you rely on it.To record where an uploaded number came from, write the file name to the comment column for each uploaded row that has no comment.Limit each person to their own rows
The access filter from the first step controls who can read and write each row. The app doesn’t need its own permission logic.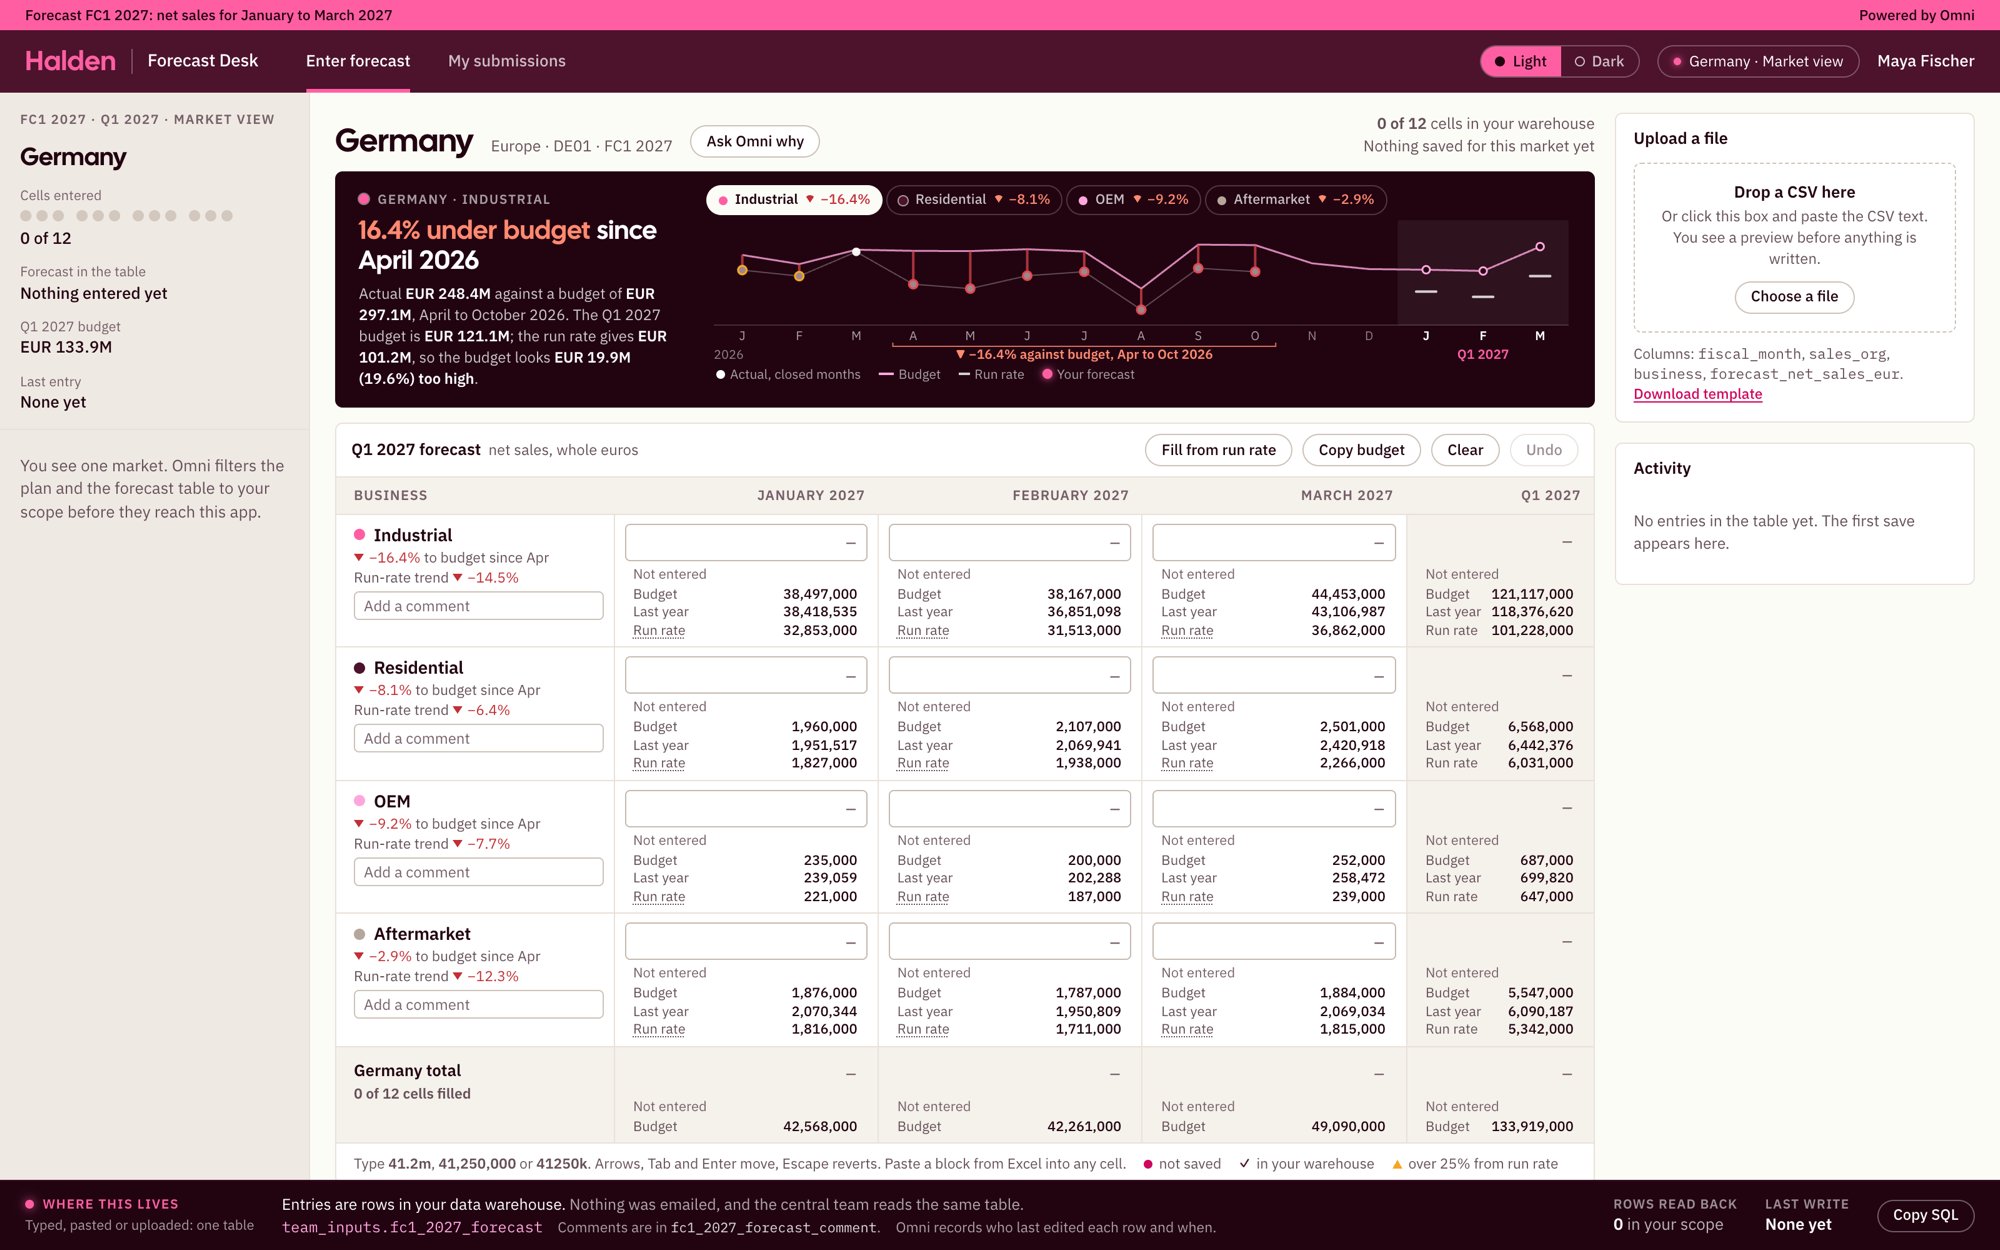
- Reading. The query returns only the markets that the person’s user attribute allows, so the app shows only those markets.
- Writing. The access filter field is part of the input column’s key, and Omni refuses a write to a row outside the person’s row-level access.
- Uploading. Build the list of accepted rows from the rows that the query returned. A CSV row for another market then appears in the rejected group.
omni_updated_by.Limitations
- Edit history records the last change only. The table shows who last edited each row and when, not earlier values. To keep earlier values, take a snapshot of the table on a schedule in your data warehouse.
- Some settings are permanent. You can’t change the data type, key columns, or table name, and you can’t turn off edit history. To change them, delete the column and create it again. This also deletes its values.
- Each input column is one table. A value and its comment are two tables with the same key.
- Input columns belong to the workbook. You can’t promote them to the shared model.
Next steps
- Input columns - Edit modes, key columns, and supported data types
- Writing data from apps - Input column writes and table writes
- Access filters - Row-level access by user attribute
- Forecast Desk in the app library - The HTML, setup notes, and rebuild prompt for the app in this guide