- You’re running a production embed instance and want a safe place to build and test changes before they reach customers
- You’re planning a CI/CD workflow for model and content changes across environments
- You want to understand how embed permissions work and what to validate before launch
Prerequisites
Before following this guide, make sure you have:- An existing Omni instance with external embed configured or in progress
- Admin permissions on both your staging and production Omni instances
- Access to a git repository that both instances can connect to
- The ability to generate API keys on each instance (required for the Content Migration API)
Two-instance setup: staging and production
The recommended pattern is two separate Omni instances (one for staging and development, one for production), using Git Follower Mode to keep the data model in-sync and the Content Migration API to move dashboards and workbooks between them.How Git Follower connects the two instances
Git Follower keeps a production instance’s data model automatically in-sync with a development instance through a shared git repository. The staging instance acts as the leader: all model development happens here, and changes are published by merging pull requests into the main branch. The production instance acts as the follower: it’s pointed at a separate branch (e.g.,prod) and picks up model changes automatically when that branch is updated.
Developers never touch the production instance directly. All changes flow through git.
Git Follower can be configured either across two separate Omni instances or across two models within the same instance. For embed customers, separate instances are strongly preferred. This fully isolates production from staging, preventing accidental changes and allowing independent instance-level configuration.
Setup
Instance and database connections
Connect the staging instance to your staging database and the production instance to your production database.Git integration
On the staging instance, connect to your git repository pointed at the main branch (this is the leader). On the production instance, connect to the same repository, enable Git Follower Mode, and point it at a separate branch (e.g.,prod).
Enable the Always create branches setting on the production instance. This ensures that when a release branch is created in git, Omni automatically opens a matching branch on the follower.
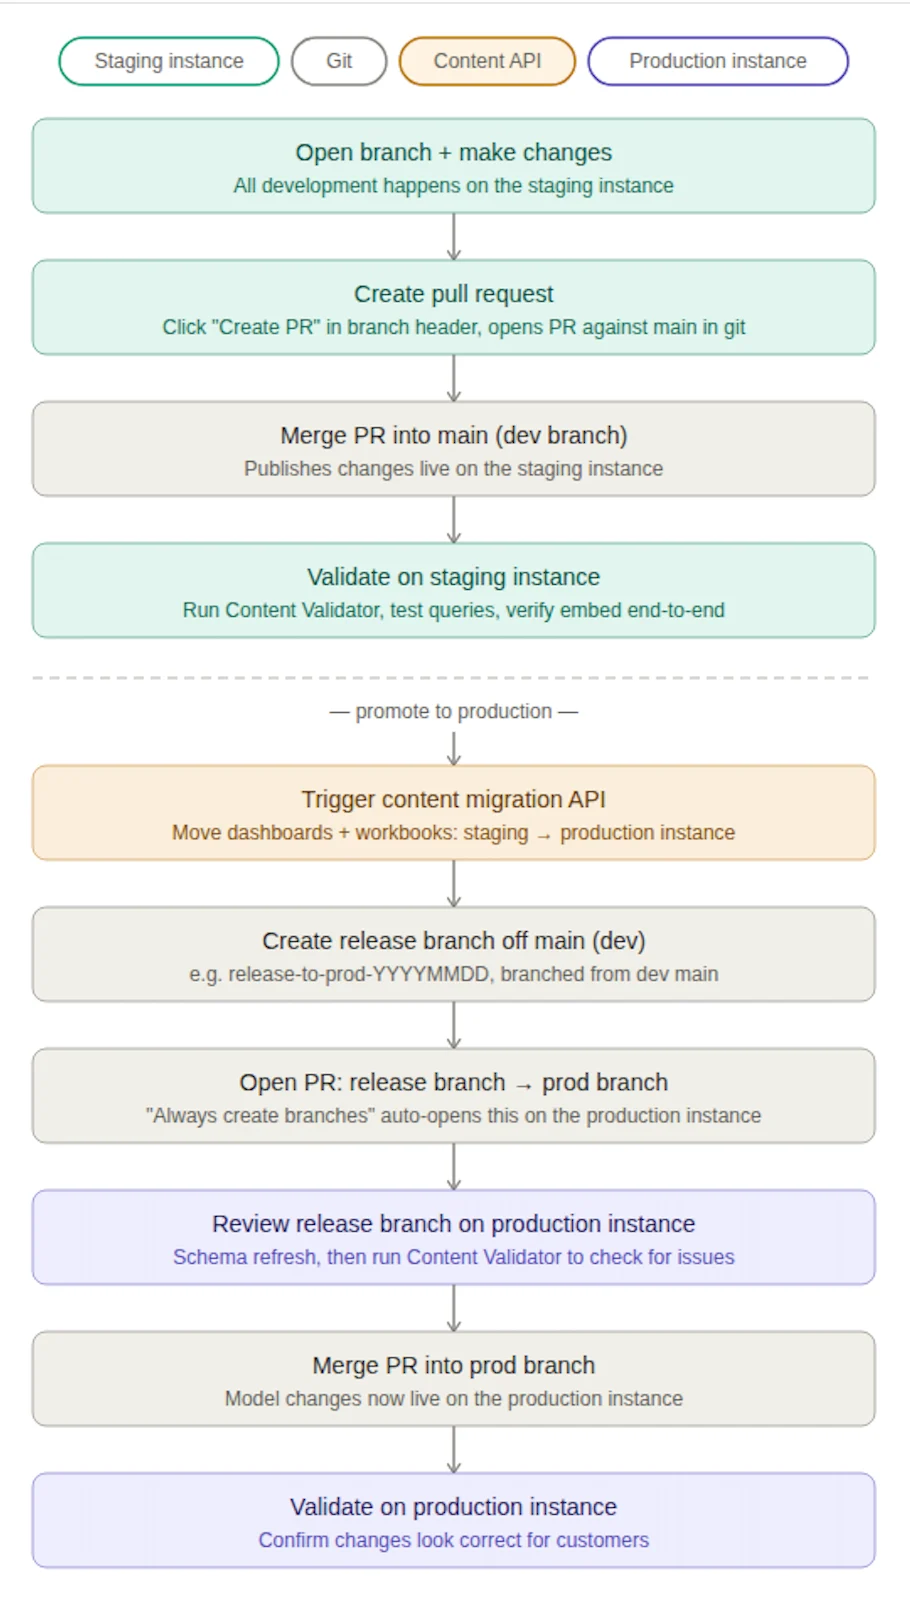
Development workflow on staging
All model and content development happens on the staging instance:1
Open a new branch in the Omni model IDE
2
Make model and/or content changes
3
Open a pull request
Click Create Pull Request from the branch header to open a PR against
main in git.4
Merge the PR
Changes are published and live on staging.
5
Validate
Run the Content Validator, test queries, and optionally embed the branch into your staging app environment to verify end-to-end.
Promoting changes to production
Once staging is validated:1
Trigger the Content Migration API
Move dashboards and workbooks from the staging instance to the production instance. Migrate into a validation folder, not the embed-accessible folder (see the next section).
2
Create a release branch
In git, create a release branch off
main (e.g., release-to-prod-YYYYMMDD).3
Open a PR
Open a PR to merge the release branch into
prod.4
Open the matching branch on production
On the production instance, open the release branch.
5
Validate
Run the Content Validator to confirm nothing is broken.
6
Merge the PR
Model changes are now live on the production instance.
7
Move content to the embed-accessible folder
Once validated, move content out of the validation folder and into the embed-accessible folder.
On the first deployment, manually trigger a schema refresh on the production instance after enabling follower mode, before running the Content Validator for the first time. This ensures the follower’s schema is aligned with the leader’s and avoids validation errors.
Order matters. Trigger the Content Migration API after staging is fully validated, but before merging the git release PR to
prod. This keeps model logic and content in-sync on the production instance.Using a validation folder to gate content visibility
On a fully locked-down embed instance, external users only see content that has been explicitly shared with them, typically through an All Embed Users group with Viewer access to a designated folder. Use this to your advantage: have the Content Migration API target a validation folder that is not shared with the embed users group. Your team can then log into the production instance as admins and review the migrated content before granting end-user visibility.Locking down permissions before launch
Beyond content visibility, several permission layers need to be configured correctly on your production embed instance before customers are live.Embed users get only the permissions you pass in the URL
Embed user permissions come exclusively from theconnectionRoles and modelRoles parameters passed in the embed URL at login time. Base access roles on the connection or model do not apply to embed users.
Every embed URL generation must explicitly pass the correct, minimally-permissive role. That said, it’s still recommended practice to set the base connection role to No Access and grant access only via URL parameters.
Use Restricted Querier or Viewer for embed users
TheconnectionRoles parameter accepts standard roles or custom roles that resolve to either Viewer or Restricted Querier. These are the two intended tiers for embed users:
- Restricted Querier: lets users create and view content through topics, keeping all model-layer permissions intact
- Viewer: lets users view dashboards only
connectionRoles. If a Querier-based custom role is passed, embed users genuinely receive that access. This needs to be controlled at URL generation time.
Build all embed content on topics, not raw SQL
Embed users with Restricted Querier access can only query through topics. Any dashboard tile or workbook query built directly on raw SQL will be inaccessible to them. Before promoting content to the embed-accessible folder, confirm that every query in every dashboard is backed by a topic. This is also what makes access filters and field-level permissions enforceable: those controls live at the model layer and only apply when queries go through topics.Apply access filters to every topic embed users can reach
Every topic accessible to embed users should have access filters implemented. These enforce row-level security at the model layer and cannot be bypassed with Restricted Querier access, making them the foundation of multi-tenant isolation.Use model roles over connection roles for model-level permissions
When setting permissions on models in admin, prefer model roles over connection roles where possible. Connection roles cascade to all child models on the connection, which can produce unintended permission grants.Test resolved permissions for a real embed user before launch
Permission resolution can produce unexpected results when a user belongs to multiple groups, since the highest-privilege role across all groups wins. Before going live, use the admin area to inspect the Resolved Permissions for a test embed user to ensure they have access to exactly what they need and nothing more.Things to be aware of as you operate
A few operational points worth keeping in mind:- Content promotion requires scripting. The Content Migration API has no native one-click sync between instances. Plan for this in your workflow.
- Be careful when deleting dashboards. Deleting a dashboard removes its associated schedules and custom identifiers, and these can’t be recovered once the dashboard clears trash.
- Git Follower covers the model only. Dashboards and workbooks must be managed separately through the Migration API.
- Two instances means two sets of auth and permissions to maintain. User attributes, user groups, and authentication protocols are configured independently on each instance. Admin access is also instance-specific.
- Always do a schema refresh on the follower before running the Content Validator. This ensures the follower’s schema is aligned with the leader’s before you validate.
If a second instance isn’t feasible right now
This is a fallback option for teams where a second instance isn’t practical yet. It reduces operational overhead but comes with real tradeoffs for embed customers. You can start here and move to separate instances later.
- Human error risk. Developers working on staging share the same instance as production. An accidental publish or permission change can reach your external customers.
- Instance-level settings bleed. Feature flags, AI settings, dashboard themes, and Slack delivery configuration can’t be managed independently per environment.
- Developer velocity. Internal developers are subject to the same locked-down controls as the embedded production environment, which slows iteration.
- IDE schema errors. When the two connections point to different databases, the follower model shows schema validation errors in the IDE.
- Harder to test embed end-to-end. You can’t fully simulate the production embed experience from within staging when they share an instance.
Next steps
- Set up Git Follower Mode on your production instance
- Review Git Follower best practices, including the schema refresh and branch settings
- Configure access filters on every topic before promoting content to production
- Review the fully locked-down embed setup to confirm your permission model is correct