

Content access permissions
Content access is determined by a user’s assigned content access role. Roles can be assigned at the content level, but Organization Admins can also assign default content access roles for the entire organization.Document permissions
Users can be assigned the following roles on individual documents.The Owner role can only be granted to individual users. It cannot be granted to user groups or used as the organization default. Documents can have more than one owner, but at least one owner is required at all times.
| Ability | No Access | Viewer | Editor | Manager | Owner |
|---|---|---|---|---|---|
| View dashboards | |||||
| View & explore workbooks | |||||
| Update dashboards & workbooks | |||||
| Delete folders they created | |||||
| Manage permissions on content | |||||
| Receive access requests |
Folder permissions
Content access roles on folders work differently than on individual documents. When you share a folder, permissions cascade to all documents and subfolders inside. Additionally, folder-level roles grant the ability to add and remove content from the folder, not just view or edit individual documents.The Owner role can only be granted to individual users. It cannot be granted to user groups or used as the organization default. Folders can have more than one owner, but at least one owner is required at all times.
| Ability | No Access | Viewer | Editor | Manager | Owner |
|---|---|---|---|---|---|
| Search for the folder & its contents | |||||
| View folder contents | |||||
| View dashboards & explore workbooks | |||||
| Edit content in the folder | |||||
| Add new content to the folder | |||||
| Delete folder content | |||||
| Manage folder and content permissions | |||||
| Receive access requests |
Assigning access roles to content
To grant content access, start by clicking the Share icon near the top right corner of any folder or document:
Users and user groups
To share content with individual users and user groups:- Click the Share with users or groups field.
- Use the dropdown to select the users and groups you want to share the content with.
- Use the access role dropdown (next to the Share button) to assign the user or group an access role.
- Click Share.
Organization
Use the access role dropdown in the Organization row to share the content with your entire organization. This role will be applied to users when they access the content unless they have explicitly been assigned a different role. Changes will be saved automatically.Embed users and external users don’t receive the Organization role. Share content with them directly or through a group.

A few settings can affect how you share content with your organization:
- Content organization - When enabled, users can add content to the organization’s Shared hub. Otherwise, users can only add content to folders that they have been granted access to.
- Default content access role - Applies the selected role as the organization default when content is saved in the organization’s Shared hub.
Managing ownership
The Owner content role grants the user full content management permissions to the content; they will also receive access requests. Documents and folders can have multiple owners, but a piece of content must have at least one owner at all times. In this case, a new owner must be assigned before you can change the current owner’s content role or remove their access entirely.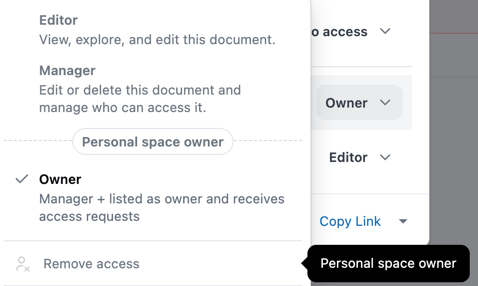
Access can't be removed from a user if they are the content's only owner
Inheriting access roles
When users create subfolders within existing parent folders, the creator of the original parent folder maintains ownership of the newly created subfolders. However, users who create the subfolders retain full ownership rights over any documents they place within the subfolders they created.
Folder 1 requires an Editor access role or higher:
Folder 1 - Editor or higher
Document A - Editor or Manager
Subfolder 1 - Editor or Manager
Document B - Inherits from Subfolder 1
Subfolder 2 - Inherits from Subfolder 1
Folder 1, this means that any documents or subfolders it contains can only be assigned Editor or Manager access roles.
Let’s take a look at an example where Folder 1 is assigned No access. With this implementation, the documents and subfolders it contains can be assigned any more permissive access role:
Folder 1 - No access
Document A - Viewer or higher
Subfolder 1 - Viewer or higher
Document B - Inherits from Subfolder 1
Subfolder 2 - Inherits from Subfolder 1
Folder 1 - No access
Document A - Viewer or higher
Subfolder 1 - No access
Document B - Editor or higher
Subfolder 2 - Manager
What can users see?
When organizing content and assigning access, assume that folder names will always be visible. If a folder contains content that a user has access to, the user will be able to see the folder. The user will only be able to see the content they have access to within the folder, however. For example,Folder 1 has a No access role, but it contains a document that the entire organization has access to. Users will be able to see the folder and the document. External users won’t see either unless the document is shared with them directly or through a group.
Requesting document access
Users can request access to dashboards and the document owner will receive an email notification to approve or review the request.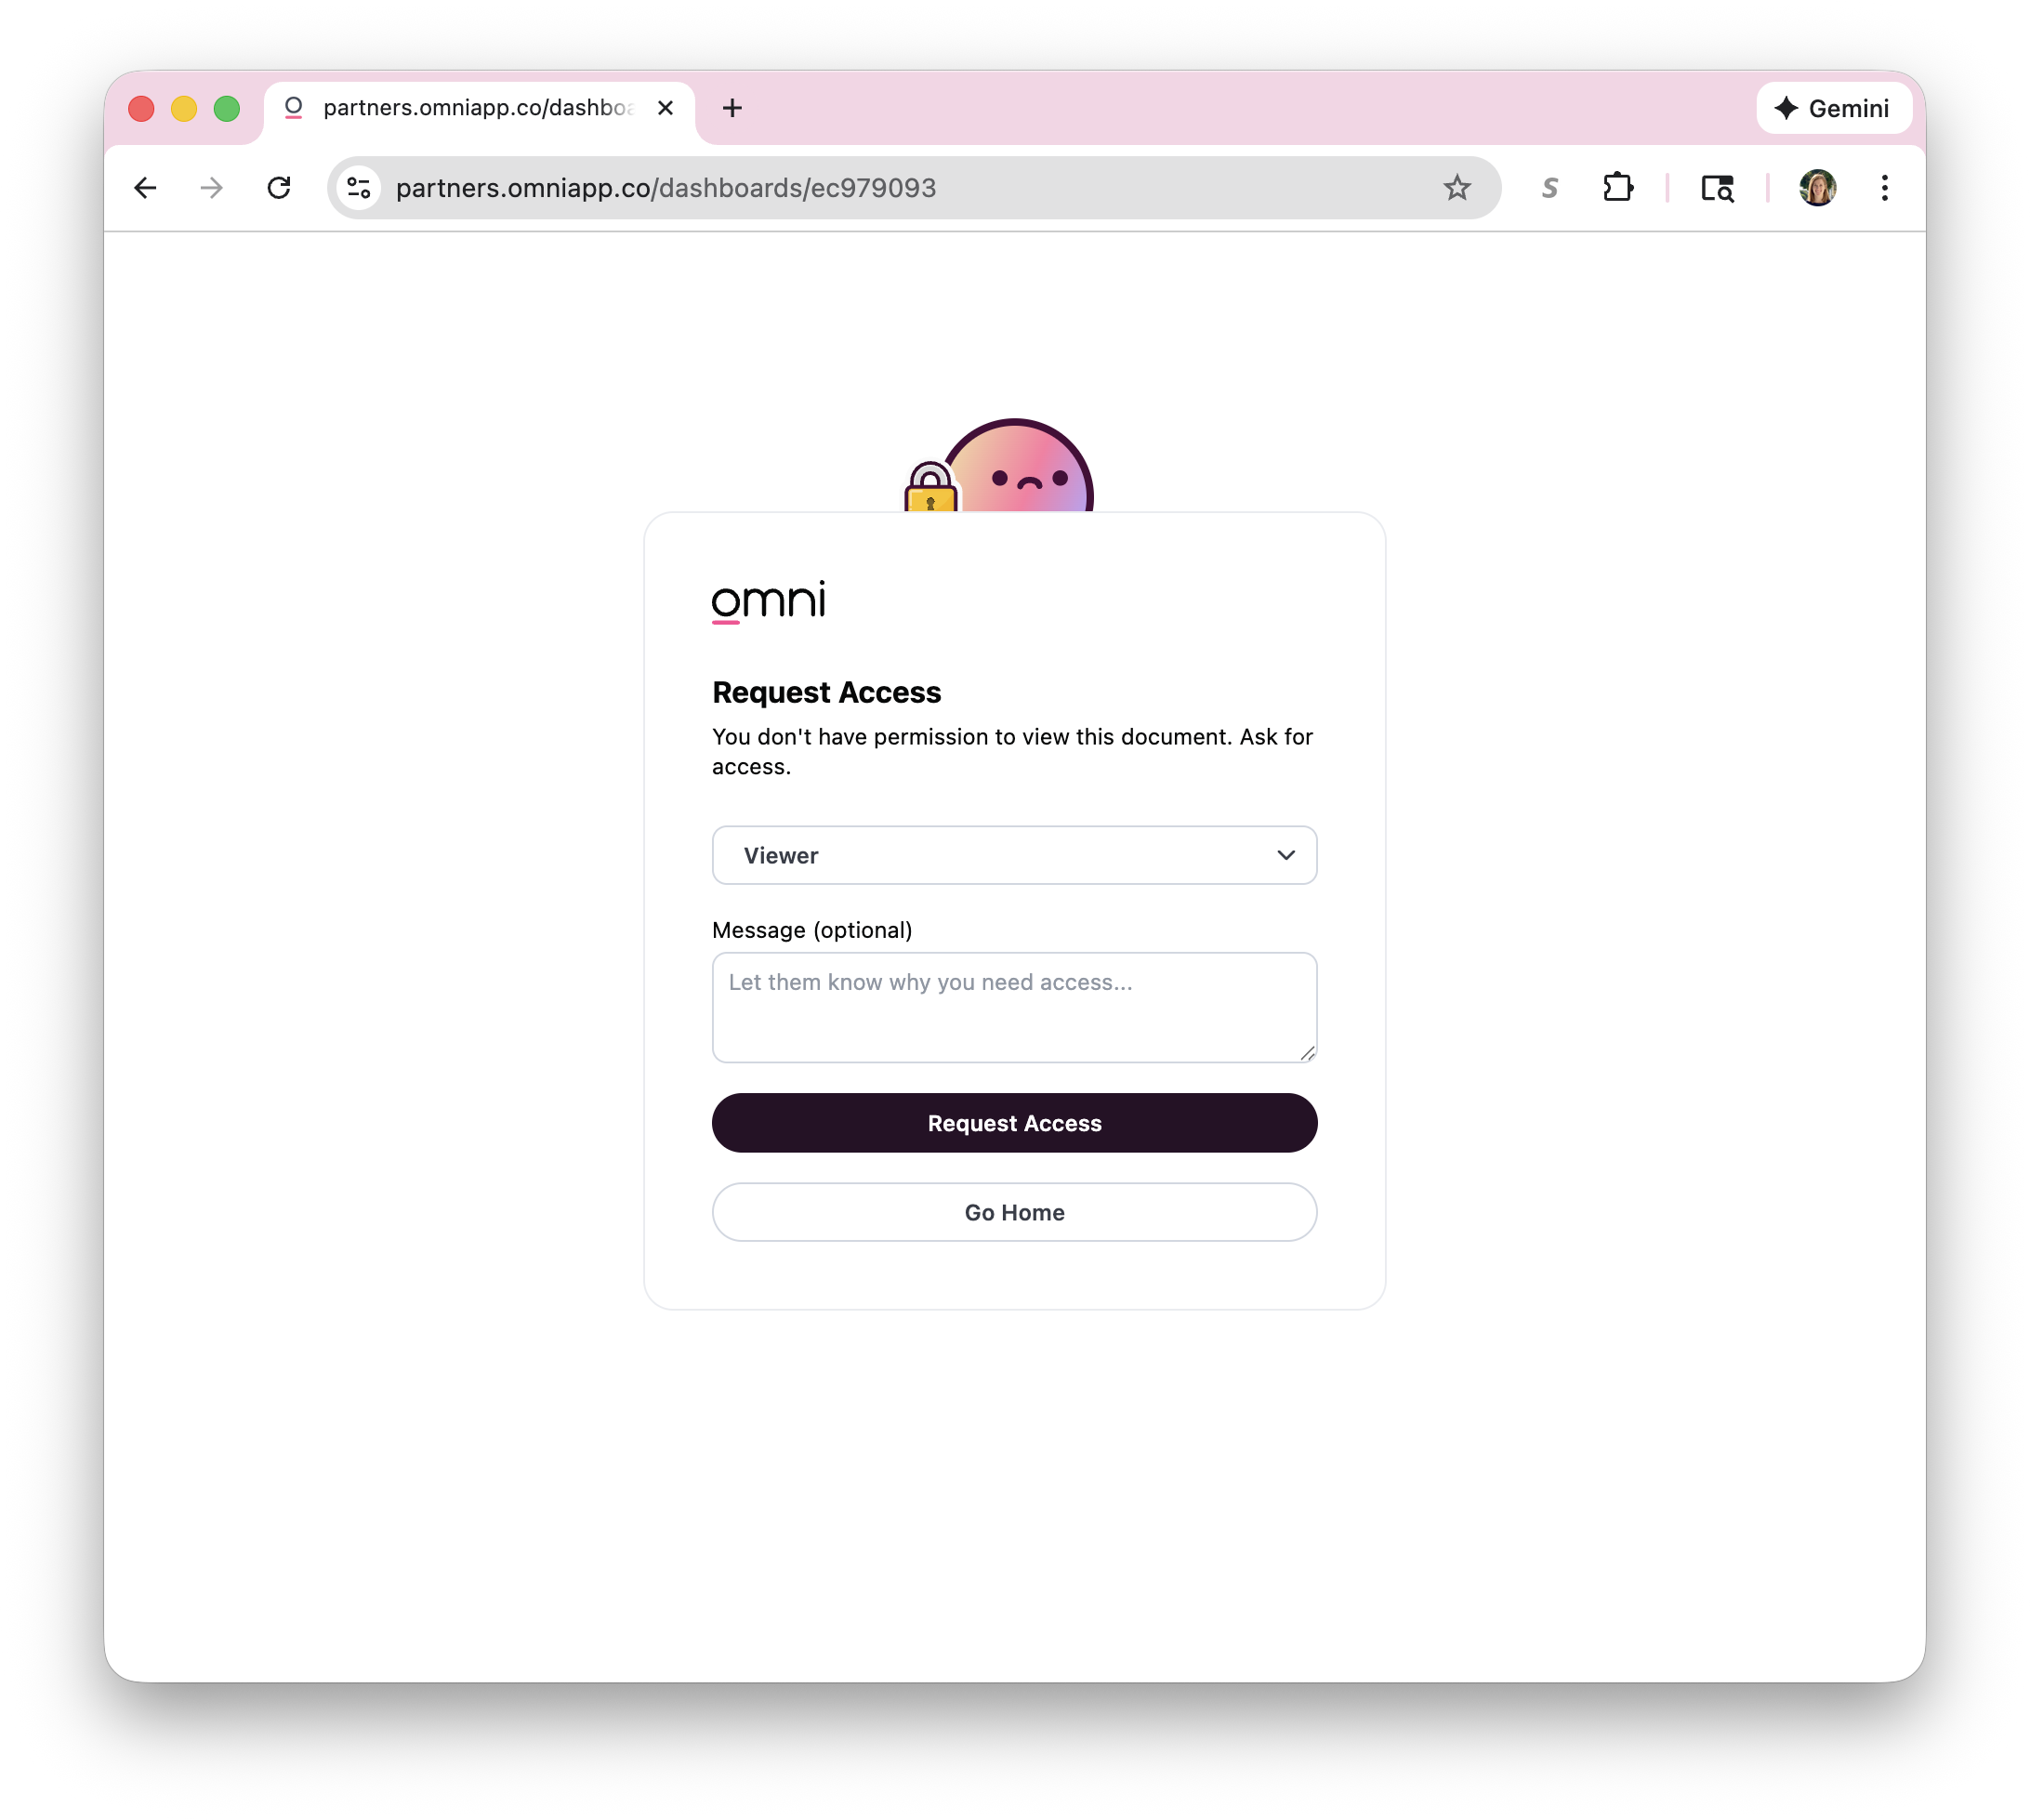
Request access to document
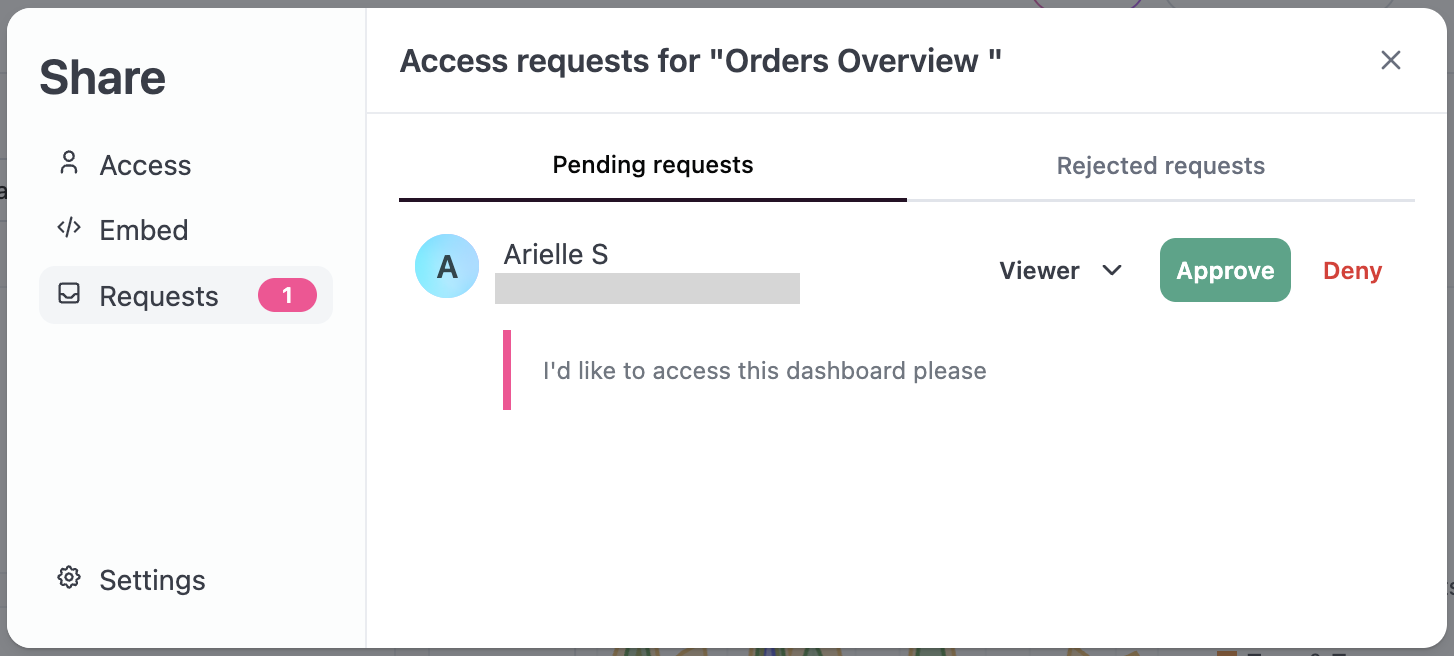
Manage document requests in the Share dialog
Keep the following in mind when using this feature:
- AccessBoost cannot be requested, only standard Viewer/Editor/Manager content roles. Model level roles still dictate what level of content access a user can have.
- Users must be Restricted Querier or higher to request Editor or Manager access to a document.
- Only standard users see the request form. Other users, such as embed users and external users, see an access-denied message instead.
Controlling document interactivity
A Manager or higher content role is required to access document settings.
Changing document URLs and identifiers
Changing a document’s identifier can make its URL more readable and easier to remember. This could also be used for updates to an embedded dashboard without requiring an engineer to point from one identifier to another by instead pointing to a fixed, immutable URL. You can access this setting by clicking File > Document Settings in a published dashboard or app. The document’s identifier must be unique. Additionally, note that changes will be reflected in real time. To keep an existing bookmarked URL working after replacing a dashboard or app, refer to the Swap dashboard identifiers guide.Boosting permissions with AccessBoost
Admin permissions are required to enable AccessBoost unless the Non-administrators can enable AccessBoost on content setting in Admin > Content permissions is enabled.
- Allow users to bypass
access_filters - Automatically bypass in-use
access_grants. If you want to bypass checks for content built on topics or views using the access grant, add anaccess_boostable: trueproperty to the grant. - Alter access to data when running queries in workbooks. Only data access on dashboards and apps is affected.
AccessBoost in embedded Omni
Enabling AccessBoost for the Organization role also applies on content that is embedded externally, which can pose security implications to consider. Typically, for embedded content Omni applies the Viewer connection role - which would only allow users to see content that is tied to modeled topics; limiting data that is exposed to external customers. This means that embed users can view SQL content and content not built on topics. However, this also means that you could inadvertently expose data to embed users that you don’t want them to see. Embed users can provision AccessBoost when both AccessBoost and Non-administrators can enable AccessBoost on content are enabled in Settings > Content permissions.Enabling AccessBoost
AccessBoost is enabled using the AccessBoost setting in Settings > Content Permissions > AccessBoost. When enabled at the organization level, you can set AccessBoost:- For your organization’s Default access role in Settings > Content Permissions > Default Content Access
- At the content level, in the document or folder’s Share modal
Examples
Sharing content externally
Omni has robust sharing functionality through Delivery and Embedding which allows users and organizations to securely share the data in a variety of forms. To let partners, contractors, or clients log in to Omni and see only the content you share with them, invite them as external users.Customizing embedded content
The Embed tab in a document’s Share dialog has several options to customize what content is embedded and how it displays to users: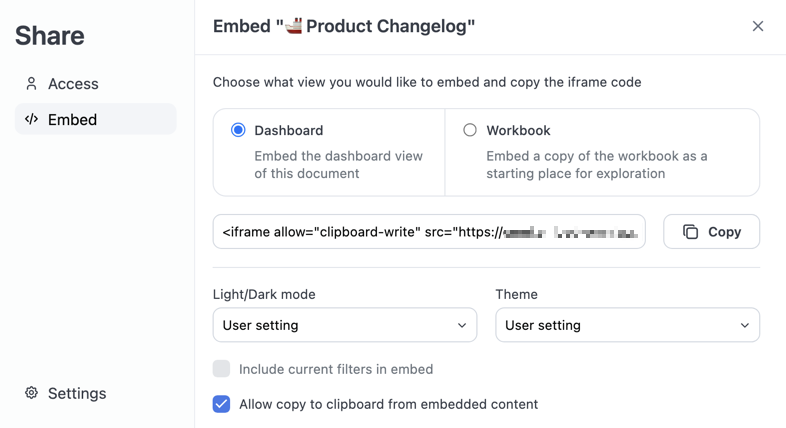
- Content - Embed the document’s Workbook, Dashboard, or App, if applicable
- Appearance settings - Define how the embedded content will display, including Light/dark mode and Omni Theme
- Include current filters in embed - If enabled, currently-applied filters will be included in the embedded content
- Allow copy to clipboard for embedded content - If enabled, users will be able to copy values to their clipboard from the embedded content. The generated iframe code will include a
allow="clipboard-write".
Access warnings
Access warnings will appear as a yellow asterisk (*) on dashboards and as an Access Warnings button in draft apps when a tile contains content that Viewers or Restricted Queriers won’t be able to see. These warnings are visible only to document editors — users with a Viewer or Restricted Querier connection role will simply see a blank tile.

Warning reasons
Query-structural issues
These warnings mean the tile itself is built in a way that Viewers and Restricted Queriers cannot run.Access grant issues
These warnings mean the topic or field requires an access grant and either the grant itself or the user’s attributes are the problem. The three reasons have different fixes:Workbook model changes
These warnings mean the workbook itself contains model-layer modifications that Viewers and Restricted Queriers aren’t permitted to be exposed to. The fix is to move the relevant model change to the shared model, or restructure the workbook to remove it.Resolving access warnings
- Fix the query or workbook — see the fix column in the tables above for the specific action per reason.
- Enable AccessBoost — bypasses connection role restrictions for dashboard and app viewers. Use with caution; AccessBoost does not bypass
access_filtersor access grants unlessaccess_boostable: trueis set on the grant.