

How it works
- In your Google Cloud project, you create a workload identity pool with an AWS provider that trusts the identity Omni presents.
- When Omni queries BigQuery or refreshes the connection’s schema, it exchanges that role’s credentials for a short-lived Google Cloud access token.
- The token acts either as the federated identity itself, or as a service account you allow Omni to impersonate.
Requirements
Workload identity federation is currently available for AWS-hosted Omni deployments only. Support for Azure-hosted deployments is planned.
- Organization Admin permissions in Omni
- Google Cloud admin permissions, which are required to create workload identity pools and grant IAM roles
-
The
gcloudCLI -
The following details about the default dataset in your BigQuery project:
- The name of the default dataset
- Its data location
- Its timezone
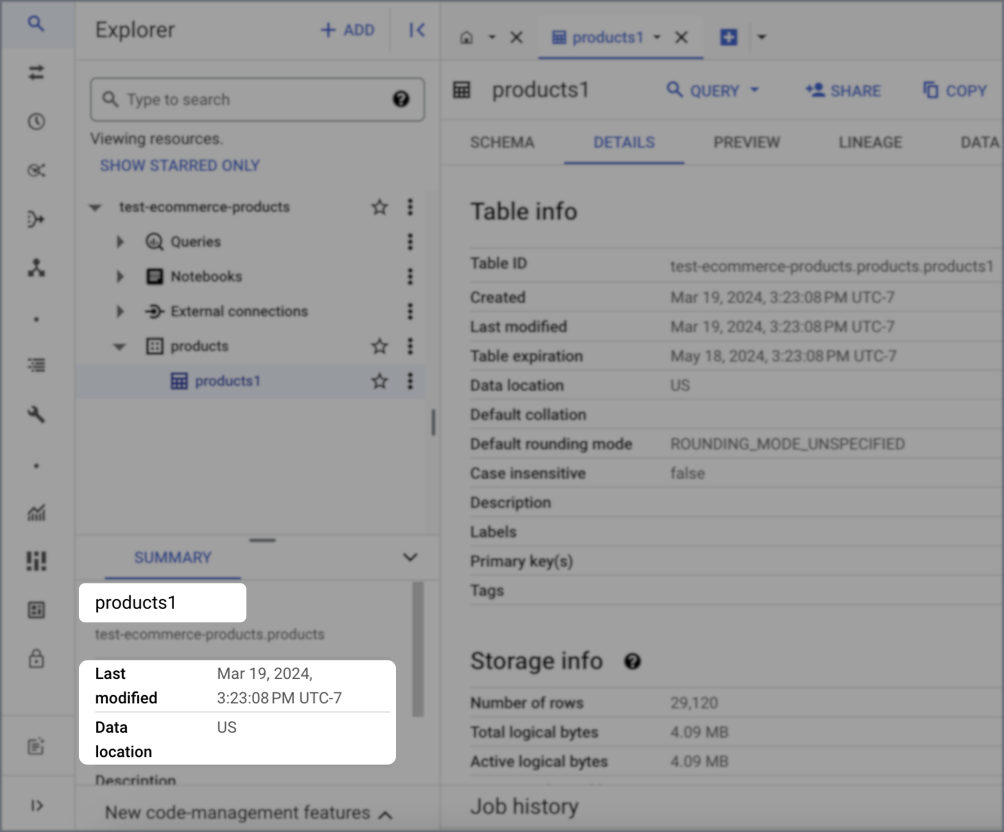
Need help locating the dataset?
- Navigate to your BigQuery console.
- Select the project your dataset resides in. Use the top middle drop-down menu to toggle between projects.
-
Select a dataset and the info will appear in the Dataset info menu. In this example:
- The dataset name is
products - The Data location is
US - The timezone is
UTC-7, as indicated in the Last modified field
- The dataset name is
Setup
Retrieve Omni's AWS identity information
- In Omni, click Settings > Connections.
- Click the BigQuery option.
- In the Authentication Type menu, select Workload Identity Federation.
-
Copy the Omni Workload Identity value. It will contain a value like the following:
- It contains Omni’s AWS account ID. This is the
123456789012segment. You’ll need this when creating the provider in the next step. - It contains a prefix, not the full role name. The actual role has a random suffix appended by Omni’s infrastructure, so your attribute condition must use a starts-with comparison. An exact-match condition will never match.
Create a workload identity pool and AWS provider
- Console
- gcloud CLI
- In the Google Cloud Console, navigate to IAM & Admin > Workload Identity Federation.
- Click Create pool.
-
Enter a name, such as
omni, and continue. -
Add a provider to the pool:
- Provider type - AWS
- Provider name - Enter a name, such as
Omni - AWS account ID - The account ID from the value you copied in step 1
-
Configure the provider attribute mappings. AWS presents Omni’s identity in a different format than the value shown in Omni, so the mappings reconstruct the role ARN before comparing it.
- Click Edit mapping.
-
For
google.subject, paste the following into the corresponding AWS field: -
For
attribute.aws_role_arn, paste the following into the corresponding AWS field:
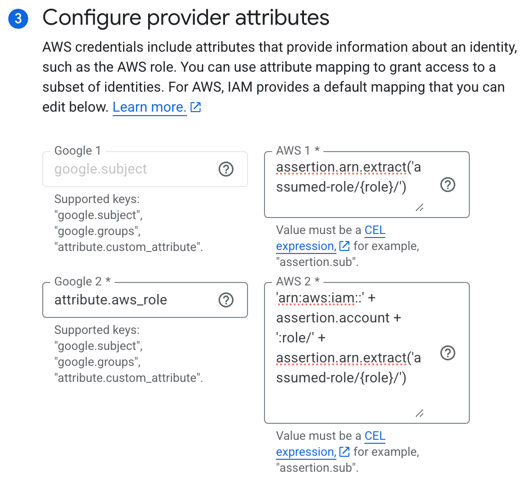
Configured provider attribute mappings
-
Configure the provider attribute conditions:
- Click Add condition.
-
In the text field, add the attribute condition. Replace OMNI_WORKLOAD_IDENTITY with the Omni Workload Identity value you copied from Omni in step 1:
For example:The attribute conditions should look like the following when finished:
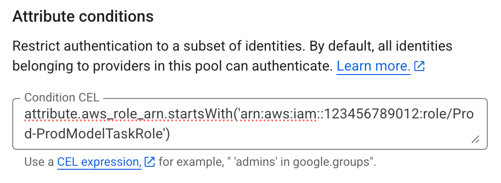
Configured provider attribute condition
- Click Save.
Grant BigQuery access
Choose how Omni’s federated identity accesses BigQuery:
Option 1 - Grant direct access
Grant the pool the BigQuery roles directly on your project.
Option 1 - Grant direct access
Grant the pool the BigQuery roles directly on your project.
Grant the BigQuery roles directly to the pool’s identities, replacing GCP_PROJECT_ID with the ID of your GCP project:Optional. Grant the The
metadataViewer role directly to the pool’s identities:metadataViewer role is only required if you want to give Omni access to all views within a dataset (e.g., project.*) when setting up the connection in Omni. If you explicitly list specific datasets without wildcards in the connection setup step, Omni will skip the project-level metadata scan and work with dataset-level permissions only.When you configure Omni, leave the Service account impersonation URL field blank.Option 2 - Impersonation through a service account
Have the pool impersonate a named service account that holds the required BigQuery roles.
Option 2 - Impersonation through a service account
Have the pool impersonate a named service account that holds the required BigQuery roles.
-
Create a service account (for example,
omni-bigquery) and grant it the following BigQuery roles on your project:- BigQuery Job User
- BigQuery Data Viewer
-
Allow the pool’s identities to impersonate the service account by granting the Workload Identity User role on the service account to the pool:
Replace GCP_PROJECT_ID with the ID of your GCP project.
Set up a table upload dataset
This step is optional. However, we recommend completing it as part of the initial set up or you won’t be able to use uploaded files like CSVs in joins.
- This dataset can’t be used for other modeled tables
- This dataset must be in the same region as other projects and schemas in the connection, or you may encounter cross-region errors
- In the Google Cloud Console, navigate to your BigQuery project.
- Create the dataset.
- After the dataset is created, open it so that its details display.
- Click Share > Manage permissions, located next to the Copy option near the top right corner of the page.
- In the dialog that displays, click Add principal.
- For the New principals field, the value you enter depends on the access method you selected in step 3:
- Add the BigQuery Data Editor role.
- Click Save.
Create the connection in Omni
- In Omni, click Settings > Connections.
- Click the BigQuery option.
-
On the connection setup page, fill in the connection details:
requiredA user-friendly name for the connection, which will be used throughout Omni.requiredThe type of authentication to use. Select Workload Identity Federation.requiredThe region the dataset resides in. Refer to the Requirements section if you need help finding this information.requiredThe timezone used by the database.requiredThe timezone to use for Omni queries. If a timezone is specified, data will be converted from the Database Timezone to the selected timezone.When enabled, users can override the connection timezone with their own when querying.default:"1TB"The maximum bytes billed for queries run on this connection.requiredSelect the minimum level of access users should have to models in the connection.
- When finished, click Create connection.
Troubleshooting
What’s next?
Now that your database is set up, you can:- Use the Omni Agent’s quickstart skill to create your first topic from business questions
- Configure user permissions, schema refreshes, environments and timezone settings
- Learn how Omni generates the model associated with the connection