Custom role basics
What are base roles and role tiers?
What are base roles and role tiers?
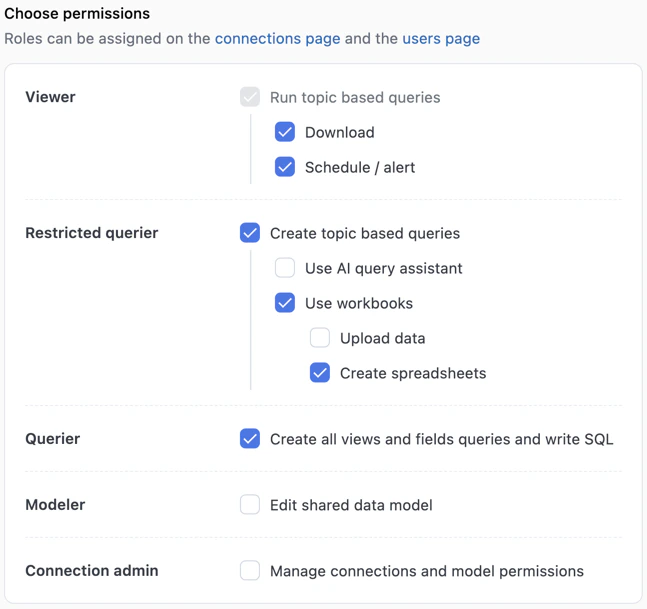
What are granular permissions?
What are granular permissions?
- Download (Viewer)
- Schedule / alert (Viewer)
- Use Omni Agent (Restricted Querier)
- Upload data (Restricted Querier)
- Create spreadsheets (Restricted Querier)
Who can create/edit/delete custom roles?
Who can create/edit/delete custom roles?
Where can I assign custom roles?
Where can I assign custom roles?
- Assigned to users
- Assigned to user groups
- Set as the Base access on a connection
What happens when a user or group is assigned multiple roles?
What happens when a user or group is assigned multiple roles?
- Across tiers - Higher base role tiers (e.g., Modeler) always take precedence over lower tiers (e.g., Viewer), regardless of custom role priority.
-
Within a tier - Priority is determined by the order roles appear in the list, starting from the top. For example, in the screenshot below, the base Querier role has the highest priority because it appears first:
You can change the priority of roles within a tier by clicking the icon on a role and dragging it to re-order the list. Role tiers cannot be reordered, only the roles defined in the tier itself.

Querier tier showing the base Querier role listed above the custom Querier No Upload role
Can custom roles be used with embed?
Can custom roles be used with embed?
connectionRoles and modelRoles, for example:Creating custom roles
- Name - Required. Enter a unique name for the custom role, such as
querier_no_upload. Names can only contain letters, numbers, underscores, and hyphens. - Display Name - Required. Enter a human-readable display name for the role. This is shown in the UI.
- Description - Enter a description of the custom role. This will display in the Description column on the Roles page.
-
Across role tiers - Each role tier builds on the tiers below it. To grant a permission from a higher tier, the base permission for each lower tier must also be selected.
For example, to grant Create all views and fields queries and write SQL (Querier), you must also select Create topic based queries (Restricted Querier):
To grant a permission from a higher tier, base permissions for lower role tiers must be selected
-
Within a role tier - Some permissions are nested under a parent permission. The parent must be selected before you can grant any of its children, but you can deselect individual child permissions.
For example, Create spreadsheets requires Use workbooks to be selected, but you can deselect Upload data independently:

Parent permissions must be selected to include any of its children, but you can deselect individual child permissions
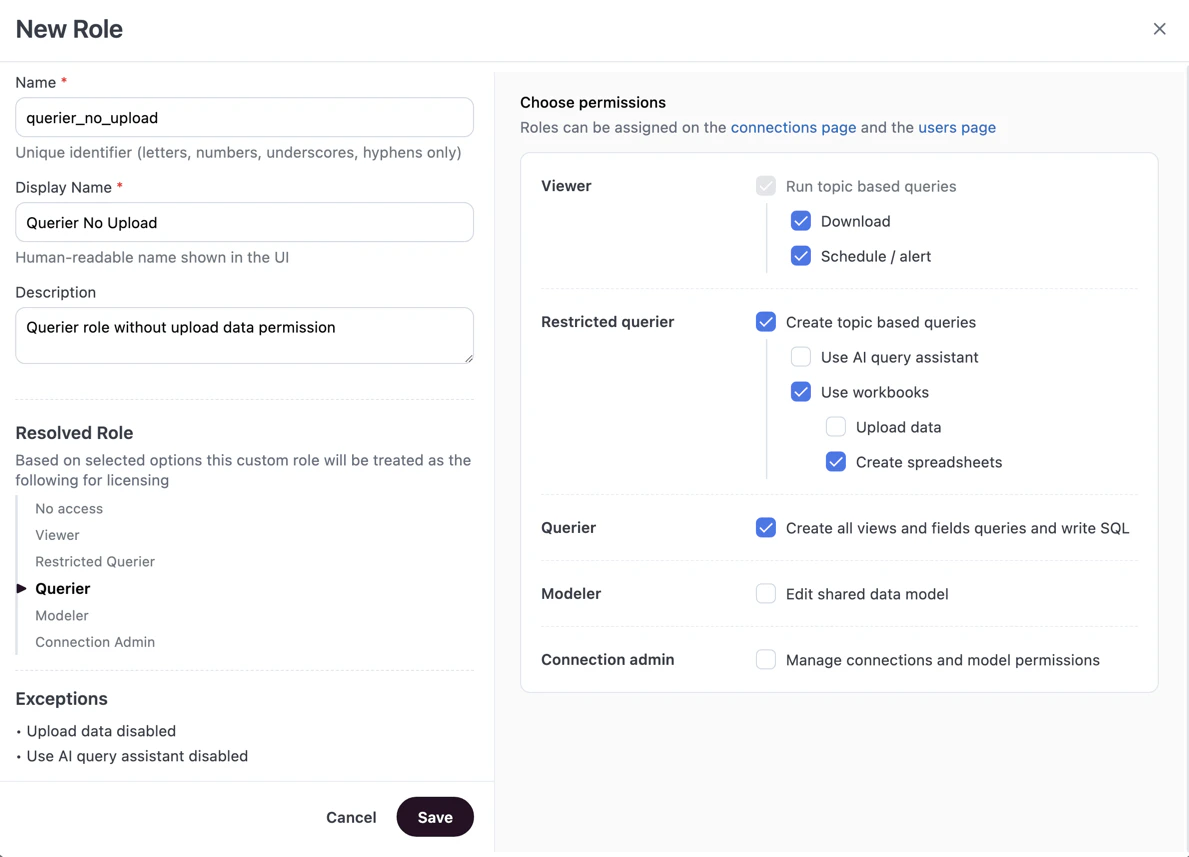
Use the Resolved Role and Exceptions sections to understand the custom role's impact on licensing and how it differs from the base version of the role tier
Custom Querier No Upload role
Changing role priority in a role tier
Priority is determined by the order roles appear in the list, starting from the top. For example, in the screenshot below, the base Querier role has the highest priority because it appears first:Querier tier showing role priority order
Editing custom roles
- Navigate to Settings > Roles.
- Click the icon in the same row as the custom role and select Edit.
- Make your changes.
- Click Save when finished.
Duplicating custom roles
- Navigate to Settings > Roles.
- Click the icon in the same row as the custom role and select Duplicate.
- Give the role a name and choose the permissions it should have.
- Click Save when finished.
Deleting custom roles
- Navigate to Settings > Roles.
- Click the icon in the same row as the custom role and select Delete.
- When prompted, click Delete.
Assigning custom roles
Custom roles can be assigned:- As the Base Access level for a connection
- To individual users in the user’s Model Access tab
- To user groups in a connection’s Permissions > Connection Roles section
Next steps
- User groups - Assign custom roles to groups of users
- Permissions - Understand the full permissions model
- Content sharing - Learn how content access works alongside connection roles