blob_entity from Microsoft Entra to Omni.
Requirements
To follow the steps in this guide, you’ll need:- To set up SCIM provisioning with Entra. Refer to the Omni Entra SCIM guide for more information.
- Organization Admin permissions in Omni
- Permissions in Microsoft Entra that allow you to:
- Access the admin panel
- Create user profile attributes
- Modify applications
Limitations
Omni system user attributes are read-only and cannot be assigned via SCIM.Setup
Create an Omni user attribute
In Omni, navigate to Settings > Attributes and create a new attribute.Our example attribute,
blob_entity, has the following settings:-
Name -
Blob Entity -
Reference -
blob_entity -
Type -
string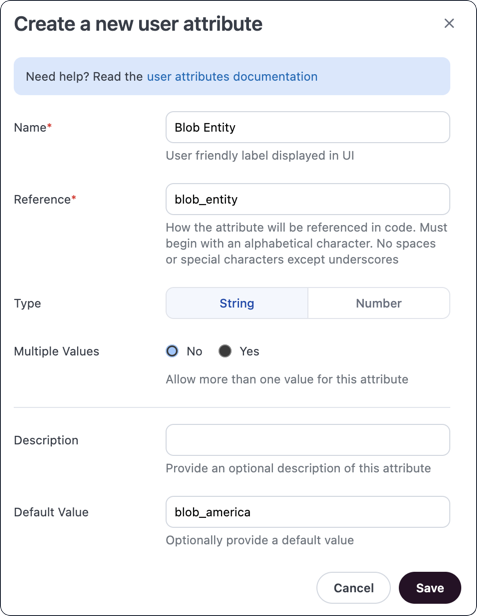
Create an Entra user attribute
- Log in to your Entra admin panel.
- Navigate to Entra ID > Enterprise apps.
- Click the Omni application.
- In the side navigation, click Provisioning under the Manage heading.
- Open the Mappings section.
- In this section, select the user you want to add an attribute to.
- At the bottom of the page, select Show advanced options.
- Select Edit attribute list for customappsso.
- Enter the following for the attribute:
- Name - Enter the reference of the attribute you created in Omni in step 1, prefixed with the following:
For example, for the
blob_entityattribute, you’durn:omni:params:1.0:UserAttribute:blob_entity. - Type - Select the type of the attribute you created in Omni:
stringorinteger - Multi-value? - Select this option if the Omni attribute is configured to support multiple values.
- Name - Enter the reference of the attribute you created in Omni in step 1, prefixed with the following:
- Configure the remaining fields as needed.
- Save the changes.
Create attribute mapping
- A message should display after you click Save - click Yes.
- In the Attribute Mapping page that opens, click Add New Mapping.
- In the Target attribute dropdown, select the attribute you created in step 2.
- Configure the remaining fields to map the appropriate value to the attribute.
- Click OK, then Save.