Relationships & Joins
Relationships describe how tables join together in SQL, and allow querying with dimensions and measures in different tables from the workbook UI. Relationships are all stored in a single model file.
Omni curates the workbook UI to avoid unexpected join relationships. This means when operating in All Views and Fields
Omni will filter joins that fan out the data set from the UI by default unless explicitly told that it can do so by setting reversible: true
.
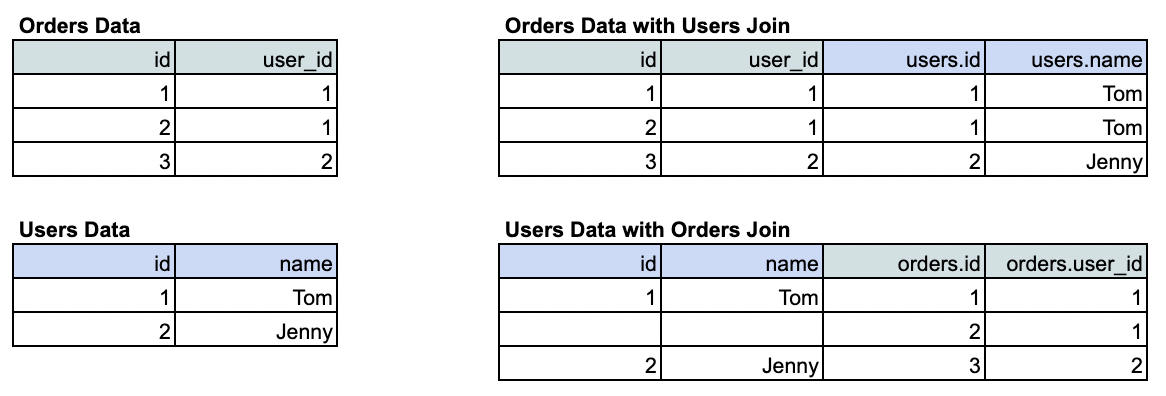
Example:
Notice how in the top example (users joined into orders), the cardinality of the data set does not change - users are simply a descriptive element of each order. Contrast that to the second set of tables, where orders actually change the shape of the base table (adding multiple rows for Tom). The default workbook experience includes these many-to-one joins (ie the top join). To include fan-out joins, joins must be explicitly flagged as 'bi-directional'.
Relationship Examples
- join_from_view: order_items
join_to_view: inventory_items
join_type: always_left
relationship_type: many_to_one
on_sql: ${order_items.inventory_item_id} = ${inventory_items.id}
- join_from_view: buyers
join_to_view: user_facts
join_to_view_as: buyer_facts
join_to_view_as_label: Buyers
join_type: always_left
on_sql: ${buyers.id} = ${buyer_facts.id}
relationship_type: one_to_one
Topic Relationships vs Global Relationships
Joins can be written into both the relationships file (see examples on this page), or topics. There are good reasons to use both.
Global relationships are available for use across any topic. These are usually the best place for a relationship because they mean the join will be reusable in many places. A simple example might be joining products
to orders
on products.id = orders.product_id
.
On the other hand, there are situations where a join is relevant only in a specific context - perhaps a single-use fact table that depends on granularity, or an aliased join where the topic dictates the specific context. The latter example is common when a given table may be joined multiple times, like Salesforce contacts. The contacts table may be Account Manager in one context, Account Executive in another context, and Customer in another context. While you could put each of those joins into the relationships file, they may only make sense in the context of an Opportunity topic. In this case, topic-specific joins may be a better route.
Often this will come down to taste with potential duplication of topic-specific joins or single-use joins in the relationships file. In general we at Omni like to default joins into the relationships file, but have several topic specific joins for Salesforce contacts, or different cuts of ARR facts (ARR_start_facts vs ARR_end_facts).
Note that topic-specific views offer a very similar trade-off, where even views and fields can be customized at the topic level. This is a common pattern when using topic-specific joins where you may want to extend an aliased view inside a topic to customize fields for a specific use case.
Relationship Arguments
id:
(DO NOT USE)
- join_from_view: buyers
join_to_view: user_facts
join_to_view_as: buyer_facts
id: buyers_0
join_type: always_left
on_sql: ${buyers.id} = ${buyer_facts.id}
relationship_type: one_to_one
id
will show up when Omni has detected duplicate joins- It's recommended to avoid explicit use of
id
as it usually means something should be cleaned up in the model
join_to_view:
- join_from_view: buyers
join_to_view: user_facts
join_to_view_as: buyer_facts
join_type: always_left
on_sql: ${buyers.id} = ${buyer_facts.id}
relationship_type: one_to_one
- Maps which table to join into the given view
join_to_view_as:
- join_from_view: buyers
join_to_view: user_facts
join_to_view_as: buyer_facts
join_type: always_left
on_sql: ${buyers.id} = ${buyer_facts.id}
relationship_type: one_to_one
- Aliases the joined table with a new name (ie re-labels the join). Often used for multiple joins, like buyers and sellers both populated via the users table.
- Note when using aliased joins, both the join_to_view name and join_to_view_as name are acceptable in the
on_sql
(this may change).
join_to_view_as_label:
- join_from_view: buyers
join_to_view: user_facts
join_to_view_as: buyer_facts
join_to_view_as_label: Buyers
join_type: always_left
on_sql: ${buyers.id} = ${buyer_facts.id}
relationship_type: one_to_one
- Used to control the view label when using this join. In this example, we want fields from
user_facts
to look like they are part of thebuyers
table even though they are in fact fromuser_facts
aliased in the model and generated SQL tobuyer_facts
. - This can be used jointly with
join_to_view_as
or used as a way to label a view within a topic.
join_from_view:
- join_from_view: buyers
join_from_view_as: users
join_to_view: user_facts
join_type: always_left
on_sql: ${users.id} = ${user_facts.id}
relationship_type: one_to_one
- Defines the view that a table is being joined to.
join_from_view_as:
- join_from_view: users
join_from_view_as: buyers
join_to_view: user_facts
join_type: always_left
on_sql: ${users.id} = ${user_facts.id}
relationship_type: one_to_one
- Aliases the joined table with a new name (ie re-labels the join). Often used for multiple joins, like buyers and sellers both populated via the users table.
- Note when using aliased joins, both the join_from_view name and join_from_view_as name are acceptable in the
on_sql
(this may change).
join_from_view_as_label:
- join_from_view: users
join_from_view_as: buyers
join_from_view_as_label: Buyers
join_to_view: user_facts
join_type: always_left
on_sql: ${users.id} = ${user_facts.id}
relationship_type: one_to_one
- Used to control the view label when using this join. In this example, we want fields from
users
to look like they are part of thebuyers
table even though they are in fact fromusers
aliased in the model and generated SQL touser_facts
. - This can be used jointly with
join_from_view_as
or used as a way to label a view within a topic.
join_type:
- join_from_view: buyers
join_to_view: user_facts
join_to_view_as: buyer_facts
join_type: always_left
on_sql: ${buyers.id} = ${buyer_facts.id}
relationship_type: one_to_one
- Defaults to left join
- Expects
always_left
- generatesLEFT JOIN
inner
- generatesINNER JOIN
full_outer
- generatesFULL JOIN
cross
- generatesCROSS JOIN
Omni Additionally supports two direction-specific join types:
Directional join_type
options:
right_left
: Generates a RIGHT JOIN
when used in the FROM/TO direction (e.g. FROM buyers RIGHT JOIN user_facts
in example above), and a LEFT JOIN
when used in the opposite direction (e.g. FROM user_facts LEFT JOIN buyers
)
left_right
: Generates a LEFT JOIN
when used in the FROM/TO direction (e.g. FROM buyers LEFT JOIN user_facts
in example above), and a RIGHT JOIN
when used in the opposite direction (e.g. FROM user_facts RIGHT JOIN buyers
)
relationship_type:
- join_from_view: buyers
join_to_view: user_facts
join_to_view_as: buyer_facts
join_type: always_left
on_sql: ${buyers.id} = ${buyer_facts.id}
relationship_type: one_to_one
- Ensures metrics across joins are calculated correctly and efficiently
- This will ensure that joins that fan out the result set (ie many orders for a single user) do not impact counts or sums
- Expects
one_to_one
many_to_one
one_to_many
many_to_many
assumed_many_to_one
Joins:
Omni will generate default, assumed joins based on naming convention (in the future, this will also look at foreign key definitions in the database). For example, if you have an orders
table with a user_id
and a users
table with an id
or user_id
field in it, Omni is going to pick up to generate this as an
assumed_many_to_one
join. Omni will not generate one_to_many
or one_to_one
joins in this fashion.
The goal of these joins is to accelerate initial exploration of a data source. If you want to carefully curate all of the joins accessible in the shared model, you may prefer to either simply delete these (Omni will add ignored: true
to each join in the "Model" IDE view, but they will disappear from the "Combined" IDE view), or to remove assumed_
to "accept" these as canonical to your model.
on_sql:
- join_from_view: buyers
join_to_view: user_facts
join_to_view_as: buyer_facts
join_type: always_left
on_sql: ${buyers.id} = ${buyer_facts.id}
relationship_type: one_to_one
- Defines the formula to match rows in the join
Complex Joins
Note that not all joins can be constructed through the UI, for custom logic, they can be encoded through YAML.
Inequality joins:
- join_from_view: table_1
join_to_view: table_2
join_type: always_left
on_sql: ${table_1.id} > ${table_2.id}
Compound join keys:
- join_from_view: table_1
join_to_view: table_2
join_type: always_left
on_sql: ${table_1.key_1} = ${table_2.key_1} AND ${table_1.key_2} = ${table_2.key_2}
reversible:
- join_from_view: users
join_to_view: orders
join_type: always_left
on_sql: ${users.id} = ${orders.id}
relationship_type: many_to_one
reversible: true
- Allows the join to function bi-directionally for topics. Defaults to false
- Omni will restrict joins in the exploration process to joins that do not fan out the result set. This means that users are always available with orders (each order has one user), but not shown by default when querying about users (one user has many orders, and thus joining orders changes the shape of the result set).
- By default, one_to_many joins will be created as many_to_one joins with
reversible: true
(meaning they will fan out the data set). - One-to-one joins are always reversible (they do not change the shape of the data set, simply adding columns)
- Many-to-many joins are default reversible (they always change the shape of the data)
where_sql:
- join_from_view: users
join_to_view: orders
join_type: always_left
on_sql: ${users.id} = ${orders.id}
relationship_type: many_to_one
where_sql: ${orders.count} < 20
- This will add a
where
clause to the generated SQL only if a join to the referenced view has been established - This clause is applied to all rows in the query
- The clause does not pre-filter then join, it joins then uses the where statement to filter
Building Joins in the Workbook
Joins can be defined in YAML when writing in bulk, but can also be added ad hoc through the workbook UI. To add a join, simply right click on a given table and build through the Join model:
To build a join:
- Select fields from each side of the join using the dropdowns
- The join type should be selected (nearly always LEFT)
- In order to count across tables correctly, enter the relationship between the tables. To make this easier we have added an inferrer that checks cardinality between data sets and will select for you (see below)