Model Management
Managing your models in Omni can be done through the workbook layer or the development IDE. This is made possible by Omni's layered approach to maintaining your data and allowing users to promote those changes to the different layers, i.e. model layer and workbook layer. We also offer a dbt integration that allows you to access that layer as well.
Users can model and query in the workbook model layer and leave all the content they create isolated to that workbook. If users want to make the changes in that workbook resuable and accessible to other users, the changes need to be promoted to the Shared Model. This action pushes the workbook model changes to the model layer and new workbooks will include the changes that were pushed.
Shared Model Promotion
Shared model promotion is an important facet of model editing within the workbook model layer. Shared model promotion pushes changes made in the workbook layer into the model layer so the changes are reusable and available in all workbooks. Model promotion can be done a number of ways depending on your workflow preferences:
- Promote all changes
- Incrementally promote workbook changes
- Editing in the IDE
Promote all of your collective changes into the Shared Model any time from the workbook Model menu option, Promote to Shared.
Incrementally promote changes to the Shared Model by clicking on the branch icon to the left of the workbook. This is a handy feature for changes that are not quite ready to go live to the masses yet. Note this option only works while making changes using Branch Mode. Learn more about Branch Mode.
Edits made directly in the develop model IDE will be "Promoted to the Shared Model" as soon as the file is saved. For more structured development processes, explore our #branch mode and #git integration options.
Branch Mode
Branch mode allows users to view the impact of model and/or workbook changes before they are promoted to the Shared Model for other users to view. It is possible to make changes in a single workbook or collect a series of changes across different workbooks that are all based on the same model connection. Users can also enter branch mode directly in the model's IDE to make model changes and see those changes across associated workbooks and dashboards.
Enter Branch Mode
Branch Mode in the Workbook Layer
- Video Guide
- Step-by-Step Guide
- Navigate to a workbook, new or existing.
- In the dropdown, select the Branch option.
- Now you can either select New Branch and enter your desired branch name or pick up where you left off on a previous branch.
- Voilà, you are now in Branch mode!
Branch Mode in the Model Layer
- Video Guide
- Step-by-Step Guide
- Navigate to the model file.
- Select the Model menu option.
- In the dropdown, select the Branch option.
- Either select New Branch and enter your desired branch name or choose an existing branch.
- Start editing your model file(s)!
Editing & Saving in Branch Mode
- Video Guide
- Step-by-Step Guide
- Start making edits to your workbook tab(s) or your model file.
- In your workbook, you can add select more fields, modify the visualization type, add new calculations, add custom fields or even pivots. Go crazy!
- In your model, you can develop anything you want like add new fields, write some custom SQL, make join changes.
- After you're done editing, you can navigate to the dashboard(s) associated with the workbook or model and see the impact of your changes.
- If you have multiple dashboards or workbooks that you want to edit, as long as they are based on the same model, you can make all edits on that same branch.
- Once you are done editing and have verified the changes look as expected, you can merge the changes made by opening the branch menu in the banner (the three-dot icon to the far-right)
- Merge your changes by selecting Merge changes...
- If you want to include your workbook layer changes, you must check the Yes, include changes option in the pop-up modal.
git Integration (beta)
Omni’s git integration allows you to sync an Omni model to a git repository. Using a git integration provides added development benefits of storing backups of model files and using pull requests to create collaborative and peer reviewed changes. Additionally, it's possible to require pull requests, for those that want a more structured development lifecycle.
Enabling the git integration requires the use of Branch Mode for modifications to the Shared model, ensuring a structured and organized development process.
Tips:
- By default, pull requests are optional, enable the Require Pull Requests setting.
- Currently, Github is the only supported git provider.
- Editing model files directly within external platforms like Github is not yet supported.
- Video Guide
- Step-by-Step Guide
Coming soon!
Setup a git Integration (beta instructions)
- In Omni:
- Navigate to the IDE for the model you want to connect to a git repo. This examples takes us to our sample e-commerce model.

- In the URL, remove
/ide(and everything after it) and replace with/settings. This will take you to the git configuration page.

- In GitHub:
- Create a repository where you want to connect your Omni model.
- Configure the Git Integration in Omni:
- Copy the SSH URL from your GitHub repository.
- Paste the URL into the settings page in the Omni app.
- Click on ‘Configure Git’. This will generate four parameters necessary for the next steps.
- Set Up Deploy Keys:
- Navigate to the deploy keys page for your GitHub repository (located under the Settings header).
- Copy the public key from Omni’s git settings page.
- Add this key as a new deploy key in GitHub, ensuring it has write access.
- Click the Add key button.
- Back in the Omni app, click Ensure Git Synced to confirm.
- Configure Webhooks for Pull Requests:
- Go to the webhooks page for your GitHub repository (under the Settings header).
- Add a new webhook.
- Copy the Webhook URL from Omni’s settings page and paste it into the Payload URL field in GitHub.
- Copy the Webhook secret from Omni’s settings page and paste it into the *Secret field in GitHub.
- Set the content type to application/json.
- Choose Let me select individual events.
- Select only the Pull Requests option.
- Click Add webhook.
- To confirm your webhook is setup correctly, navigate to the Deliveries tab in Github and confirm there is 200 response for the ping event. If not, contact mailto:support@omni.co and provide the response body to troubleshoot further.
- Disconnect your git Integration:
- Navigate to the same git settings page from step 1 above and unlink git.
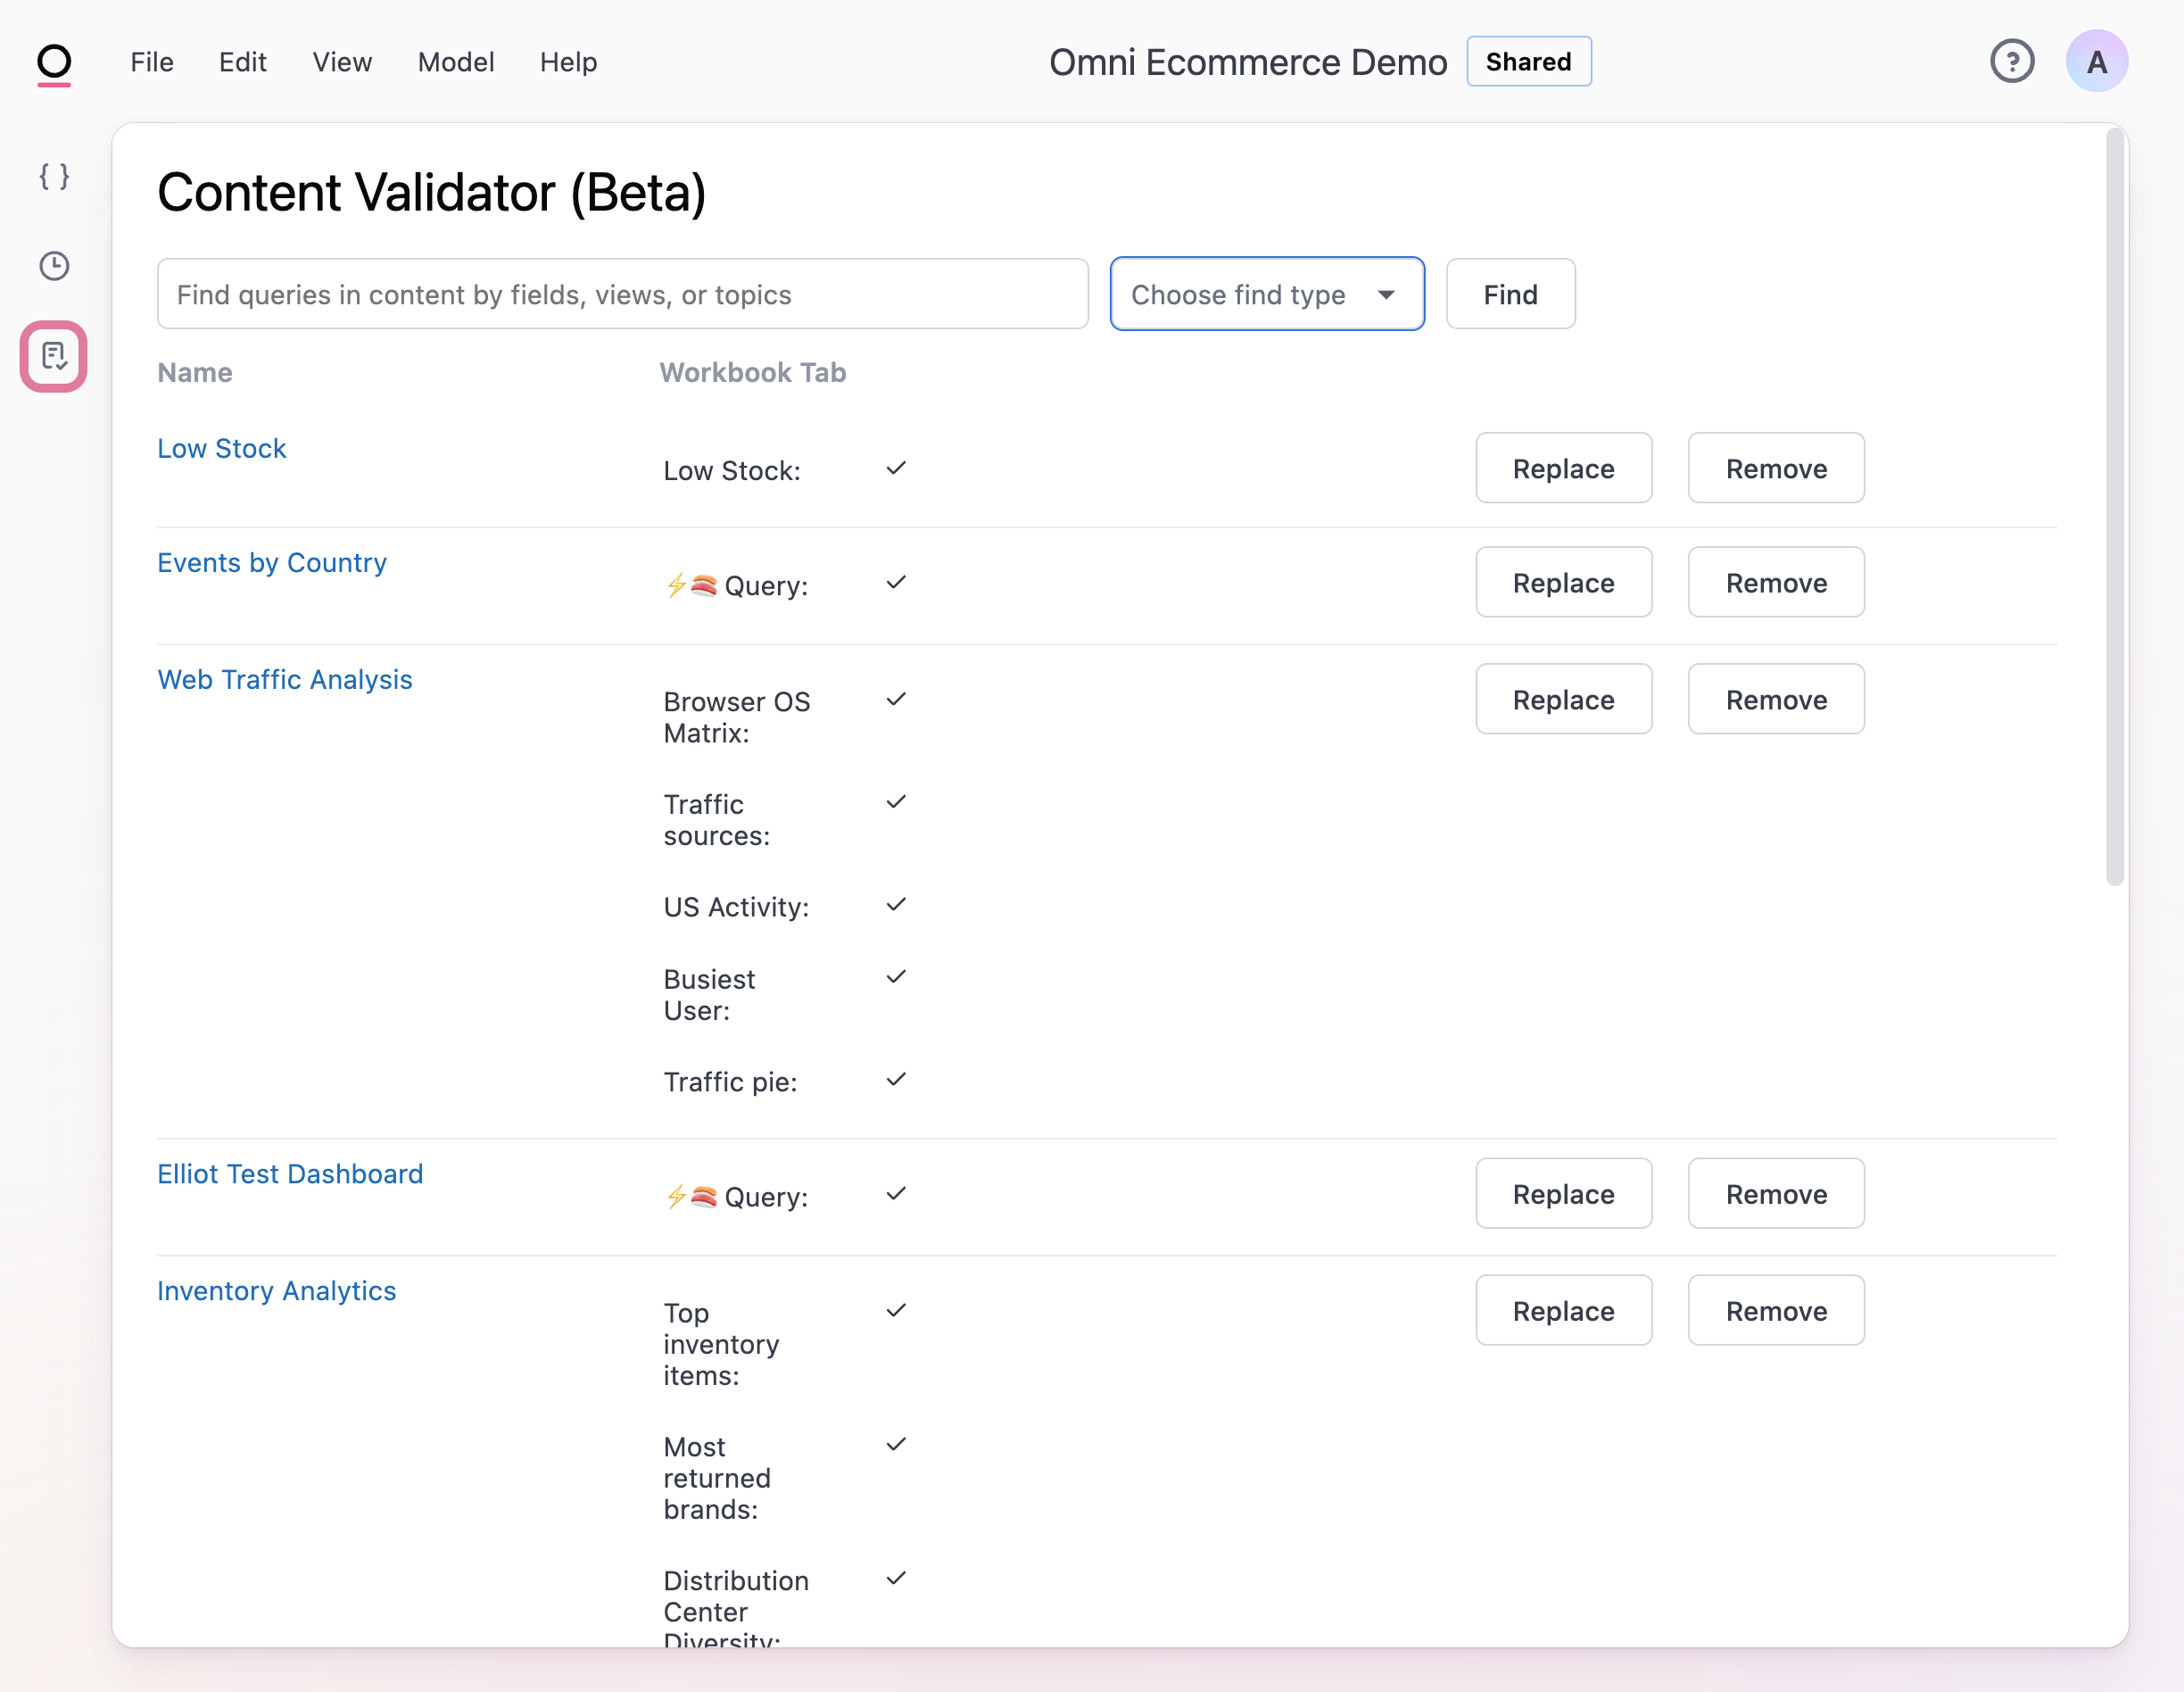
Content Validator (beta)
The Content Validator allows users to visualize broken content when the model or downstream database references inevitably change.
Access the model validator from the left-hand navigation in the model IDE. You can update content in bulk when those downstream dependencies change. Another bonus use case is you can use the validator to find all content that uses a certain field, view, or topic to understand how much something is being used before you update or remove it.
Model Editing
Edit a Model in the Workbook Layer(Easy Mode)
The workbook allows users to not only explore data but it also allows users to create new model content like topics, relationships (joins), new fields, SQL views and fields, as well as promote those all from the workbook model layer back into the model layer.
Create a Topic
Topics curate the views that are joined together for exploring (querying) data in the workbook view.
- Starting from your Omni app's homepage, click on the ** + New ** button in the top left corner of your Omni app's homepage.
- Select the database connection you want to use. Now we have two options:
- Create a new topic
- Edit an existing topic
1. Create a new topic
- At the bottom of the list of Topics, click on the All Views * Fields option in the Advanced section. This will show you the views and the fields in those views available in the model connection you chose.
Topic with a single view
- In the view's menu, click on the Modeling option then choose Make Topic.
- The topic is now available in this workbook model.
- To promote this topic to the Shared Model, choose from an option outlined here. #ADD A LINK#
Topic with multiple views (Joins)
- Hover over the view name that you want to set as the base view and click on the vertical three-dot icon that appears.
- Click on the Set as Base View option. This hides the other views field picker menu.
- After opening the view's menu and clicking on Joins there are two options:
- Omni makes a suggested join, it's the option with the links icon to the left of the suggested view name.
- Clicking on this option still opens up the Join modal but all of the join options are pre-populated based on inferred knowledge of the fields in the two views.
- (Optional) Edit the choices in the parameter options.
- Click Update.
- Clicking on
+ New Joinopens up the Join modal. Walk through the field inputs in the pop-up modal to create a new join. Repeat this process for adding multiple joins back to the base view. This method is only recommended for joins requiring one join condition in theONclause.- Choose the view to join from the Choose right view drop-down.
- Click on the fields you want to join on. Recommend choosing a field like a unique ID.
- The default join type is a Left join but other join types like inner, full outer and cross joins are also available.
- In the Relationship (Advanced) field can you can click on the Infer Relationship button in the bottom left of the modal. This will populate the assumed relationship into this field. Alternatively, if you know your join relationship choose one of the options from the drop-down.
- We recommend only adding joins to your current topic. Use the Add to all possible topics option with caution as this may expose data in workbooks that should not be seen by certain users.
- Omni makes a suggested join, it's the option with the links icon to the left of the suggested view name.
2. Edit an Existing Topic
- Click on the topic you want to make edits to.
- Make your desired model edits
- Add in new joins.
- Create custom fields.
- Create table calculations (these can also be promoted to the Shared Model!)
Edit a Model in the IDE (Hard Mode)
Create Your First Topic
- Find your model
- Define relationships
- Create your topic
- Navigate to your Omni app's homepage.
- Click on the ** + New ** button in the top right of your Omni app's homepage.
The next step is to define the relationships between the tables we want to inlcude in our topic. We recommend starting as simple as possible just to give you a good base on how modeling works in Omni. It's important to select tables that contain unique IDs you can join on to prevent your aggregate values from fanning out.
For the last bit of modeling in this tutorial, let's create your first topic!
Quick tips
- Joins
- Topics
- Workbook
- Omni automatically adds joinable tables by default when you set up your connection.
- Users can curate the list of joinable tables to add or remove specific tables.
- New joins can be added to topics using the relationships file or custom joins per-topic basis.
- Limiting the number of joined tables creates a cleaner Workbook exploration experience for your users.
- Be sure to save your changes so they are visible in the Workbook view of the topic.
- Apply a clear, customized name to topics making it easier for business users to navigate table and schema names.
- Group related topics using group_label to make it easier to navigate a large number of topics.
- Limit field accessibility in each topic and hide or ignore fields in their views. This can be used to hide unnecessary or helper fields, which keeps views refined and relevant for all users.
- Set up default filters or
always_where_sqlto ensure users have the correct defaults applied to their analyses.
- Workbooks provide users with a versatile interface for querying data in their databases.
- Users can explore and iterate on analyses without impacting the saved version. Exploration changes are not saved, and users can exit exploration to return to the latest version.
- Workbooks consist of one or more tabs where users can query data using a UI-driven table experience.
- Workbooks can be in either View or Edit mode. In View mode, users see the latest saved version, while in Edit mode, changes auto-save and impact attached dashboards.
- Workbooks can be named and saved, appearing alongside other dashboards and workbooks in the content system. Unsaved workbooks can be accessed via the Activity section or URL.
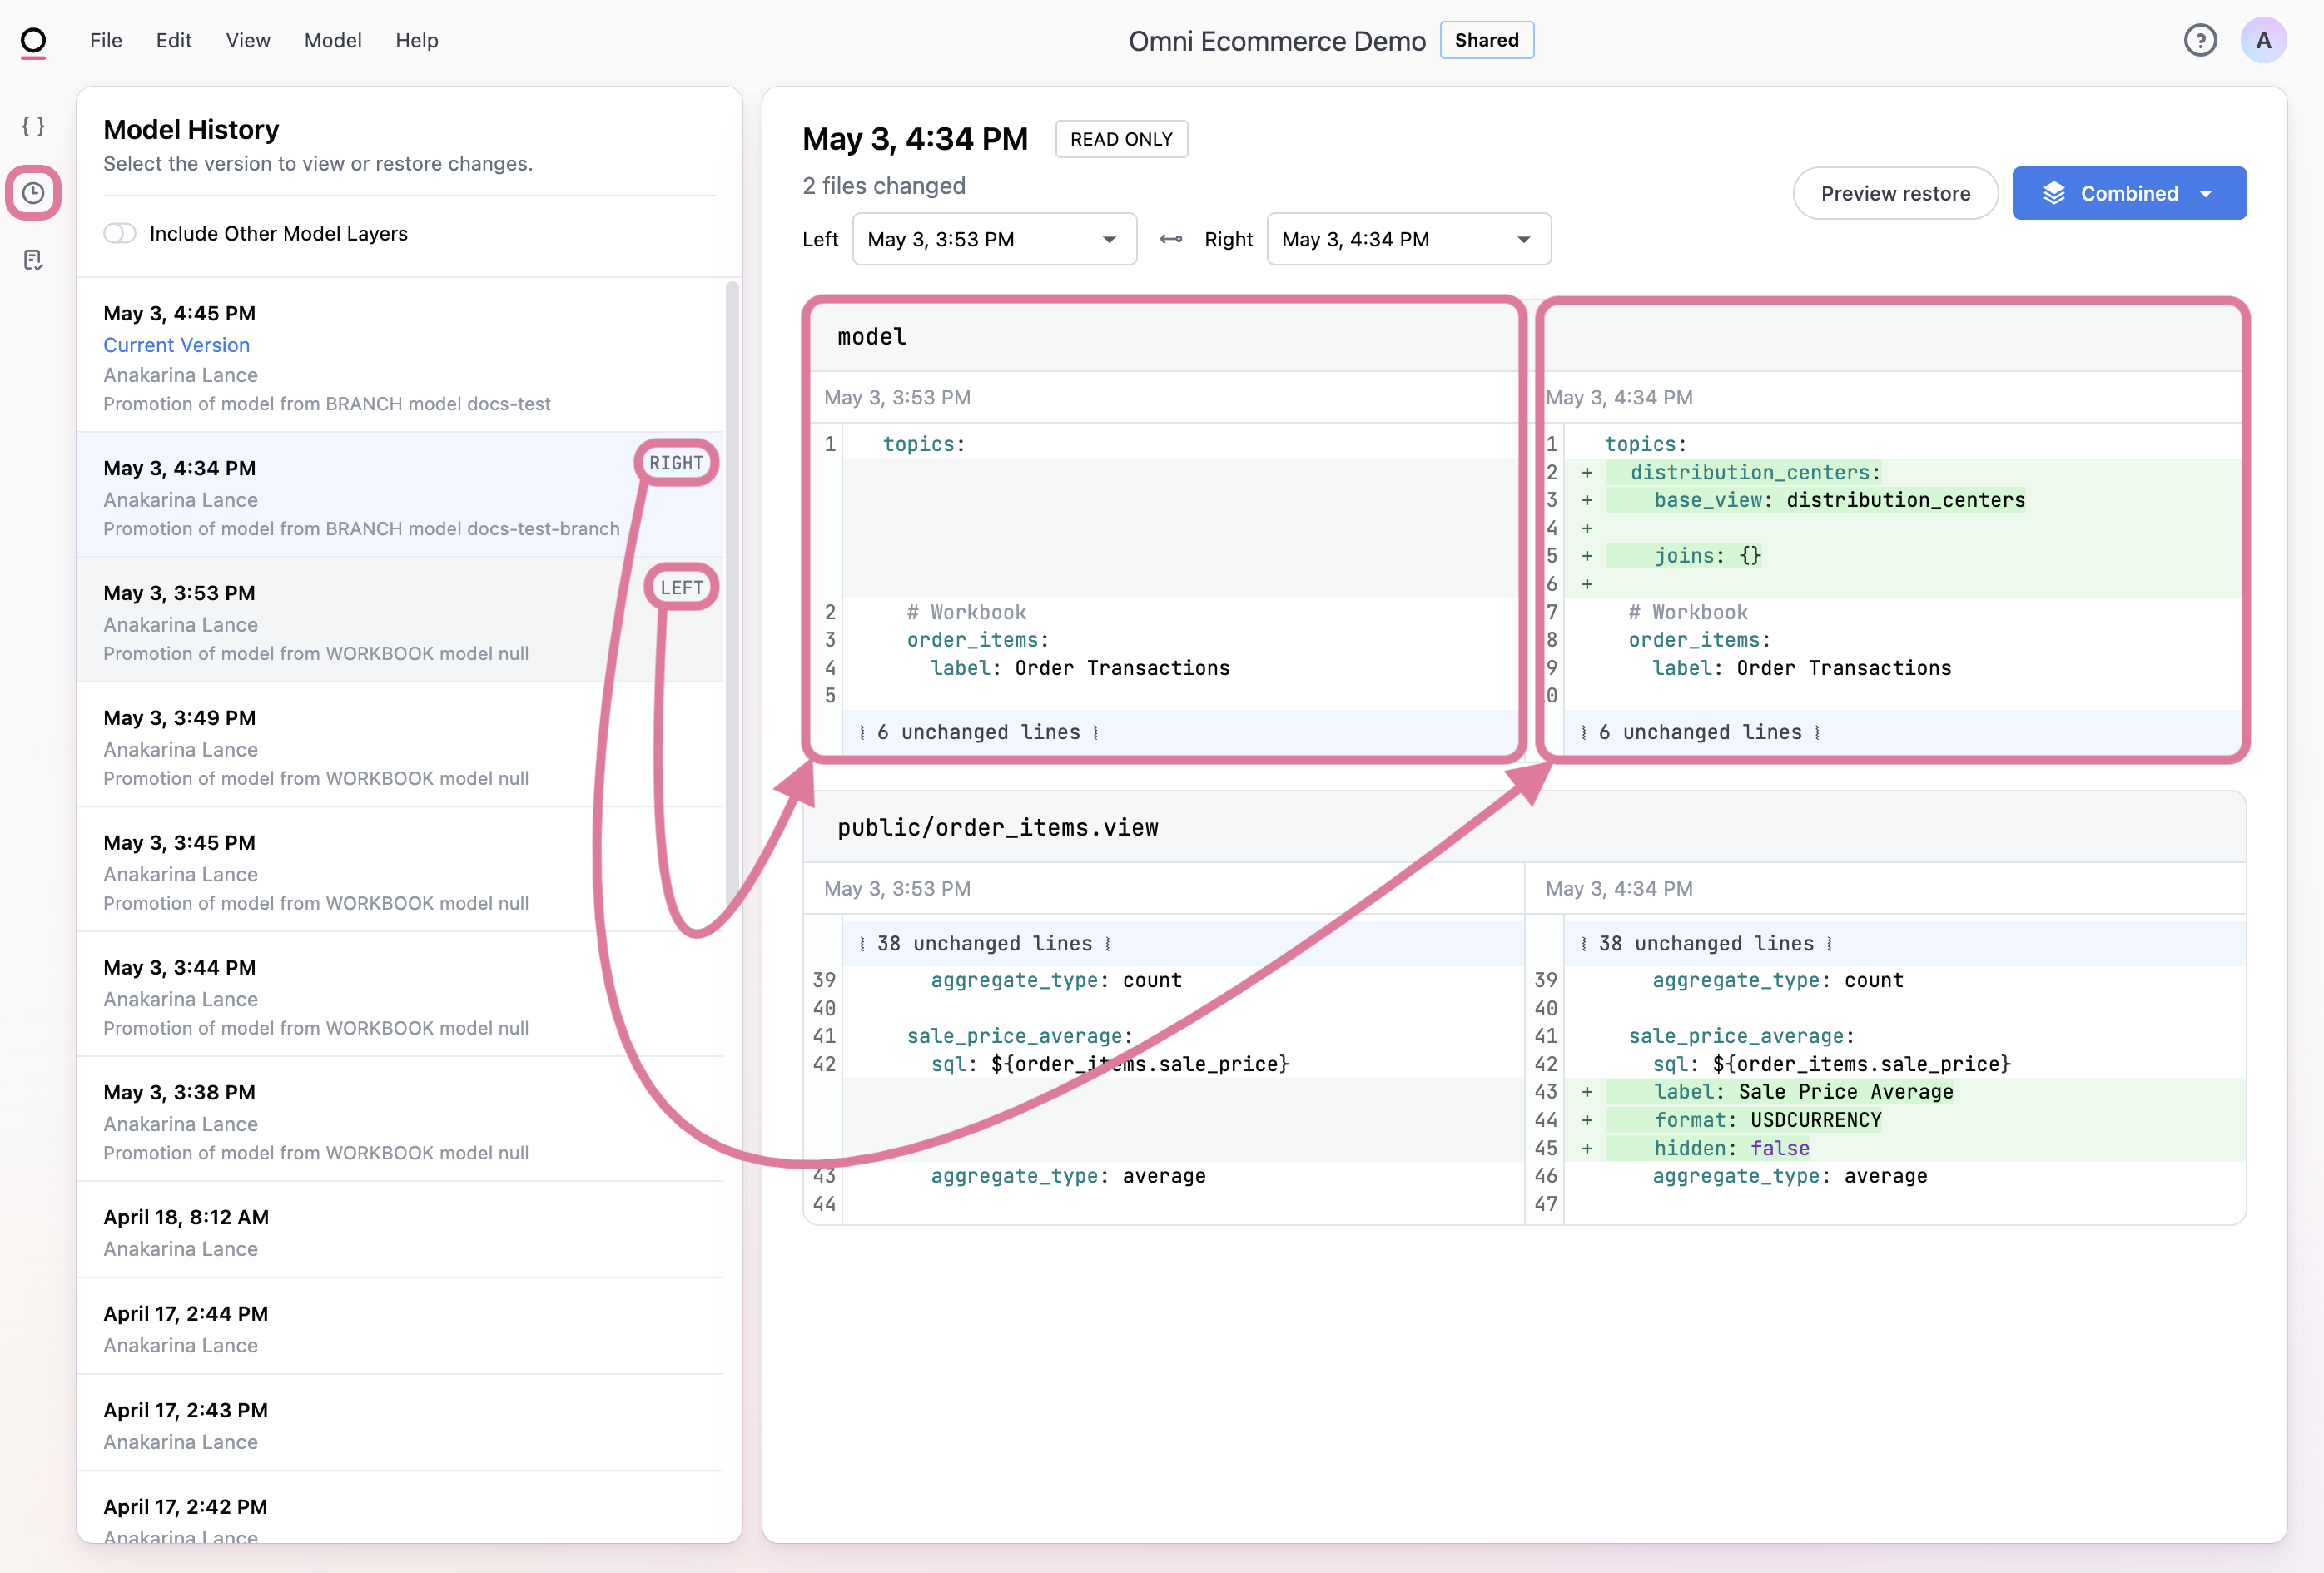
Model History
Model history in the developer IDE allows users to see the changes made to the model and restore to an older version.

Explore & Compare Older Versions
The left-hand menu includes a chronological list of time-stamped changes. The detailed view to the right of the list of changes, compares the previous change to the currently selected version.
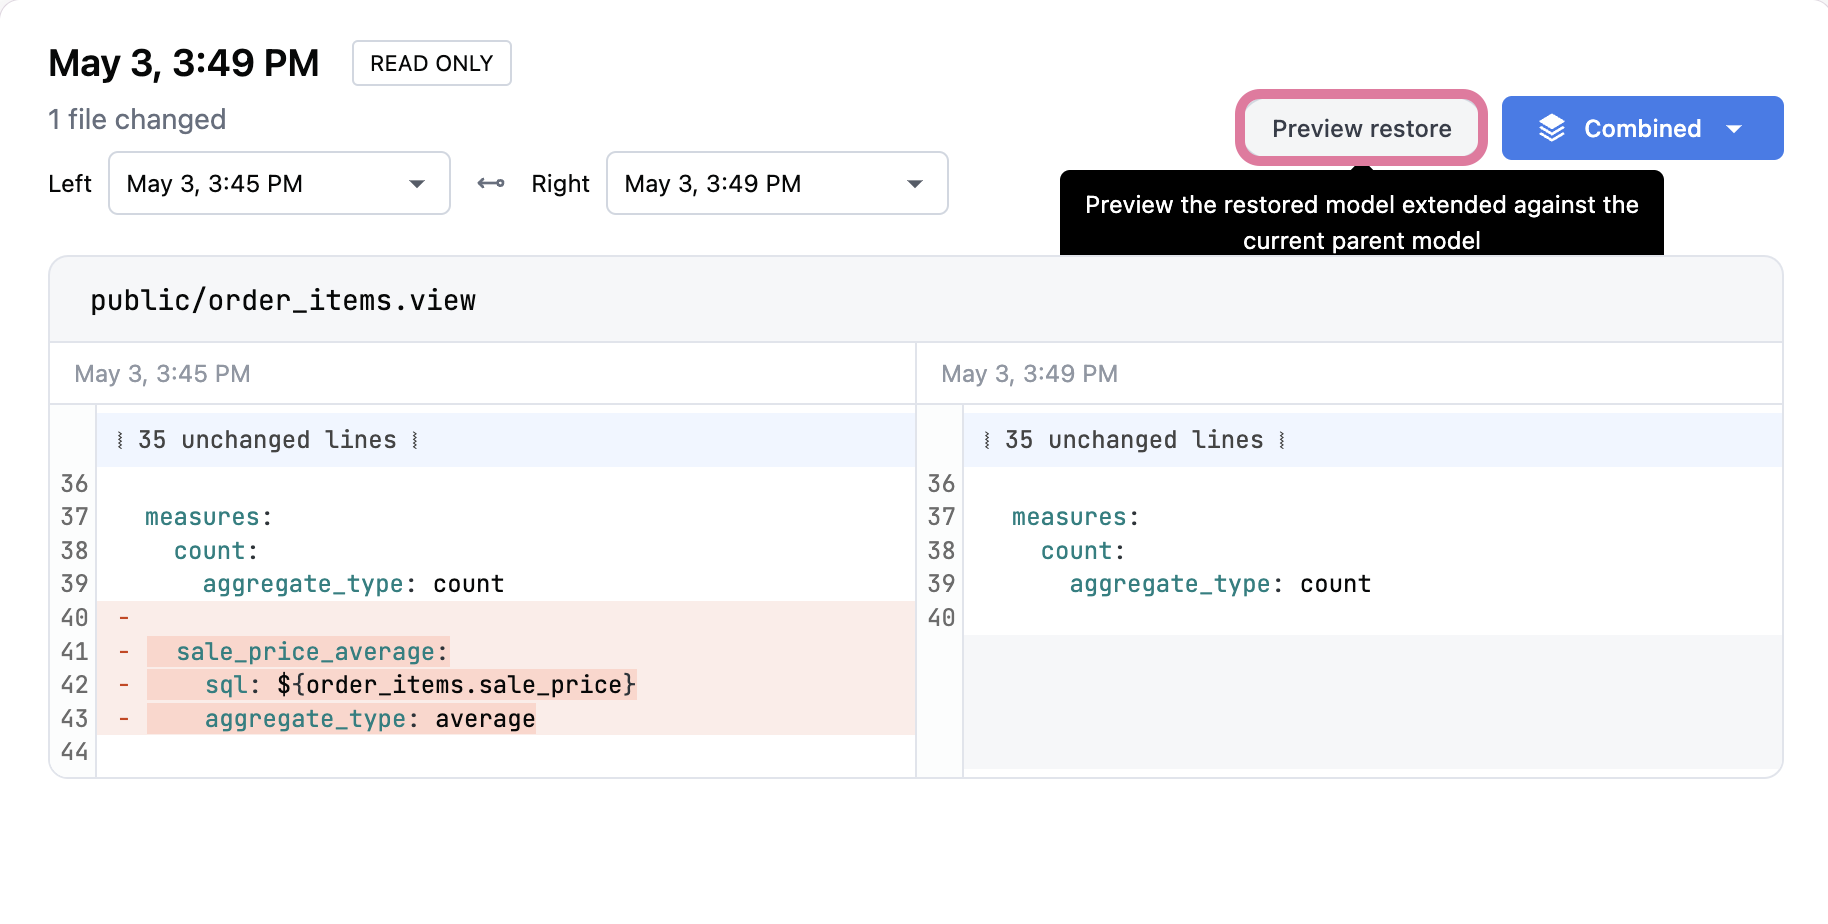
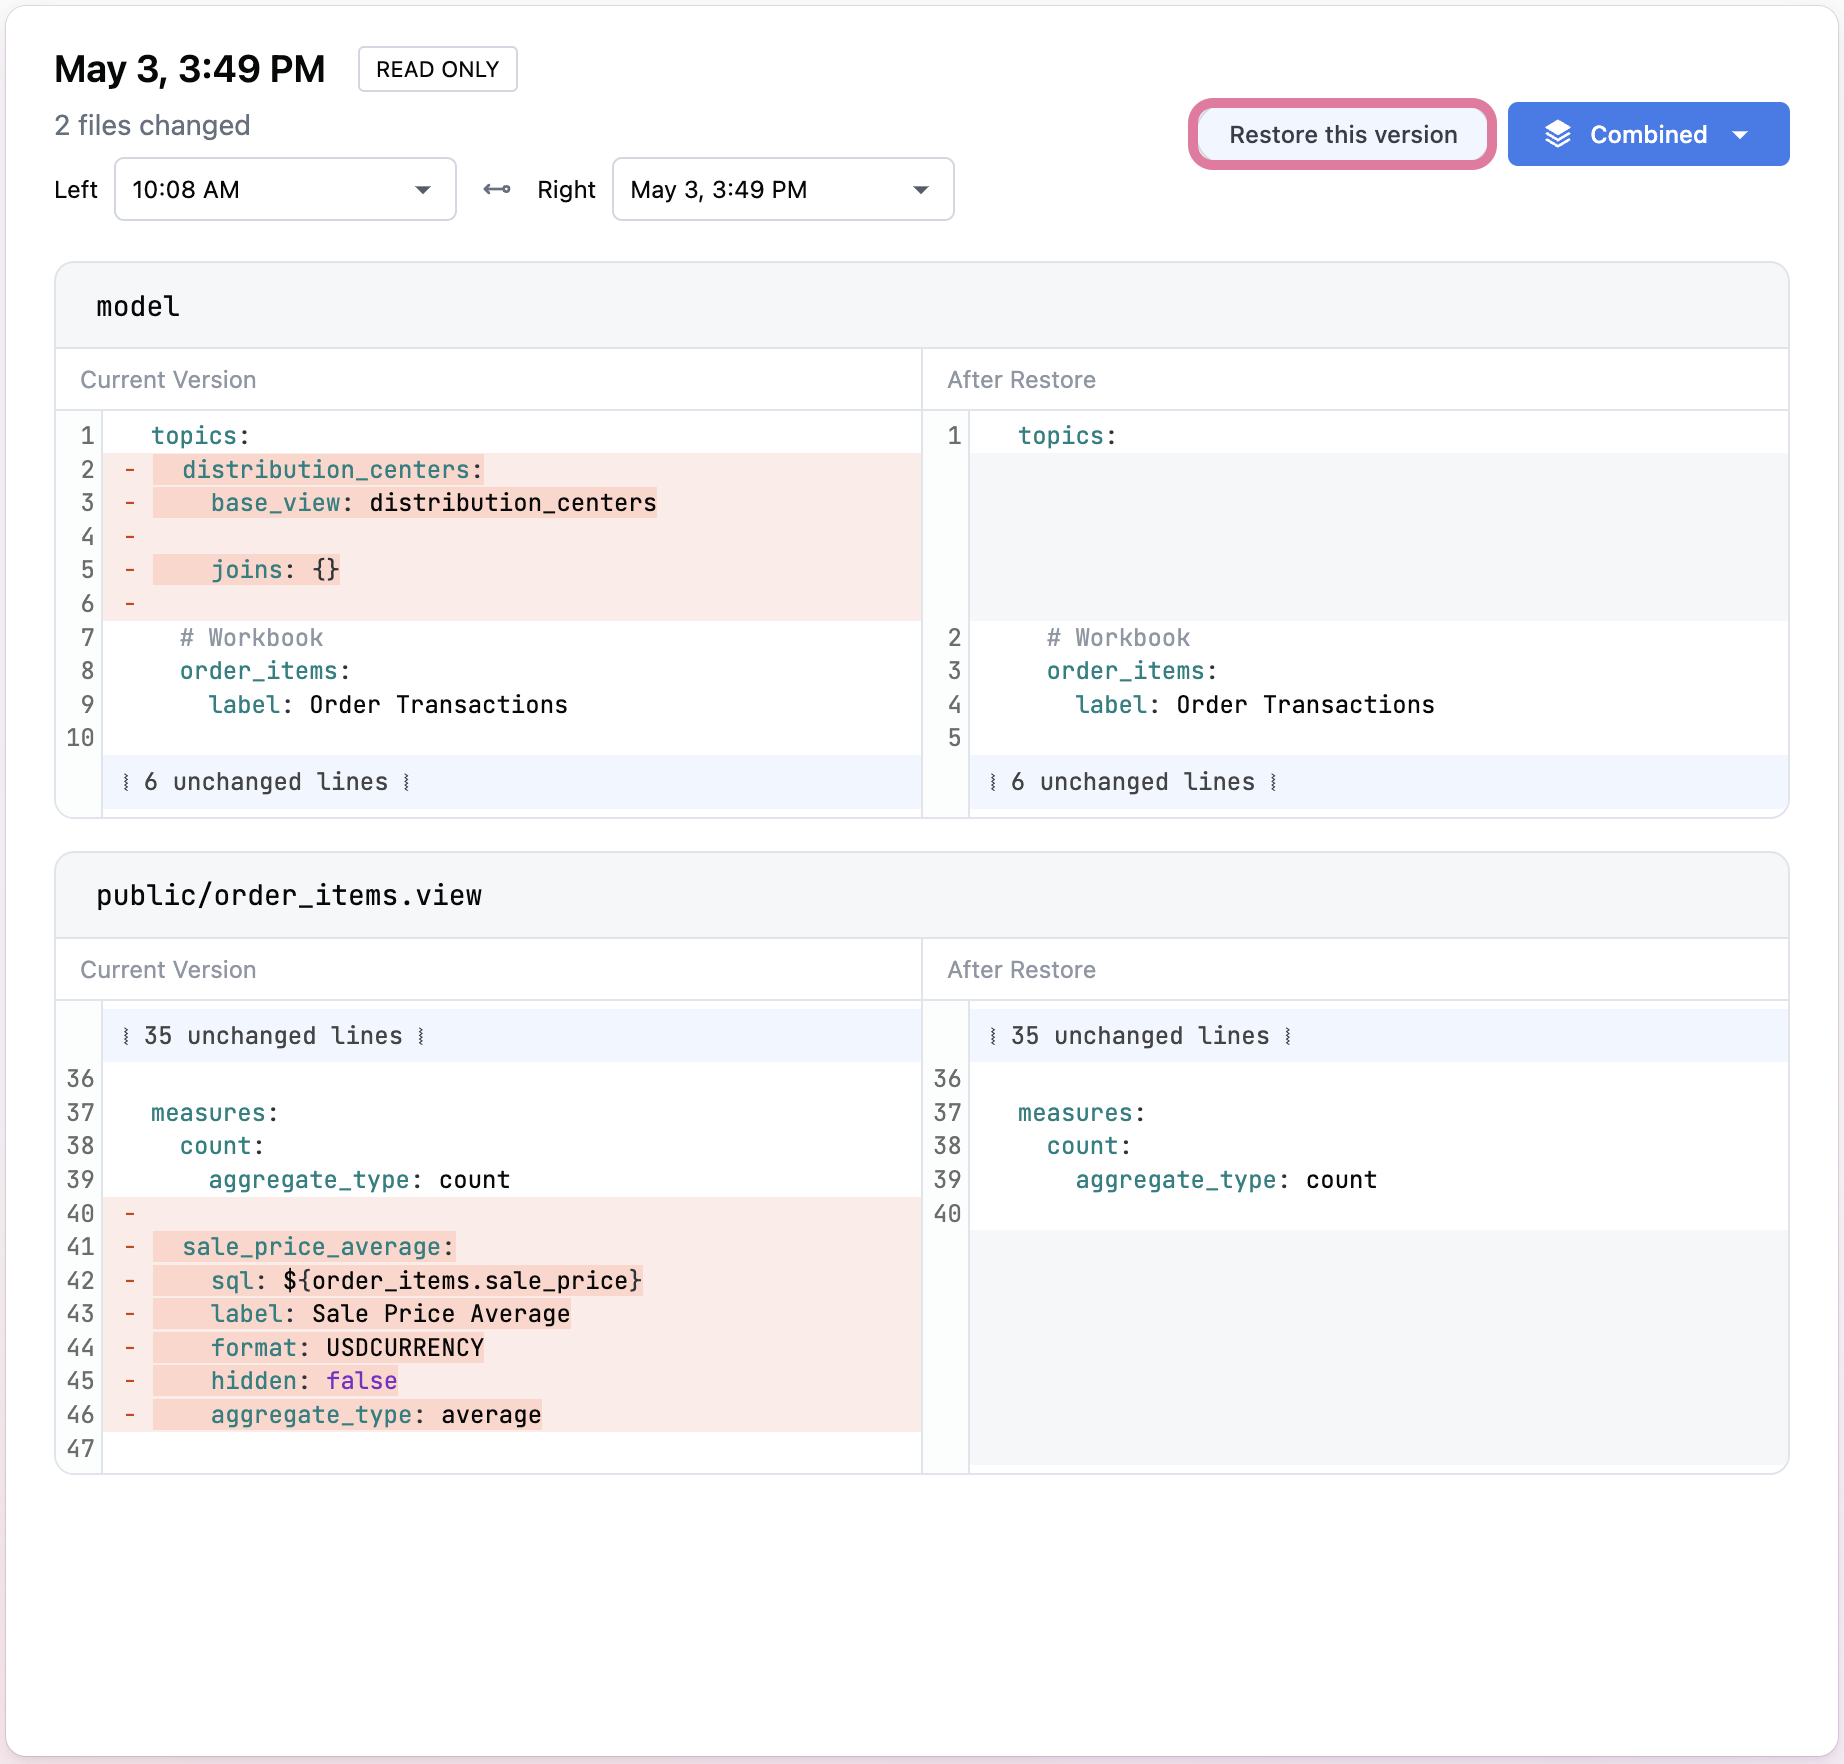
Restore an Older Version
Restore a previously saved version of your model files by navigating to the change you want to restore to.
- Click Preview restore
-
Compare the changes in all affected files.
-
Select Restore this version.
Refresh Schema
Omni strives to stay in lockstep with changes in the database layer below. One of the more challengeing experiences in BI management are when schema changes occur in the database layer, and this has only become more prevelant with dbt.
The shared data model exists in two layers, the schema model from the database and the user-generated, virtual fields that exist only in the Omni layer. When Refresh Schema is selected from Model dropdown in the IDE, simple field references will be updated to reflect the current schema in the database (including objects like dbt views). This means if columns or tables are added or removed, these changed would be reflected in the updated schema model. Note these changes may result in invalid/broken references, but will be flagged by the model validator.
Currently schema refresh is user-triggered, but in the future this will be able to be automated on a schedule.
Note that the schema refresh kicks off a job that runs in the background, so can take several minutes depending on size of database. If schema updates do not appear instantly, give the refresh job a bit of time to complete.
Export to dbt
We want to make model management easy both in Omni and below the BI layer. To this end, we offer the ability to export a view file's dbt SQL. This will allow users to build fact tables, or virtualized fields into their dbt models beneath Omni.
Currently this will require some rework of your Omni model, because new dbt views will then be populated into the model upon schema refresh. This means field references would need to be remapped to maintain continuity. In the future the intent is for this promotion to become button-click.