> ## Documentation Index
> Fetch the complete documentation index at: https://docs.omni.co/llms.txt
> Use this file to discover all available pages before exploring further.
# Delivering Omni content via email
> With email deliveries, you can automatically schedule sending dashboards and individual tiles to your team.
export const contentCopy_0 = "Select the content to be delivered."
export const destination_0 = "Email"
## Creating an email delivery
1. Navigate to a **published** dashboard.
2. Click **File > Deliveries & Alerts**. The delivery options will display on the left side of the page.
3. Fill in the following:
* **Delivery** - Select **Schedule** or **Alert**.
* **Send** - {contentCopy_0}
* **Destination** - Select **{destination_0}**.
* **Name** - Enter a name for the delivery.
**If creating an alert**, use the **Alert** tab to define the conditions that must be met to trigger the delivery. For example, you have a chart that tracks the **Total sales** for your ecommerce company. Using an alert, you can trigger a delivery when the total of your sales has changed.
In this step, you'll define the cadence for the delivery:
* For **schedules**, this determines when Omni will deliver the specified content to the destination
* For **alerts**, this tells Omni when to check if the current query results meet the conditions required to send the delivery
Schedules can be defined using the visual options or with cron:
Use the UI options (**Daily**, **Weekly**, etc.) to select a time period.
By default, schedules are set to send in the local timezone of the delivery creator's computer. Use the **Times are in** drop down to change the timezone.
A cron expression is a string that describes the individual details of a schedule:
| Order | Unit | Allowed values | Allowed special characters |
| ----- | ------------ | --------------- | -------------------------- |
| 1 | minute | 0-59 | \* , - / |
| 2 | hour | 0-23 | \* , - / |
| 3 | day of month | 1-31 | \* , - / L W ? |
| 4 | month | 1-12 or JAN-DEC | \* , - / |
| 5 | day of week | 1-7 or SUN-SAT | \* , - / L W ? |
| 6 | year | any | \* , - / |
Using cron, you can create schedules like the following:
```markdown title="At 9:00 AM every day" theme={null}
0 9 ? * * *
```
```markdown title="At 6:30AM on the last day of the month" theme={null}
30 6 L * ? *
```
```markdown title="At 8:45 AM every day, Monday through Friday" theme={null}
45 8 ? * MON-FRI *
```
Omni uses Amazon Web Services' (AWS) syntax for cron expressions. Refer to the [AWS documentation](https://docs.aws.amazon.com/eventbridge/latest/userguide/eb-scheduled-rule-pattern.html) for more information. By default, the most frequent you can configure a schedule is hourly.
If your organization has [AI enabled](/ai/settings/features), you can use the AI cron generator to create cron expressions from natural language. Click the sparkle icon next to the cron input field and describe your desired schedule, such as "every weekday at 9am" or "first Monday of each month at noon."
Schedule send timezone may be different than query run timezone. For example, if your **Database timezone** is `UTC` with no other timezone conversion settings and you set your schedule to send at `12:00 PM PST`, the query will execute at `8:00 PM UTC`.
Refer to your [connection timezone settings](/connect-data/timezones) for more information.
You can use filters to customize content for different recipients! For example, set a filter to `A` in a scheduled delivery to recipient A, and in another scheduled delivery to recipient B, set a filter to `B`.
In the **Dashboard** or **Chart** tab, you can:
* **Select the format of the content**, such as PNG, PDF, XLSX, or CSV.
* **Lightly customize the contents and layout**, such as expanding tables to include up to 1,000 rows, hiding filter values, or arranging tiles in a single column.
* **Select the page(s) to include in the dashboard delivery**. This is applicable only to [advanced layouts](/visualize-present/dashboards/advanced-layout) with multiple pages.
**Note**: PNGs can only include one page. You'll need to create multiple deliveries to output a PNG for each page.
* **Override the query timezone for the delivery** using the [timezone picker](/visualize-present/dashboards/timezone-override). The picker label changes based on whether **Personalize delivery with recipient user attributes** is enabled (**Recipient's timezone** when enabled, **Default timezone** when disabled).
This setting affects the content of queries included in the delivery, not the timing of the delivery itself. Use the **Schedule** tab to define when content should be delivered.
* **Set filter or control values for the delivery**. Some formats will have additional customization options. PDF formats, for example, will allow you to specify the orientation and page size for the PDF.
For dashboard deliveries, the default filters and controls will automatically be applied upon creation. Subsequent default filter value updates will not change the filter values set for existing deliveries.
#### PNG deliveries
If you select the PNG (image) format, how the image is included with the email will depend on the image's size:
**If 2MB or less**, the image will be included inline in the email:
 **If larger than 2MB**, the image will be included as an attachment. Omni takes this approach to prevent failed deliveries, as some email providers limit how large inline images can be.
 To finish setting up the delivery, click the **Email** tab and fill in the following:
Restrict email deliveries to recipients at approved domains with the [domain whitelist](/share/deliveries/email/domain-allowlist).
Add one or more recipients. Recipients can be other members of your Omni organization or non-users, such as a contractor or external stakeholder. You can also add Omni user groups as recipients.
When adding recipients, note that:
* **When existing Omni users are added as recipients** there are no checks on whether or not each of those users have system access (connection or content permissions) to the content being scheduled. This means users could potentially *receive* content that they do not otherwise have access to in the Omni application.
* **When non-users are added as recipients** - that is, when a user with the recipient's email can't be matched to an Omni user - Omni creates an [**email-only user**](/administration/users/email-only). These accounts are created when a delivery is saved to allow you to monitor scheduler usage and related metadata.
* **If a user belongs to multiple user groups**, they will only receive one delivery.
If enabled, the content of the delivery will be personalized using the recipients' [user attributes](/administration/users/attributes). Otherwise, the delivery owner's user attributes will be used.
For example, you could use personalization to deliver a dashboard to sales managers that only displays quarterly sales data for their region.
Keep in mind that enabling this option doesn't impact who *receives* this delivery, only the contents of the delivery.
#### How Omni resolves a delivery recipient by email
When personalization is enabled, Omni uses each recipient's resolved user attributes. The resolved user depends on which type of account matches the recipient email — Omni checks in the following order. The first match wins.
Omni first looks for an active **standard user**, **external user**, or **embed SSO user** whose account email matches the recipient email. Users with a **pending invitation** at that email are also included here.
If no standard account email matches, Omni looks for an **embed user** associated with the recipient email through the `email` [URL parameter](/embed/setup/url-parameters/email). This is the typical case for non-SSO embed users whose work email is passed in at embed time.
If no embed association is found, Omni falls back to an **email-only user** with that email — either an existing one or a new placeholder created when the delivery is saved.
Pending invitations are treated the same as active accounts in step 1. If you invite someone at a given email as a standard user and they haven't accepted yet, they'll still resolve ahead of any embed or email-only user with the same email.
If using Omni in an [embedded context](/embed), keep these in mind:
* Never mix internal (standard) and embed user emails. If you *must* reuse the same email, use the `+` modifier — for example, `blob@example.com` for the internal user and `blob+omniembed@example.com` for the embed user.
* Never reuse emails across `externalId`s for embed users.
Email subjects and bodies can include [Mustache references](/share/deliveries/dynamic-content), including [user attributes](/administration/users/attributes), allowing you to create dynamic, personalized content for recipients.
Enter a **subject** and a **body** message for the email delivery.
If you want to test the delivery before saving, click the **Test Now** button in the bottom left corner of the page. This will send the dashboard/chart to the destination using the current settings. For example, using **Test Now** would send the delivery to all **Recipients**.
The **Test Now** button will be unavailable for alerts if the **Condition type** is `Results have changed` or `Results have stayed the same`. A workaround is to use the **Send Now** option to manually trigger the delivery, which is available once the delivery has been saved.
Save the alert and then click the icon to display the **Send Now** option. This will initiate a check on the alert condition - if the condition isn't met, the delivery will show as successful but not send anything.
When finished, click **Save** to create the delivery.
## Subscribing to email deliveries
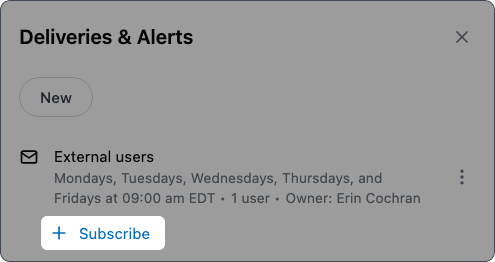
If you aren't currently a recipient of an email delivery, you can subscribe if you have the ability to view the schedule. In a published dashboard, navigate to **File > Deliveries & Alerts** and then click the **Subscribe** link under the schedule:
To finish setting up the delivery, click the **Email** tab and fill in the following:
Restrict email deliveries to recipients at approved domains with the [domain whitelist](/share/deliveries/email/domain-allowlist).
Add one or more recipients. Recipients can be other members of your Omni organization or non-users, such as a contractor or external stakeholder. You can also add Omni user groups as recipients.
When adding recipients, note that:
* **When existing Omni users are added as recipients** there are no checks on whether or not each of those users have system access (connection or content permissions) to the content being scheduled. This means users could potentially *receive* content that they do not otherwise have access to in the Omni application.
* **When non-users are added as recipients** - that is, when a user with the recipient's email can't be matched to an Omni user - Omni creates an [**email-only user**](/administration/users/email-only). These accounts are created when a delivery is saved to allow you to monitor scheduler usage and related metadata.
* **If a user belongs to multiple user groups**, they will only receive one delivery.
If enabled, the content of the delivery will be personalized using the recipients' [user attributes](/administration/users/attributes). Otherwise, the delivery owner's user attributes will be used.
For example, you could use personalization to deliver a dashboard to sales managers that only displays quarterly sales data for their region.
Keep in mind that enabling this option doesn't impact who *receives* this delivery, only the contents of the delivery.
#### How Omni resolves a delivery recipient by email
When personalization is enabled, Omni uses each recipient's resolved user attributes. The resolved user depends on which type of account matches the recipient email — Omni checks in the following order. The first match wins.
Omni first looks for an active **standard user**, **external user**, or **embed SSO user** whose account email matches the recipient email. Users with a **pending invitation** at that email are also included here.
If no standard account email matches, Omni looks for an **embed user** associated with the recipient email through the `email` [URL parameter](/embed/setup/url-parameters/email). This is the typical case for non-SSO embed users whose work email is passed in at embed time.
If no embed association is found, Omni falls back to an **email-only user** with that email — either an existing one or a new placeholder created when the delivery is saved.
Pending invitations are treated the same as active accounts in step 1. If you invite someone at a given email as a standard user and they haven't accepted yet, they'll still resolve ahead of any embed or email-only user with the same email.
If using Omni in an [embedded context](/embed), keep these in mind:
* Never mix internal (standard) and embed user emails. If you *must* reuse the same email, use the `+` modifier — for example, `blob@example.com` for the internal user and `blob+omniembed@example.com` for the embed user.
* Never reuse emails across `externalId`s for embed users.
Email subjects and bodies can include [Mustache references](/share/deliveries/dynamic-content), including [user attributes](/administration/users/attributes), allowing you to create dynamic, personalized content for recipients.
Enter a **subject** and a **body** message for the email delivery.
If you want to test the delivery before saving, click the **Test Now** button in the bottom left corner of the page. This will send the dashboard/chart to the destination using the current settings. For example, using **Test Now** would send the delivery to all **Recipients**.
The **Test Now** button will be unavailable for alerts if the **Condition type** is `Results have changed` or `Results have stayed the same`. A workaround is to use the **Send Now** option to manually trigger the delivery, which is available once the delivery has been saved.
Save the alert and then click the icon to display the **Send Now** option. This will initiate a check on the alert condition - if the condition isn't met, the delivery will show as successful but not send anything.
When finished, click **Save** to create the delivery.
## Subscribing to email deliveries
If you aren't currently a recipient of an email delivery, you can subscribe if you have the ability to view the schedule. In a published dashboard, navigate to **File > Deliveries & Alerts** and then click the **Subscribe** link under the schedule:
 In an embedded context, users with a defined embed [entity](/embed/setup/url-parameters) will only see schedules created by users in the same embed entity. Embed users that don't have a defined `entity` property will only see their schedules.
## Next steps
* [Restrict recipient email domains with an allowlist](/share/deliveries/email/domain-allowlist)
* [Whitelabel sender addresses for email deliveries](/share/deliveries/email/whitelabel)
* [Embed Omni in your application](/embed)
* [Manage deliveries](/share/deliveries/manage)
In an embedded context, users with a defined embed [entity](/embed/setup/url-parameters) will only see schedules created by users in the same embed entity. Embed users that don't have a defined `entity` property will only see their schedules.
## Next steps
* [Restrict recipient email domains with an allowlist](/share/deliveries/email/domain-allowlist)
* [Whitelabel sender addresses for email deliveries](/share/deliveries/email/whitelabel)
* [Embed Omni in your application](/embed)
* [Manage deliveries](/share/deliveries/manage)