> ## Documentation Index
> Fetch the complete documentation index at: https://docs.omni.co/llms.txt
> Use this file to discover all available pages before exploring further.
# Creating topics
> Omni offers two ways to develop topics: visually (in workbooks) or using code (in the model IDE).
In this guide, each step of the topic development process will show you how to complete the step using either the workbook or the model IDE.
## Requirements
To follow the steps in this guide, you'll need:
* **Querier, Modeler,** or **Connection Admin** permissions to create the topic. **Note**: Queriers can only create topics in workbooks.
* **Connection Admin** or **Modeler** permissions to promote the topic to the shared model
* **Optional: Familiarity with [Omni branches](/content/develop/branch-mode)**. While not required, this is recommended if your organization uses branch-based workflows for Omni development.
While not required, we recommend using the [topic design best practices](/modeling/topics/best-practices) to create efficient, approachable topics.
## Before you begin
You can use the workbook-based topic editor, the model IDE, or both to develop your topics. However, keep the following in mind before you begin:
* **Queriers** can only create topics in workbooks, as they don't have access to the IDE
* **Changes made outside a branch in the IDE directly edit the shared model**. This means that changes are automatically promoted when a file is saved in the IDE. You can revert changes in the IDE using the [model history panel](/modeling/develop/history).
## 1. Create the topic
First, you'll start by creating the topic in the workbook or the model IDE.
If you know the model you'll be working with is connected to git, we recommend [creating a branch](/content/develop/branch-mode) before continuing. This can save you a few steps when you're ready to promote the topic to the shared model.
If you're unsure, that's okay! We'll show you what to do to promote the topic, if needed.
1. Open or create a workbook.
2. In a query tab, navigate to **All views & fields** in the field browser.
3. Hover over a view and click the (three dots icon), then **Modeling > Make topic**.
This will open the topic editor:
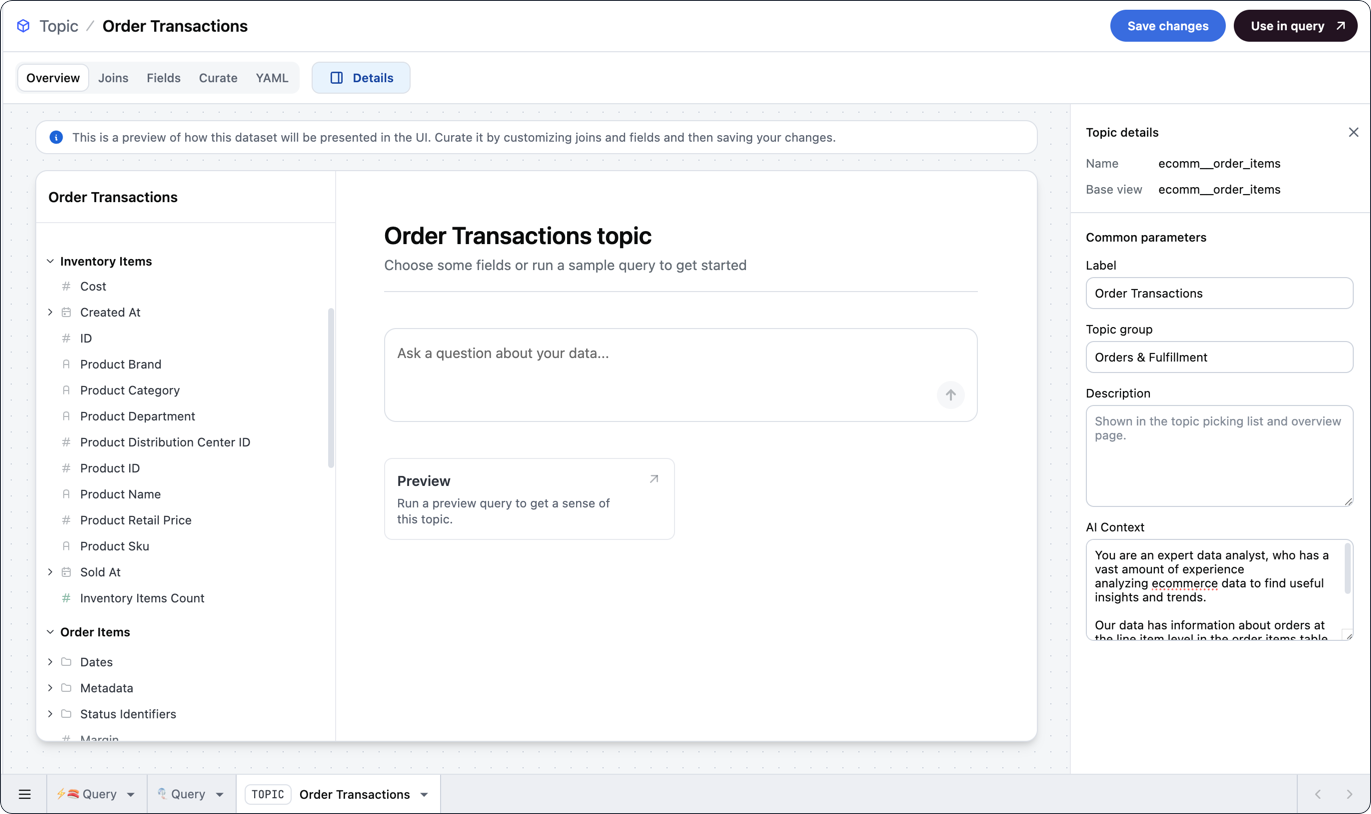 In this editor, you can:
* Save the changes and use **Use in query** to use the topic in a new query, or
* Further curate your topic by following the remaining **optional** steps in this guide
If your model is connected to git, you'll need to [create a branch](/content/develop/branch-mode) before making changes in the IDE.
1. In the **Files** panel of the modeling IDE, click the (plus sign) button in the **Topics** section.
In this editor, you can:
* Save the changes and use **Use in query** to use the topic in a new query, or
* Further curate your topic by following the remaining **optional** steps in this guide
If your model is connected to git, you'll need to [create a branch](/content/develop/branch-mode) before making changes in the IDE.
1. In the **Files** panel of the modeling IDE, click the (plus sign) button in the **Topics** section.
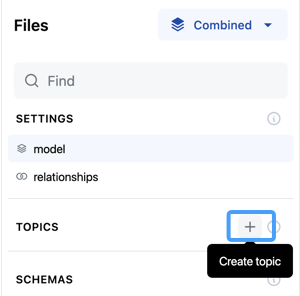 2. You'll be prompted to enter a name for the topic. Currently, Omni will use this name to automatically set the topic's base view. If the name doesn't match an existing view, the IDE will display an error.
To resolve this, enter the desired name for the topic and use the [`base_view`](/modeling/topics/parameters/base-view) parameter to define the base view:
```yaml title="Topic base view" theme={null}
base_view: ecomm__order_items
```
## 2. Design the topic
The steps in this section are **optional**. You can add metadata, fields, joins, etc. to topics at any time.
**Want to work with an existing topic in the topic editor?** Open the topic in a workbook and click **Model > Edit topic**.
In this section, we'll cover how you can further curate your topic by adding metadata like descriptions and labels, AI context, joins, and fields.
### 2.1. Add metadata and AI context
You'll start designing the topic by adding optional metadata and AI context.
The **Overview** tab contains a preview of the topic and allows you to do some quick curation like renaming the topic (label), adding it to a topic group (a folder of related topics) adding a description, or providing AI context.
Making changes here will, by default, be added to the workbook model. To propagate these changes to the shared model, ensure you promote them.
While AI context is optional, Omni recommends using it if you plan to use any AI features. Refer to the [Optimizing models for AI guide](/modeling/develop/ai-optimization) for more information.
After you create the topic file, you can start designing the topic with [topic parameters](/modeling/topics/parameters).
Define the following parameters, which will also display in the **Overview** tab of the workbook-based topic editor:
* [`label`](/modeling/topics/parameters/label) - A user-friendly display name
* [`group_label`](/modeling/topics/parameters/group-label) - The group that the topic belongs to, which is useful for improving workbook navigation for your end users
* [`ai_context`](/modeling/topics/parameters/ai-context) - Additional information for the AI, which can help improve results
```yaml title="Topic description, label, group, and AI context" theme={null}
base_view: ecomm__order_items
label: Order Transactions
group_label: Orders & Fulfillment
ai_context: |
You are an expert data analyst, who has a vast amount of experience analyzing ecommerce data to find useful insights and trends.
Our data has information about orders at the line item level in the order items table, users in our user table, inventory in our inventory items table, and products in the products table.
```
### 2.2. Add joins
By default, Omni adds all joinable non-fanout tables to newly-created topics — specifically those with `many-to-one` or `one-to-one` relationships to other tables. The list of joinable tables can also be curated, either to remove joins generated by default or to add in tables that would fan out the base table, such as `many-to-many` or `one-to-many` joins.
Joins added to the model's [relationships file](/modeling/relationships) can also be added to topics.
The **Joins** tab will display the joins that are available for the dataset:
2. You'll be prompted to enter a name for the topic. Currently, Omni will use this name to automatically set the topic's base view. If the name doesn't match an existing view, the IDE will display an error.
To resolve this, enter the desired name for the topic and use the [`base_view`](/modeling/topics/parameters/base-view) parameter to define the base view:
```yaml title="Topic base view" theme={null}
base_view: ecomm__order_items
```
## 2. Design the topic
The steps in this section are **optional**. You can add metadata, fields, joins, etc. to topics at any time.
**Want to work with an existing topic in the topic editor?** Open the topic in a workbook and click **Model > Edit topic**.
In this section, we'll cover how you can further curate your topic by adding metadata like descriptions and labels, AI context, joins, and fields.
### 2.1. Add metadata and AI context
You'll start designing the topic by adding optional metadata and AI context.
The **Overview** tab contains a preview of the topic and allows you to do some quick curation like renaming the topic (label), adding it to a topic group (a folder of related topics) adding a description, or providing AI context.
Making changes here will, by default, be added to the workbook model. To propagate these changes to the shared model, ensure you promote them.
While AI context is optional, Omni recommends using it if you plan to use any AI features. Refer to the [Optimizing models for AI guide](/modeling/develop/ai-optimization) for more information.
After you create the topic file, you can start designing the topic with [topic parameters](/modeling/topics/parameters).
Define the following parameters, which will also display in the **Overview** tab of the workbook-based topic editor:
* [`label`](/modeling/topics/parameters/label) - A user-friendly display name
* [`group_label`](/modeling/topics/parameters/group-label) - The group that the topic belongs to, which is useful for improving workbook navigation for your end users
* [`ai_context`](/modeling/topics/parameters/ai-context) - Additional information for the AI, which can help improve results
```yaml title="Topic description, label, group, and AI context" theme={null}
base_view: ecomm__order_items
label: Order Transactions
group_label: Orders & Fulfillment
ai_context: |
You are an expert data analyst, who has a vast amount of experience analyzing ecommerce data to find useful insights and trends.
Our data has information about orders at the line item level in the order items table, users in our user table, inventory in our inventory items table, and products in the products table.
```
### 2.2. Add joins
By default, Omni adds all joinable non-fanout tables to newly-created topics — specifically those with `many-to-one` or `one-to-one` relationships to other tables. The list of joinable tables can also be curated, either to remove joins generated by default or to add in tables that would fan out the base table, such as `many-to-many` or `one-to-many` joins.
Joins added to the model's [relationships file](/modeling/relationships) can also be added to topics.
The **Joins** tab will display the joins that are available for the dataset:
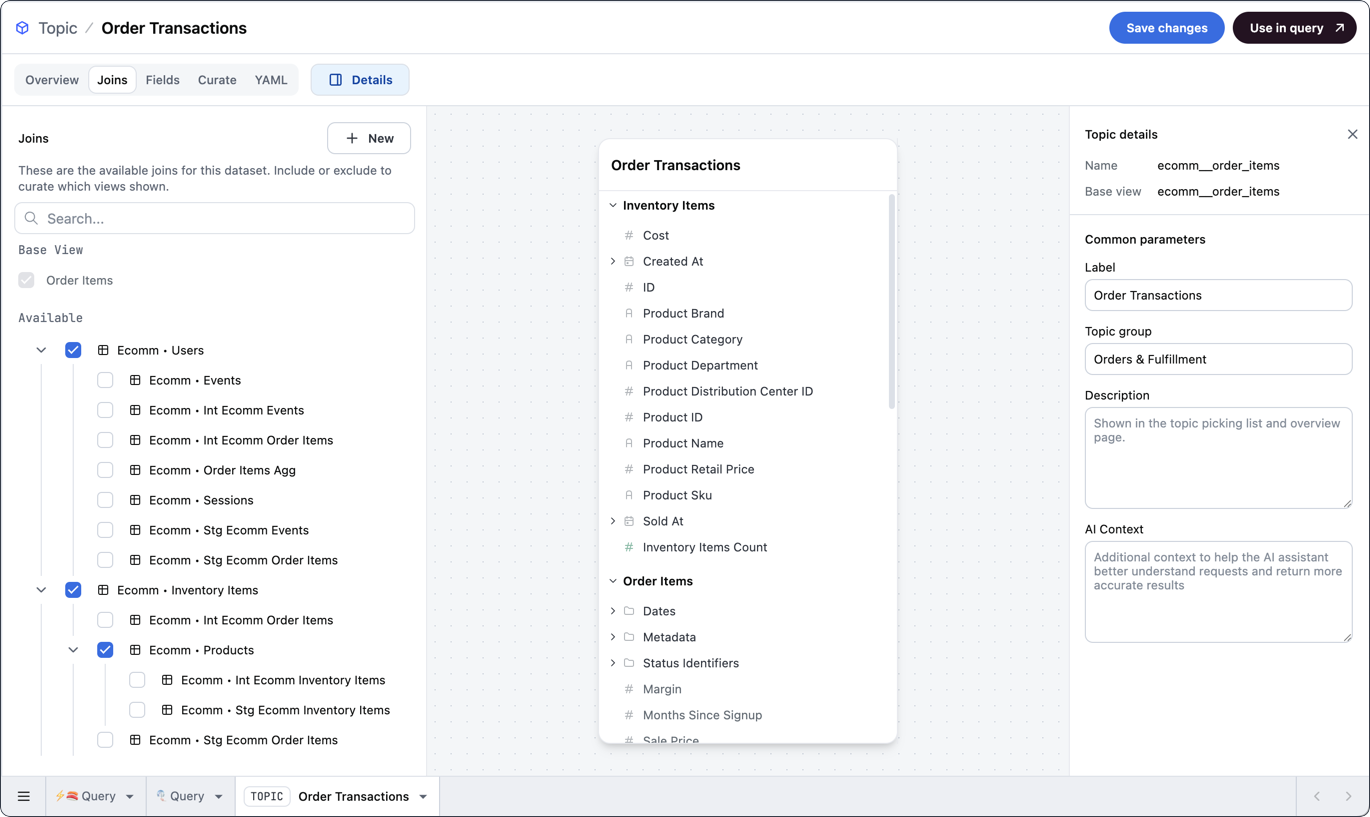 The view browser allows you to search for and select views to include in the topic.
To add a brand new join - that is, one that is not already defined in your model's [relationships file](/modeling/relationships) - click the **+ New** button. You'll then be prompted to define and save the join.
**Don't lose your work!** Click the **Save changes** button located near the top-right corner of the IDE before navigating to a different file.
To add joins to a topic in the model IDE, use the [`joins`](/modeling/topics/parameters/joins) parameter in the topic file:
```yaml title="Topic-level join" highlight={2,5} theme={null}
joins:
ecomm__users: {}
ecomm__inventory_items:
ecomm__products:
ecomm__distribution_centers: {}
```
**Note**: The last table in each 'node' - specifically, tables that don't have children nested under them - must have an empty bracket pair: `{}`.
The joins you define will also display in the **Joins** tab of the workbook-based topic editor:
### 2.3. Add fields
By default, all fields from the topic's base view and any [joined views](#2-2-add-joins) will be accessible in the topic. In this step, we'll show you how to curate the fields in the topic.
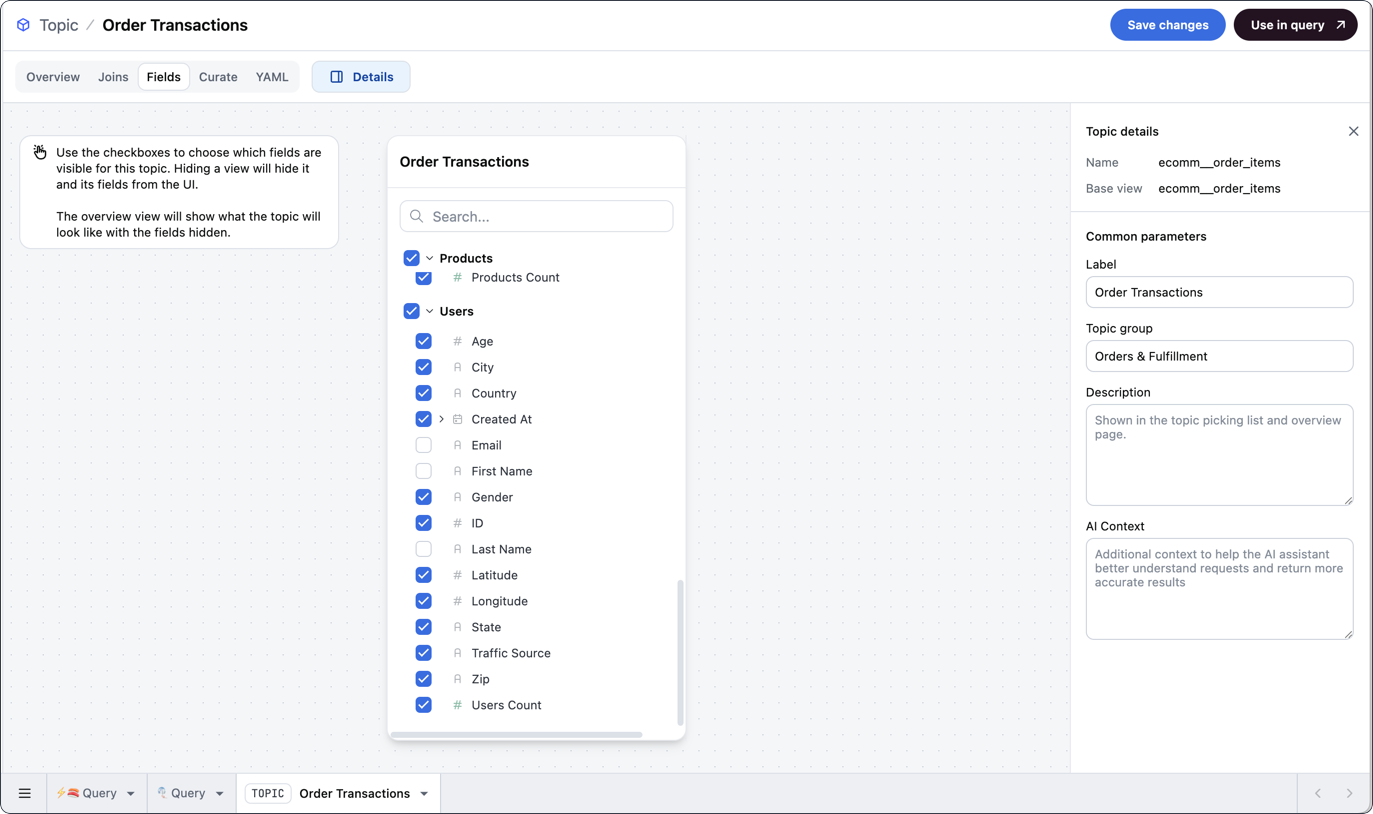
The **Fields** tab displays all the fields that are visible in the topic.
**To exclude a field**, deselect the checkbox next to the field:
The view browser allows you to search for and select views to include in the topic.
To add a brand new join - that is, one that is not already defined in your model's [relationships file](/modeling/relationships) - click the **+ New** button. You'll then be prompted to define and save the join.
**Don't lose your work!** Click the **Save changes** button located near the top-right corner of the IDE before navigating to a different file.
To add joins to a topic in the model IDE, use the [`joins`](/modeling/topics/parameters/joins) parameter in the topic file:
```yaml title="Topic-level join" highlight={2,5} theme={null}
joins:
ecomm__users: {}
ecomm__inventory_items:
ecomm__products:
ecomm__distribution_centers: {}
```
**Note**: The last table in each 'node' - specifically, tables that don't have children nested under them - must have an empty bracket pair: `{}`.
The joins you define will also display in the **Joins** tab of the workbook-based topic editor:
### 2.3. Add fields
By default, all fields from the topic's base view and any [joined views](#2-2-add-joins) will be accessible in the topic. In this step, we'll show you how to curate the fields in the topic.
The **Fields** tab displays all the fields that are visible in the topic.
**To exclude a field**, deselect the checkbox next to the field:
 **Don't lose your work!** Click the **Save changes** button located near the top-right corner of the IDE before navigating to a different file.
You can include and exclude fields in the model IDE by using the [`fields`](/modeling/topics/parameters/fields) parameter in the topic file.
For example, the following definition would make all fields accessible **except** the `email`, `first_name`, and `last_name` fields in the `ecomm__users` view:
```yaml title="Topic field curation" theme={null}
fields: [
all_views.*,
-ecomm__users.email,
-ecomm__users.first_name,
-ecomm__users.last_name
]
```
If you viewed this topic's **Fields** tab in the workbook topic editor, the excluded fields would be **unchecked**:
### 2.4. Curate views and fields
Adding context to a topic can be helpful for both your end users and Omni's AI. In this step, we'll show you how to further curate your topic by adding information to included views and fields.
The **Curate** tab allows you to bulk-add information - such as labels, descriptions, and AI context - to views and fields in the topic.
While working in a workbook query, you can also access these options for individual fields by right-clicking on a field and selecting **Edit**.
**Don't lose your work!** Click the **Save changes** button located near the top-right corner of the IDE before navigating to a different file.
You can include and exclude fields in the model IDE by using the [`fields`](/modeling/topics/parameters/fields) parameter in the topic file.
For example, the following definition would make all fields accessible **except** the `email`, `first_name`, and `last_name` fields in the `ecomm__users` view:
```yaml title="Topic field curation" theme={null}
fields: [
all_views.*,
-ecomm__users.email,
-ecomm__users.first_name,
-ecomm__users.last_name
]
```
If you viewed this topic's **Fields** tab in the workbook topic editor, the excluded fields would be **unchecked**:
### 2.4. Curate views and fields
Adding context to a topic can be helpful for both your end users and Omni's AI. In this step, we'll show you how to further curate your topic by adding information to included views and fields.
The **Curate** tab allows you to bulk-add information - such as labels, descriptions, and AI context - to views and fields in the topic.
While working in a workbook query, you can also access these options for individual fields by right-clicking on a field and selecting **Edit**.
 **Don't lose your work!** Click the **Save changes** button located near the top-right corner of the IDE before navigating to a different file.
Unlike the workbook-based topic editor, there isn't a way to bulk-add information to views and fields in the model IDE. Adding curation must currently be accomplished by opening and editing the view file for views included in the topic.
To get started, locate and click the view in the **Schema** browser. You can then add information to the view and its fields.
In the following example, we added:
* A view-level `description`
* A [`description`](/modeling/dimensions/parameters/description) and [`ai_context`](/modeling/dimensions/parameters/ai-context) to each of the view's [`dimensions`](/modeling/dimensions)
```yaml wrap title="Curating the distribution_centers view" theme={null}
# Reference this view as ecomm__distribution_centers
description: |
This is a dimension table containing information about distribution centers,
including a unique identifier, their name, which is actually their location in
the form of city name, and where they are located with regards to latitude and longitude
schema: ECOMM
table_name: DISTRIBUTION_CENTERS
dimensions:
id:
sql: '"ID"'
format: ID
description: Unique identifier for each distribution center
primary_key: true
ai_context: |
Often users will not pull this into a query directly and we should not include it
unless specifically requested.
name:
sql: '"NAME"'
description: Name of the distribution center
ai_context: This is the name of the city where the distribution center is located.
latitude:
sql: '"LATITUDE"'
description: Geographical latitude of the distribution center location
ai_context: will often be used in tandem with longitude for mapping purposes
longitude:
sql: '"LONGITUDE"'
description: Geographical longitude of the distribution center location
ai_context: will often be used in tandem with longitude for mapping purposes
measures:
count:
aggregate_type: count
```
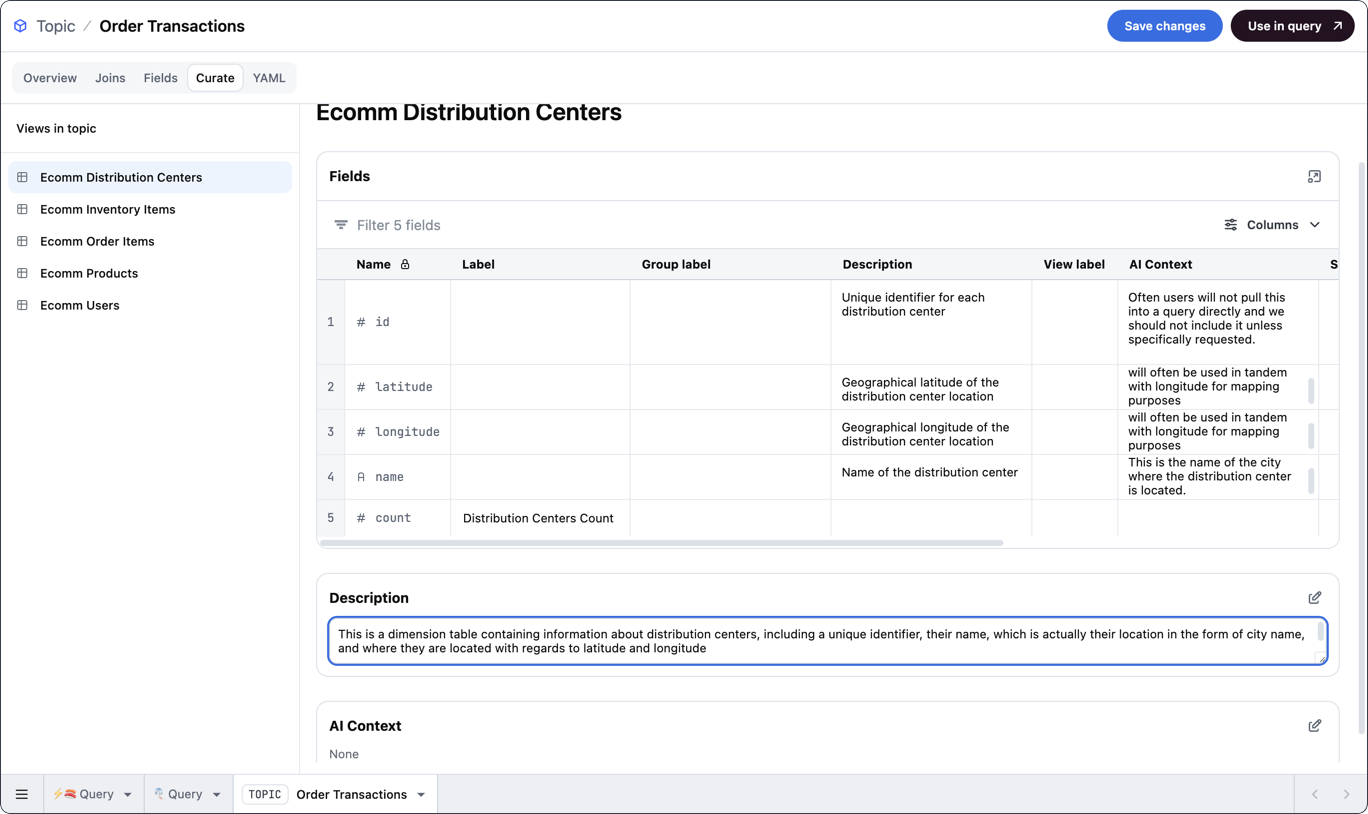
If you opened this view in the topic's **Curate** tab in the workbook topic editor, it would look like the following image:
Refer to the [Database view](/modeling/views), [Dimension](/modeling/dimensions), and [Measure references](/modeling/measures) for more information about all supported parameters.
## 3. Review and save
Next, you'll review and save the changes you made to the topic.
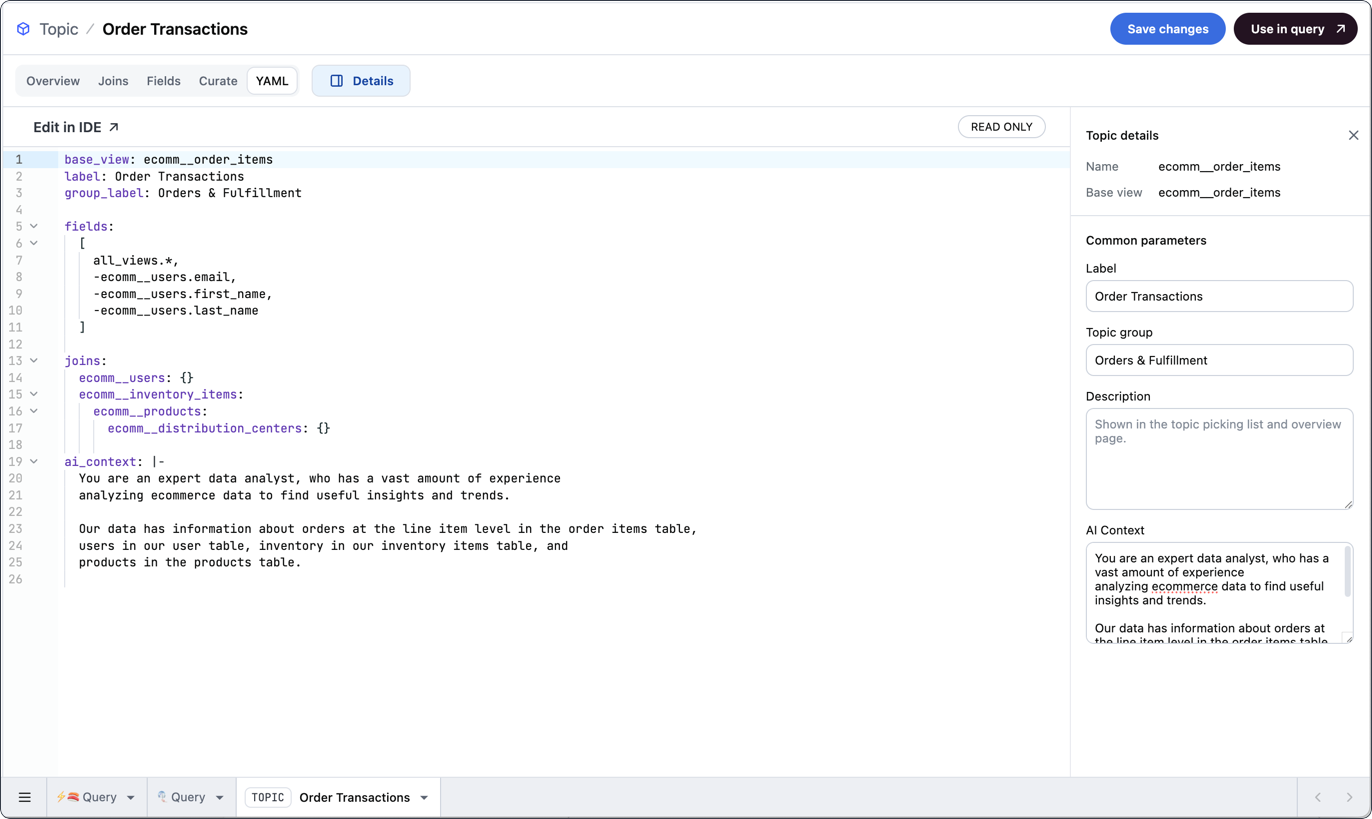
The **YAML** tab will automatically generate the YAML definition for the topic based on what you built in the other topic editor tabs. When finished, click **Save changes**.
In this tab, you can also:
* After saving, click **Use in query** to create a new workbook query based on the topic
* Click **Edit in IDE** to directly edit the topic's YAML configuration
**Don't lose your work!** Click the **Save changes** button located near the top-right corner of the IDE before navigating to a different file.
Unlike the workbook-based topic editor, there isn't a way to bulk-add information to views and fields in the model IDE. Adding curation must currently be accomplished by opening and editing the view file for views included in the topic.
To get started, locate and click the view in the **Schema** browser. You can then add information to the view and its fields.
In the following example, we added:
* A view-level `description`
* A [`description`](/modeling/dimensions/parameters/description) and [`ai_context`](/modeling/dimensions/parameters/ai-context) to each of the view's [`dimensions`](/modeling/dimensions)
```yaml wrap title="Curating the distribution_centers view" theme={null}
# Reference this view as ecomm__distribution_centers
description: |
This is a dimension table containing information about distribution centers,
including a unique identifier, their name, which is actually their location in
the form of city name, and where they are located with regards to latitude and longitude
schema: ECOMM
table_name: DISTRIBUTION_CENTERS
dimensions:
id:
sql: '"ID"'
format: ID
description: Unique identifier for each distribution center
primary_key: true
ai_context: |
Often users will not pull this into a query directly and we should not include it
unless specifically requested.
name:
sql: '"NAME"'
description: Name of the distribution center
ai_context: This is the name of the city where the distribution center is located.
latitude:
sql: '"LATITUDE"'
description: Geographical latitude of the distribution center location
ai_context: will often be used in tandem with longitude for mapping purposes
longitude:
sql: '"LONGITUDE"'
description: Geographical longitude of the distribution center location
ai_context: will often be used in tandem with longitude for mapping purposes
measures:
count:
aggregate_type: count
```
If you opened this view in the topic's **Curate** tab in the workbook topic editor, it would look like the following image:
Refer to the [Database view](/modeling/views), [Dimension](/modeling/dimensions), and [Measure references](/modeling/measures) for more information about all supported parameters.
## 3. Review and save
Next, you'll review and save the changes you made to the topic.
The **YAML** tab will automatically generate the YAML definition for the topic based on what you built in the other topic editor tabs. When finished, click **Save changes**.
In this tab, you can also:
* After saving, click **Use in query** to create a new workbook query based on the topic
* Click **Edit in IDE** to directly edit the topic's YAML configuration
 Some parameters - like default filters, cache policies, and access grants - can only be added to topics by using the model IDE. Refer to the [Topic parameter reference](/modeling/topics/parameters) for a list of all available topic parameters.
If not using a branch, changes will be automatically promoted to the shared model after every save. Use the [model history panel](/modeling/develop/history) to revert changes, if needed.
At this point, the example Orders Transactions (`ecomm__order_items`) topic file looks like this:
```yaml title="Example Order Transactions topic" theme={null}
base_view: ecomm__order_items
label: Order Transactions
group_label: Orders & Fulfillment
ai_context: |
You are an expert data analyst, who has a vast amount of experience analyzing ecommerce data to find useful insights and trends.
Our data has information about orders at the line item level in the order items table, users in our user table, inventory in our inventory items table, and products in the products table.
joins:
ecomm__users: {}
ecomm__inventory_items:
ecomm__products:
ecomm__distribution_centers: {}
fields: [
all_views.*,
-ecomm__users.email,
-ecomm__users.first_name,
-ecomm__users.last_name
]
```
When you're finished making changes to the topic, click the **Save changes** button located near the top-right corner of the IDE.
## 4. Promote to shared
This step requires **Connection Admin** or **Modeler** permissions.
The last step is to promote the topic to the shared model. This makes the topic accessible in [new and existing workbooks](/analyze-explore/queries/topics) that are built off the underlying model.
How you promote the topic depends on whether you used a branch:
If you didn't use a branch and you created the topic:
* **In a workbook** - While in a **published** workbook, navigate to [**Model > View & promote**](/modeling/develop/promotion).
* **If you see a `Use branch to promote` message**:
* **And you're in a draft**, click **File > Move to branch**. This will move the changes to a branch.
* **Otherwise**, click **Model > Branch > Create branch** to create a new branch in the workbook with the changes.
* **Otherwise**, click **Promote to shared**.
* **In the IDE** - Your changes were promoted to the shared model when you clicked **Save changes**. You're all done!
[Promotion from a branch to shared](/content/develop/branch-mode) depends on whether the model is connected to git and pull requests are required:
* **If git isn't enabled or pull requests aren't required**, click the **Merge** button in the green branch header at the top of the page. Follow the prompts to merge the branch.
* **Otherwise,** click the **Create pull request** button in the green branch header at the top of the page. This will open the connected git repository, where you'll be prompted to create the pull request. The changes in the branch will be applied to the shared model once the pull request is merged.
Built with [Mintlify](https://mintlify.com).
Some parameters - like default filters, cache policies, and access grants - can only be added to topics by using the model IDE. Refer to the [Topic parameter reference](/modeling/topics/parameters) for a list of all available topic parameters.
If not using a branch, changes will be automatically promoted to the shared model after every save. Use the [model history panel](/modeling/develop/history) to revert changes, if needed.
At this point, the example Orders Transactions (`ecomm__order_items`) topic file looks like this:
```yaml title="Example Order Transactions topic" theme={null}
base_view: ecomm__order_items
label: Order Transactions
group_label: Orders & Fulfillment
ai_context: |
You are an expert data analyst, who has a vast amount of experience analyzing ecommerce data to find useful insights and trends.
Our data has information about orders at the line item level in the order items table, users in our user table, inventory in our inventory items table, and products in the products table.
joins:
ecomm__users: {}
ecomm__inventory_items:
ecomm__products:
ecomm__distribution_centers: {}
fields: [
all_views.*,
-ecomm__users.email,
-ecomm__users.first_name,
-ecomm__users.last_name
]
```
When you're finished making changes to the topic, click the **Save changes** button located near the top-right corner of the IDE.
## 4. Promote to shared
This step requires **Connection Admin** or **Modeler** permissions.
The last step is to promote the topic to the shared model. This makes the topic accessible in [new and existing workbooks](/analyze-explore/queries/topics) that are built off the underlying model.
How you promote the topic depends on whether you used a branch:
If you didn't use a branch and you created the topic:
* **In a workbook** - While in a **published** workbook, navigate to [**Model > View & promote**](/modeling/develop/promotion).
* **If you see a `Use branch to promote` message**:
* **And you're in a draft**, click **File > Move to branch**. This will move the changes to a branch.
* **Otherwise**, click **Model > Branch > Create branch** to create a new branch in the workbook with the changes.
* **Otherwise**, click **Promote to shared**.
* **In the IDE** - Your changes were promoted to the shared model when you clicked **Save changes**. You're all done!
[Promotion from a branch to shared](/content/develop/branch-mode) depends on whether the model is connected to git and pull requests are required:
* **If git isn't enabled or pull requests aren't required**, click the **Merge** button in the green branch header at the top of the page. Follow the prompts to merge the branch.
* **Otherwise,** click the **Create pull request** button in the green branch header at the top of the page. This will open the connected git repository, where you'll be prompted to create the pull request. The changes in the branch will be applied to the shared model once the pull request is merged.
Built with [Mintlify](https://mintlify.com).