> ## Documentation Index
> Fetch the complete documentation index at: https://docs.omni.co/llms.txt
> Use this file to discover all available pages before exploring further.
# Creating table joins
> Create table joins in Omni workbooks or the model IDE, configure join types and conditions, and promote joins to the shared model.
## Creating joins in the workbook
Unless promoted to the shared model, joins created in workbooks will only be available in the workbook where they were created.
Queriers can create joins in workbooks, but Modeler or Connection Admin permissions are required for promotion.
In the field browser, right-click on a table and select **Joins > New join**. This opens the join builder:
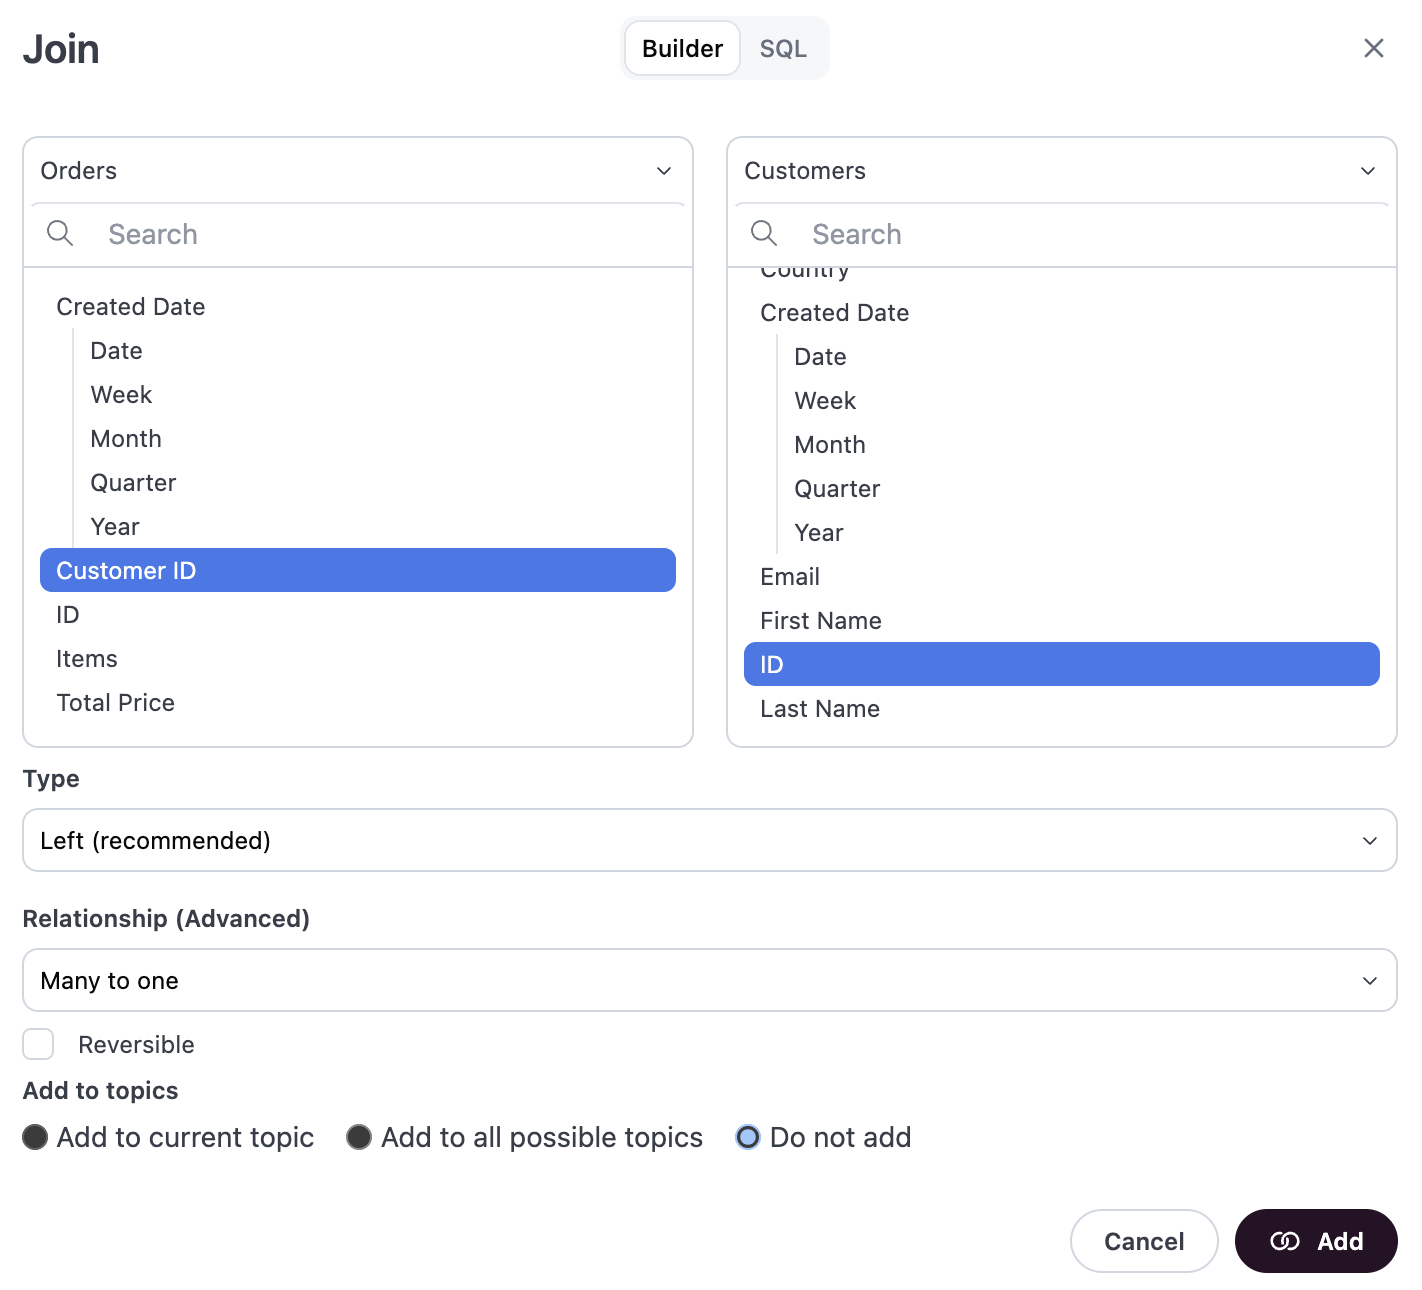 From here, you can use the **Builder** or **SQL** tabs to define the join:
The left and right sides of the **Builder tab** represent the views you want to join. On each side, select the fields that should be used to join the views.
For example, selecting `orders.customer_id` and `customers.id`.
Select a **Type** to define what type of join this is. Omni defaults to **Left** (`LEFT JOIN`), but you can change this. Refer to the [`join_type`](/modeling/relationships/parameters/join-type) reference for more information about this setting.
Select a **Relationship** for the join. This setting is used to ensure that counts across the tables are accurate. If you're not sure what this setting should be, click the **Infer relationship** button at the bottom left corner of the modal.
Omni will check the cardinality between the datasets and select the relationship type on your behalf. Refer to the [`relationship_type`](/modeling/relationships/parameters/relationship-type) reference for more information about this setting.
Check the **Reversible** box allow for exploration in both directions of the join.
This setting controls how fan out is handled and thus impacts the shape of result sets. Refer to the [`reversible`](/modeling/relationships/parameters/reversible) reference for more information.
Use the **Add to topic** settings to select if the join should be added to the current topic, all possible topics, or not added.
Click **Save** to create the join.
The **SQL** tab is useful if you're creating a complex join or just prefer writing in SQL:
From here, you can use the **Builder** or **SQL** tabs to define the join:
The left and right sides of the **Builder tab** represent the views you want to join. On each side, select the fields that should be used to join the views.
For example, selecting `orders.customer_id` and `customers.id`.
Select a **Type** to define what type of join this is. Omni defaults to **Left** (`LEFT JOIN`), but you can change this. Refer to the [`join_type`](/modeling/relationships/parameters/join-type) reference for more information about this setting.
Select a **Relationship** for the join. This setting is used to ensure that counts across the tables are accurate. If you're not sure what this setting should be, click the **Infer relationship** button at the bottom left corner of the modal.
Omni will check the cardinality between the datasets and select the relationship type on your behalf. Refer to the [`relationship_type`](/modeling/relationships/parameters/relationship-type) reference for more information about this setting.
Check the **Reversible** box allow for exploration in both directions of the join.
This setting controls how fan out is handled and thus impacts the shape of result sets. Refer to the [`reversible`](/modeling/relationships/parameters/reversible) reference for more information.
Use the **Add to topic** settings to select if the join should be added to the current topic, all possible topics, or not added.
Click **Save** to create the join.
The **SQL** tab is useful if you're creating a complex join or just prefer writing in SQL:
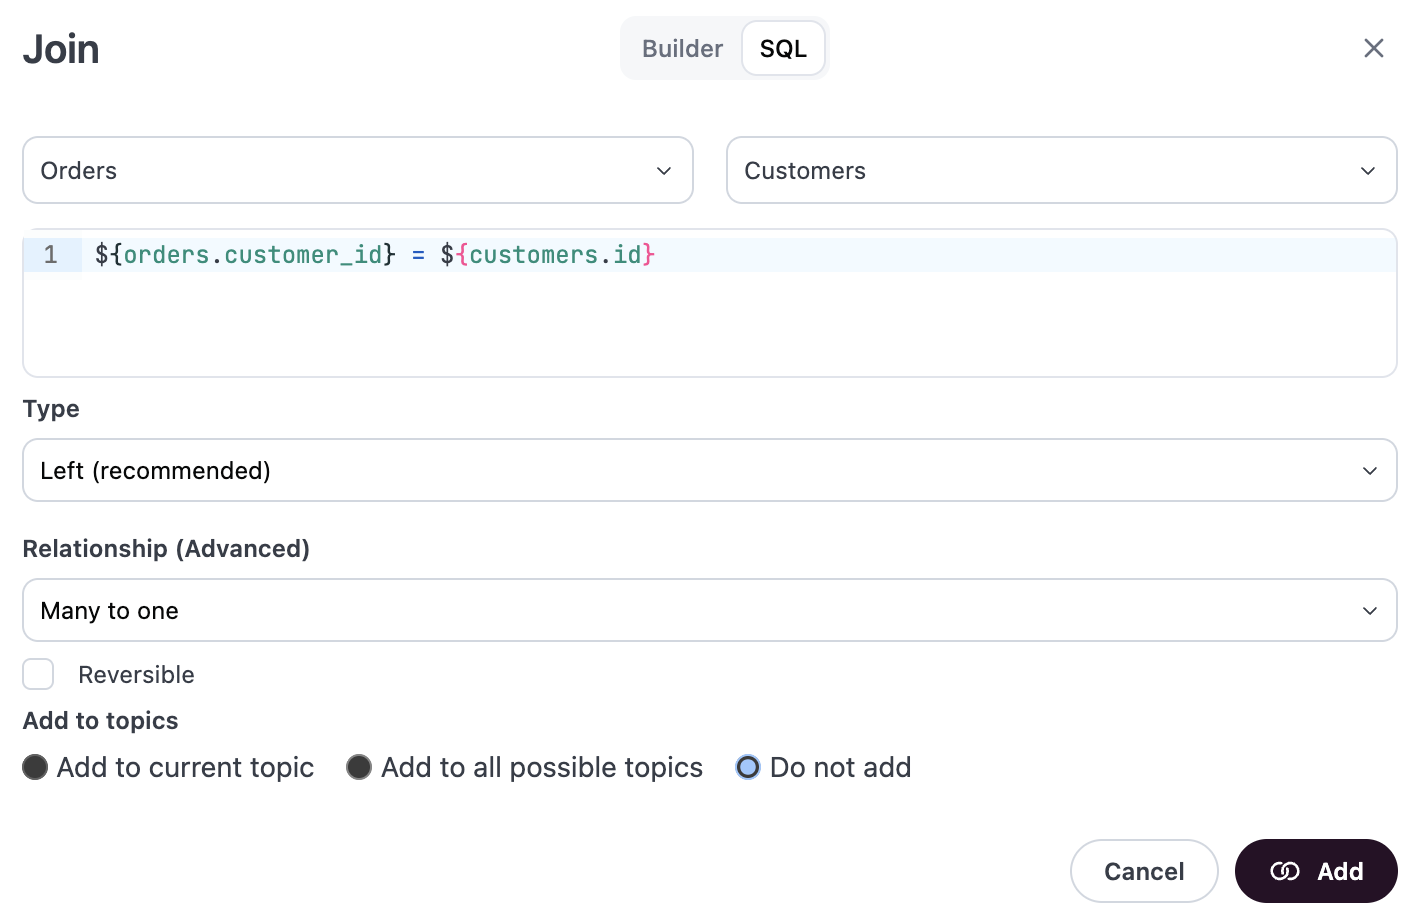 Select the source and target views using the dropdowns.
In the code block, write the join using SQL. Use `${view_name.field_name}` syntax to reference fields.
Select a **Type** to define what type of join this is. Omni defaults to **Left** (`LEFT JOIN`), but you can change this. Refer to the [`join_type`](/modeling/relationships/parameters/join-type) reference for more information about this setting.
Select a **Relationship** for the join. This setting is used to ensure that counts across the tables are accurate. If you're not sure what this setting should be, click the **Infer relationship** button at the bottom left corner of the modal.
Omni will check the cardinality between the datasets and select the relationship type on your behalf. Refer to the [`relationship_type`](/modeling/relationships/parameters/relationship-type) reference for more information about this setting.
Check the **Reversible** box allow for exploration in both directions of the join.
This setting controls how fan out is handled and thus impacts the shape of result sets. Refer to the [`reversible`](/modeling/relationships/parameters/reversible) reference for more information.
Use the **Add to topic** settings to select if the join should be added to the current topic, all possible topics, or not added.
Click **Save** to create the join.
Saving the join will add a new relationship definition to the workbook model's `relationships` file, which you can view by clicking **Model > Model layers > Workbook**.
[Promote the join](/modeling/develop/model-management) to the shared model to make it accessible outside the workbook.
## Defining relationships in the model IDE
Connection Admin or Modeler permissions are required to access the model IDE.
For a code-forward approach, you can use the model IDE to create and modify joins.
Open the model IDE by clicking **Develop** in the left navigation, then clicking the model you want to work with.
In the **Settings** section, click **Relationships**.
The `relationships` file will open in the editor panel. Add a relationship definition, which will look similar to the following example:
```yaml Example definition theme={null}
- join_from_view: main__orders
join_to_view: main__customers
join_type: always_left
on_sql: ${main__orders.customer_id} = ${main__customers.id}
relationship_type: assumed_many_to_one
```
```yaml Template theme={null}
- join_from_view:
join_to_view:
join_type:
on_sql:
relationship_type:
```
Click the **Template** tab in the above code block for a copy + pasteable relationship definition!
Define the parameters to complete the join. In addition to the parameters in the above example and template, you can add parameters like [`where_sql`](/modeling/relationships/parameters/where-sql) or [`reversible`](/modeling/relationships/parameters/reversible) to further customize the relationship. Refer to the [Relationship parameters reference](/modeling/relationships/parameters/parameters) for more information and examples.
Click **Save changes**.
If the model is currently configured to require branches, merge the branch to apply the changes to the shared model.
If the model also uses the git integration, you may need to create a pull request to accomplish this.
Select the source and target views using the dropdowns.
In the code block, write the join using SQL. Use `${view_name.field_name}` syntax to reference fields.
Select a **Type** to define what type of join this is. Omni defaults to **Left** (`LEFT JOIN`), but you can change this. Refer to the [`join_type`](/modeling/relationships/parameters/join-type) reference for more information about this setting.
Select a **Relationship** for the join. This setting is used to ensure that counts across the tables are accurate. If you're not sure what this setting should be, click the **Infer relationship** button at the bottom left corner of the modal.
Omni will check the cardinality between the datasets and select the relationship type on your behalf. Refer to the [`relationship_type`](/modeling/relationships/parameters/relationship-type) reference for more information about this setting.
Check the **Reversible** box allow for exploration in both directions of the join.
This setting controls how fan out is handled and thus impacts the shape of result sets. Refer to the [`reversible`](/modeling/relationships/parameters/reversible) reference for more information.
Use the **Add to topic** settings to select if the join should be added to the current topic, all possible topics, or not added.
Click **Save** to create the join.
Saving the join will add a new relationship definition to the workbook model's `relationships` file, which you can view by clicking **Model > Model layers > Workbook**.
[Promote the join](/modeling/develop/model-management) to the shared model to make it accessible outside the workbook.
## Defining relationships in the model IDE
Connection Admin or Modeler permissions are required to access the model IDE.
For a code-forward approach, you can use the model IDE to create and modify joins.
Open the model IDE by clicking **Develop** in the left navigation, then clicking the model you want to work with.
In the **Settings** section, click **Relationships**.
The `relationships` file will open in the editor panel. Add a relationship definition, which will look similar to the following example:
```yaml Example definition theme={null}
- join_from_view: main__orders
join_to_view: main__customers
join_type: always_left
on_sql: ${main__orders.customer_id} = ${main__customers.id}
relationship_type: assumed_many_to_one
```
```yaml Template theme={null}
- join_from_view:
join_to_view:
join_type:
on_sql:
relationship_type:
```
Click the **Template** tab in the above code block for a copy + pasteable relationship definition!
Define the parameters to complete the join. In addition to the parameters in the above example and template, you can add parameters like [`where_sql`](/modeling/relationships/parameters/where-sql) or [`reversible`](/modeling/relationships/parameters/reversible) to further customize the relationship. Refer to the [Relationship parameters reference](/modeling/relationships/parameters/parameters) for more information and examples.
Click **Save changes**.
If the model is currently configured to require branches, merge the branch to apply the changes to the shared model.
If the model also uses the git integration, you may need to create a pull request to accomplish this.