> ## Documentation Index
> Fetch the complete documentation index at: https://docs.omni.co/llms.txt
> Use this file to discover all available pages before exploring further.

# Point-in-time snapshots with parameters

> How to use Mustache syntax to dynamically modify a query view

export const categoryIcons = {
  'administration': 'lock',
  'api': 'terminal',
  'connections': 'database',
  'dashboards': 'table-columns',
  'embed': 'code',
  'errors': 'exclamation',
  'modeling': 'wrench',
  'patterns': 'plus',
  'schedules & alerts': 'envelope',
  'visualizations': 'chart-column',
  'workbooks': 'book'
};

export const GuideSidebar = ({category, relatedLinks, updatedDate}) => {
  const [progress, setProgress] = React.useState(0);
  React.useEffect(() => {
    const sidebar = document.querySelector('.guide-sidebar');
    if (!sidebar) return;
    let container = sidebar.parentElement;
    while (container && !container.querySelector('.guide-header')) {
      container = container.parentElement;
    }
    if (container && !container.classList.contains('guide-page-layout')) {
      container.classList.add('guide-page-layout');
    }
  }, []);
  React.useEffect(() => {
    const handleScroll = () => {
      const scrollTop = window.scrollY;
      const docHeight = document.documentElement.scrollHeight - window.innerHeight;
      const scrollPercent = docHeight > 0 ? scrollTop / docHeight * 100 : 0;
      setProgress(Math.min(100, Math.max(0, scrollPercent)));
    };
    window.addEventListener('scroll', handleScroll, {
      passive: true
    });
    handleScroll();
    return () => window.removeEventListener('scroll', handleScroll);
  }, []);
  const icon = category ? categoryIcons[category.toLowerCase()] || 'book' : 'book';
  return <aside className="guide-sidebar">
      <div className="guide-sidebar-content">
        <a href="/guides" className="guide-sidebar-back">
          <Icon icon="arrow-left" iconType="solid" size={14} />
          <span>All guides</span>
        </a>

        <div className="guide-sidebar-section">
          <div className="guide-sidebar-label">Progress</div>
          <div className="guide-sidebar-progress">
            <div className="guide-mascot">
              <svg viewBox="0 0 450 450" width="48" height="48">
                <defs>
                  <clipPath id="progressClip">
                    <rect x="0" y={450 - progress * 4.5} width="450" height={progress * 4.5} />
                  </clipPath>
                  <linearGradient id="blobbyGradient" x1="55.9753" y1="0" x2="492.197" y2="169.724" gradientUnits="userSpaceOnUse">
                    <stop stopColor="#BCA2F3" />
                    <stop offset="0.572917" stopColor="#FF7AA2" />
                    <stop offset="1" stopColor="#F3D4A2" />
                  </linearGradient>
                </defs>

                {}
                <circle cx="223.901" cy="223.901" r="213.901" transform="matrix(-0.999988 -0.0049013 0.00491945 -0.999988 447.797 449.992)" fill="#FAFAFA" stroke="#480B38" strokeWidth="20" />

                {}
                <circle cx="223.901" cy="223.901" r="213.901" transform="matrix(-0.999988 -0.0049013 0.00491945 -0.999988 447.797 449.992)" fill="url(#blobbyGradient)" stroke="#480B38" strokeWidth="20" clipPath="url(#progressClip)" />

                {}
                <path d="M310.41 195.084C310.41 200.052 301.362 212.472 284.328 212.472C266.585 212.472 258.246 201.294 258.246 195.912" stroke="#480B38" strokeWidth="17.3883" strokeMiterlimit="1.33344" strokeLinecap="round" />
                <circle cx="21.168" cy="21.168" r="21.168" transform="matrix(-1 0 0 1 388.658 169.001)" fill="#480B38" />
                <circle cx="21.168" cy="21.168" r="21.168" transform="matrix(-1 0 0 1 223.467 169.001)" fill="#480B38" />
              </svg>
            </div>
            <span className="guide-sidebar-progress-text">{Math.round(progress)}%</span>
          </div>
        </div>

        {category && <div className="guide-sidebar-section">
            <div className="guide-sidebar-label">Category</div>
            <div className="guide-sidebar-category">
              <Icon icon={icon} iconType="solid" size={14} />
              <span>{category}</span>
            </div>
          </div>}

        {updatedDate && <div className="guide-sidebar-section">
            <div className="guide-sidebar-label">Last updated</div>
            <div className="guide-sidebar-date">{updatedDate}</div>
          </div>}

        {relatedLinks && relatedLinks.length > 0 && <div className="guide-sidebar-section">
            <div className="guide-sidebar-label">Related</div>
            <ul className="guide-sidebar-links">
              {relatedLinks.map((link, index) => <li key={index}>
                  <a href={link.href}>{link.title}</a>
                </li>)}
            </ul>
          </div>}
      </div>
    </aside>;
};

export const GuideTitle = ({title}) => {
  return <div className="guide-header">
      <h1 className="guide-title">{title}</h1>
    </div>;
};

<GuideSidebar categoryIcons={categoryIcons} category="workbooks" updatedDate="February 2026" />

<GuideTitle title="Point-in-time snapshots with parameters" />

Sometimes you need to answer "as of" questions like *Which reservations were active last Tuesday?* or *What did our pipeline look like at quarter-end?* This guide shows how to build a parameterized query view that filters data to a specific point in time — and allows users to pick that date themselves.

## Requirements

To follow the steps in this guide, you'll need:

* A table with start and end date (or datetime) fields — for example, `check_in_date` and `check_out_date`
* Access to the model in your Omni instance

## How it works

A [query view](/modeling/query-views) is a SQL view defined in the model that can accept parameter values at query time. Instead of hardcoding a date in SQL, the selected date is injected directly into the `WHERE` clause. When the user changes the parameter, the query view regenerates automatically.

```sql The core pattern theme={null}
WHERE {{filters.your_view_name.snapshot_date.value}}::DATE
      >= your_table.start_date::DATE
  AND {{filters.your_view_name.snapshot_date.value}}::DATE
      < your_table.end_date::DATE
```

In the above example,  only the records that were "active" on the selected date will be returned, meaning they had started but not yet ended.

<Note>
  The `::DATE` cast strips time information from your timestamps. This prevents mismatches when your datetime fields include time components like `2024-02-15 14:30:00`
</Note>

## Set up the query view

<Steps>
  <Step title="Define the query view">
    1. In the workbook, create the query from a new SQL tab. Once the query is created, save as query view.  *Note: This particular pattern focuses on SQL based query views*
    2. Define a filter parameter for the snapshot date. The syntax for injecting parameter values follows this pattern:

       ```sql theme={null}
       {{ filters.<view_name>.<parameter_name>.value }}
       ```

       For example, if the view is named `snapshots` and the parameter is `snapshot_date`:

       ```sql theme={null}
       {{ filters.snapshots.snapshot_date.value }}::DATE
       ```

           <Warning>
             Verify that the filter parameter syntax is correct, including that the view name and parameter name match exactly. Incorrect syntax is the most common cause for issues.
           </Warning>
    3. Using the above-mentioned syntax, add the newly created parameter to the query view's SQL to inject the parameter's value.  When building the `WHERE` clause, use `<` (not `<=`) for the end date comparison. For example, a reservation that checks out on Feb 17th shouldn't appear in a Feb 17th snapshot.

       ```yaml snapshots.query.view {4,6,14,15,16,17} theme={null}
       sql: |
         SELECT *
         FROM your_schema.your_table
         WHERE {{filters.snapshots.snapshot_date.value}}::DATE
               >= your_table.start_date::DATE
           AND {{filters.snapshots.snapshot_date.value}}::DATE
               < your_table.end_date::DATE

       dimensions:
         reservation_date: {}
         check_in_datetime: {}
         check_out_datetime: {}
       ## etc...
       filters:
         snapshot_date:
           type: timestamp
           description: "The date to snapshot active records"
       ```

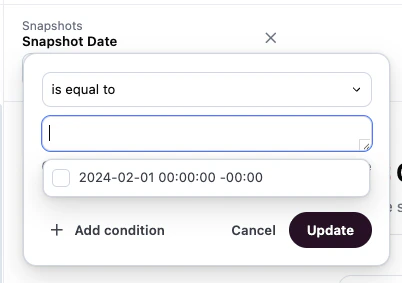
       You can also suggest from a list of timestamps using `suggestion_list` or optionally set a value as the default filter, for example:

       ```yaml theme={null}
       filters:
         snapshot_date:
           type: string
           suggestion_list:
             - value: 2024-02-01 00:00:00 -00:00
           default_filter:
             is: 2024-02-01 00:00:00 -00:00
       ```

       Which would then look like this in the workbook:

           <img src="https://mintcdn.com/omni-e7402367/1-Z4_hCo1DbYJhNT/guides/workbooks/images/snapsnot-date-set-filter.png?fit=max&auto=format&n=1-Z4_hCo1DbYJhNT&q=85&s=8df7cbb97ac8335f72c1eebd4cca528a" alt="" width="402" height="283" data-path="guides/workbooks/images/snapsnot-date-set-filter.png" />
  </Step>

  <Step title="Add the view to your topic">
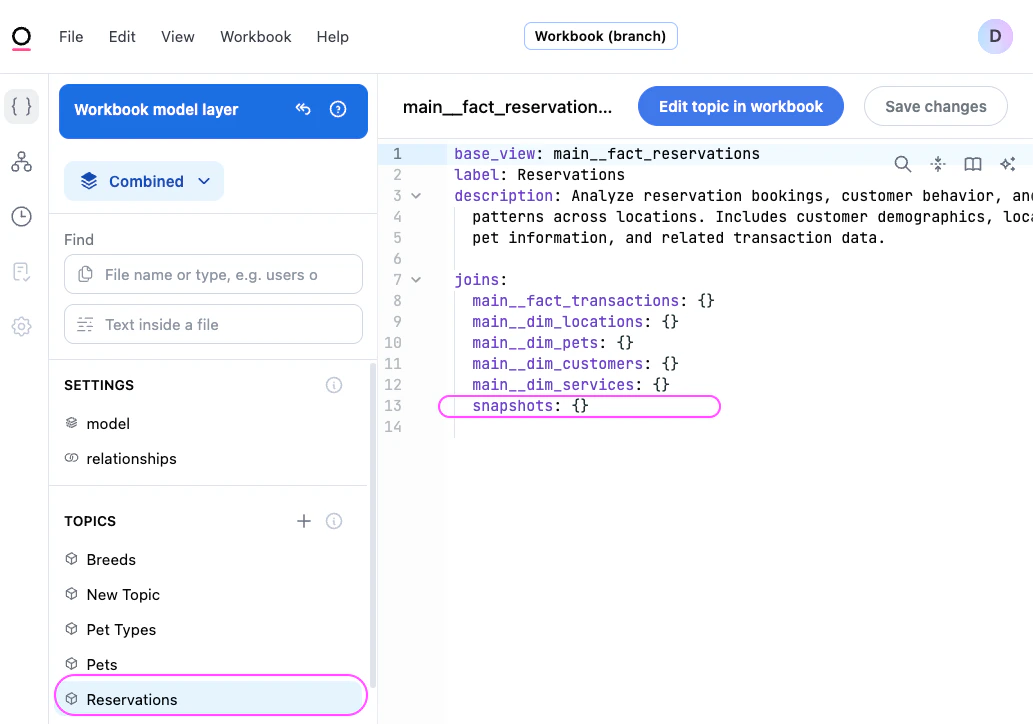
    In the topic file, add the query view as a join (as shown) or include it as a standalone view so users can access it in workbooks:

    <Frame>
      <img src="https://mintcdn.com/omni-e7402367/kfzFayBn7aXXPk1S/images/image-4.png?fit=max&auto=format&n=kfzFayBn7aXXPk1S&q=85&s=37646ecb395a43d85bf01dcbdb3b6e53" alt="Image" width="1033" height="724" data-path="images/image-4.png" />
    </Frame>
  </Step>

  <Step title="Test the snapshot">
    1. Open a workbook and navigate to your topic.
    2. Add the `snapshot_date` parameter filter to the query.
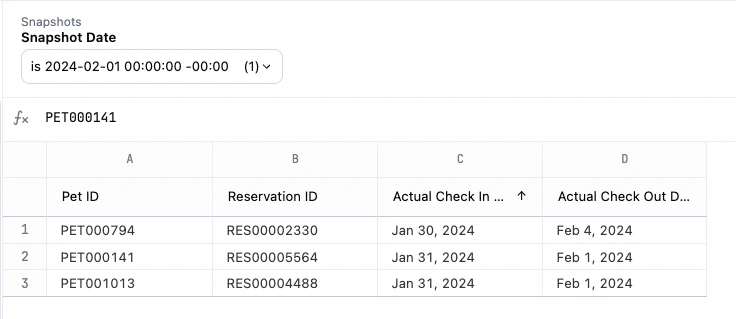
    3. Enter a date into the filter and run the query. You should see only the records that were active on that date:

           <img src="https://mintcdn.com/omni-e7402367/1-Z4_hCo1DbYJhNT/guides/workbooks/images/snapshot-date-query-results.png?fit=max&auto=format&n=1-Z4_hCo1DbYJhNT&q=85&s=901d62fcefcec023d823c40197b9fe52" alt="" width="736" height="319" data-path="guides/workbooks/images/snapshot-date-query-results.png" />

    If counts look off, check that you're using `count_distinct` on your ID field — without it, records that span multiple days can be counted more than once.
  </Step>
</Steps>

## Bonus: Populate the date picker with a list of dates

By default, the `snapshot_date` parameter accepts free-text input. If you want users to select from a list of valid dates instead, you can use `suggest_field` to populate the dropdown from a calendar view.

<Steps>
  <Step title="Create a calendar view">
    A calendar view is a query view that generates a list of dates. Most databases support a recursive CTE approach:

    <Note>
      The SQL syntax for recursive CTEs varies by database. Click the tab for your database to view the correct SQL.
    </Note>

    <CodeGroup>
      ```yaml Snowflake theme={null}
      # calendar.query.view
      sql: |
        WITH RECURSIVE dates AS (
          SELECT '2020-01-01'::TIMESTAMP AS date
          UNION ALL
          SELECT DATEADD(day, 1, date) AS date
          FROM dates
          WHERE date < '2029-12-31'::TIMESTAMP
        )
        SELECT date FROM dates

      dimensions:
        date:
          sql: ${date}
          type: date
      ```

      ```yaml DuckDB theme={null}
      # calendar.query.view
      sql: |
        WITH RECURSIVE rec_cte AS (
          SELECT '2020-01-01'::TIMESTAMP AS DATE
          UNION ALL
          SELECT DATE + INTERVAL '1 day'
          FROM rec_cte
          WHERE DATE < '2029-12-31'::TIMESTAMP
        )
        SELECT DATE FROM rec_cte

      dimensions:
        date:
          sql: '"DATE"'
          type: date
      ```

      ```yaml Google BigQuery theme={null}
      # calendar.query.view
      sql: |
        SELECT date
        FROM UNNEST(
          GENERATE_DATE_ARRAY('2020-01-01', '2029-12-31', INTERVAL 1 DAY)
        ) AS date

      dimensions:
        date:
          sql: "'date'"
          type: date
      ```

      ```yaml Postgres theme={null}
      # calendar.query.view
      sql: |
        SELECT generate_series::DATE AS DATE
        FROM generate_series(
          '2020-01-01'::TIMESTAMP,
          '2029-12-31'::TIMESTAMP,
          INTERVAL '1 day'
        )

      dimensions:
        date:
          sql: "'DATE'"
          type: date
      ```
    </CodeGroup>
  </Step>

  <Step title="Point parameter at the calendar">
    Update the snapshot parameter to pull suggestions from the calendar view:

    ```yaml theme={null}
    filters:
      snapshot_date:
        type: timestamp
        description: "The date to snapshot active records"
        suggest_field: calendar.date
    ```

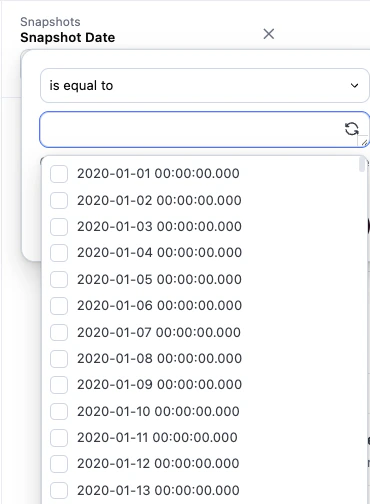
    Now when users click the `snapshot_date` parameter, they'll see a dropdown populated with dates from your calendar view instead of a blank text field or suggestions from the specific `suggestion_list`.

    <img src="https://mintcdn.com/omni-e7402367/1-Z4_hCo1DbYJhNT/guides/workbooks/images/snapshot-date-calendar-view-list.png?fit=max&auto=format&n=1-Z4_hCo1DbYJhNT&q=85&s=418e7caff01751c97a08073605960a6c" alt="" width="370" height="504" data-path="guides/workbooks/images/snapshot-date-calendar-view-list.png" />
  </Step>
</Steps>
