> ## Documentation Index
> Fetch the complete documentation index at: https://docs.omni.co/llms.txt
> Use this file to discover all available pages before exploring further.

# Embedding Omni in your Salesforce instance

> Embed static and dynamic Omni dashboards in Salesforce using Visualforce pages and tabs.

export const categoryIcons = {
  'administration': 'lock',
  'api': 'terminal',
  'connections': 'database',
  'dashboards': 'table-columns',
  'embed': 'code',
  'errors': 'exclamation',
  'modeling': 'wrench',
  'patterns': 'plus',
  'schedules & alerts': 'envelope',
  'visualizations': 'chart-column',
  'workbooks': 'book'
};

export const GuideSidebar = ({category, relatedLinks, updatedDate}) => {
  const [progress, setProgress] = React.useState(0);
  React.useEffect(() => {
    const sidebar = document.querySelector('.guide-sidebar');
    if (!sidebar) return;
    let container = sidebar.parentElement;
    while (container && !container.querySelector('.guide-header')) {
      container = container.parentElement;
    }
    if (container && !container.classList.contains('guide-page-layout')) {
      container.classList.add('guide-page-layout');
    }
  }, []);
  React.useEffect(() => {
    const handleScroll = () => {
      const scrollTop = window.scrollY;
      const docHeight = document.documentElement.scrollHeight - window.innerHeight;
      const scrollPercent = docHeight > 0 ? scrollTop / docHeight * 100 : 0;
      setProgress(Math.min(100, Math.max(0, scrollPercent)));
    };
    window.addEventListener('scroll', handleScroll, {
      passive: true
    });
    handleScroll();
    return () => window.removeEventListener('scroll', handleScroll);
  }, []);
  const icon = category ? categoryIcons[category.toLowerCase()] || 'book' : 'book';
  return <aside className="guide-sidebar">
      <div className="guide-sidebar-content">
        <a href="/guides" className="guide-sidebar-back">
          <Icon icon="arrow-left" iconType="solid" size={14} />
          <span>All guides</span>
        </a>

        <div className="guide-sidebar-section">
          <div className="guide-sidebar-label">Progress</div>
          <div className="guide-sidebar-progress">
            <div className="guide-mascot">
              <svg viewBox="0 0 450 450" width="48" height="48">
                <defs>
                  <clipPath id="progressClip">
                    <rect x="0" y={450 - progress * 4.5} width="450" height={progress * 4.5} />
                  </clipPath>
                  <linearGradient id="blobbyGradient" x1="55.9753" y1="0" x2="492.197" y2="169.724" gradientUnits="userSpaceOnUse">
                    <stop stopColor="#BCA2F3" />
                    <stop offset="0.572917" stopColor="#FF7AA2" />
                    <stop offset="1" stopColor="#F3D4A2" />
                  </linearGradient>
                </defs>

                {}
                <circle cx="223.901" cy="223.901" r="213.901" transform="matrix(-0.999988 -0.0049013 0.00491945 -0.999988 447.797 449.992)" fill="#FAFAFA" stroke="#480B38" strokeWidth="20" />

                {}
                <circle cx="223.901" cy="223.901" r="213.901" transform="matrix(-0.999988 -0.0049013 0.00491945 -0.999988 447.797 449.992)" fill="url(#blobbyGradient)" stroke="#480B38" strokeWidth="20" clipPath="url(#progressClip)" />

                {}
                <path d="M310.41 195.084C310.41 200.052 301.362 212.472 284.328 212.472C266.585 212.472 258.246 201.294 258.246 195.912" stroke="#480B38" strokeWidth="17.3883" strokeMiterlimit="1.33344" strokeLinecap="round" />
                <circle cx="21.168" cy="21.168" r="21.168" transform="matrix(-1 0 0 1 388.658 169.001)" fill="#480B38" />
                <circle cx="21.168" cy="21.168" r="21.168" transform="matrix(-1 0 0 1 223.467 169.001)" fill="#480B38" />
              </svg>
            </div>
            <span className="guide-sidebar-progress-text">{Math.round(progress)}%</span>
          </div>
        </div>

        {category && <div className="guide-sidebar-section">
            <div className="guide-sidebar-label">Category</div>
            <div className="guide-sidebar-category">
              <Icon icon={icon} iconType="solid" size={14} />
              <span>{category}</span>
            </div>
          </div>}

        {updatedDate && <div className="guide-sidebar-section">
            <div className="guide-sidebar-label">Last updated</div>
            <div className="guide-sidebar-date">{updatedDate}</div>
          </div>}

        {relatedLinks && relatedLinks.length > 0 && <div className="guide-sidebar-section">
            <div className="guide-sidebar-label">Related</div>
            <ul className="guide-sidebar-links">
              {relatedLinks.map((link, index) => <li key={index}>
                  <a href={link.href}>{link.title}</a>
                </li>)}
            </ul>
          </div>}
      </div>
    </aside>;
};

export const GuideTitle = ({title}) => {
  return <div className="guide-header">
      <h1 className="guide-title">{title}</h1>
    </div>;
};

<GuideSidebar
  categoryIcons={categoryIcons}
  category="embed"
  updatedDate="April 2026"
  relatedLinks={[
{ title: "Embedding docs", href: "/embed" },
{ title: "Embedding in internal apps", href: "/guides/embed/omni-in-internal-app" },
{ title: "Embedding in Notion", href: "/guides/embed/omni-in-notion" }
]}
/>

<GuideTitle title="Embedding Omni in your Salesforce instance" />

Want to put Omni analytics right where your sales team already spends their day? Embedding dashboards directly in Salesforce means reps can see account-level metrics, pipeline trends, or usage data without switching tabs - and dynamic dashboards can automatically filter to whichever record they're viewing.

In this guide, we'll walk through two approaches: embedding a static dashboard as its own Visualforce page, and embedding a dynamic dashboard that parameterizes filters based on the current Salesforce record.

## Requirements

To follow this guide, you'll need:

* Permissions in Omni that allow you to access the dashboard you want to embed
* Permissions in Salesforce that allow you to create Visualforce pages and modify Salesforce objects

## Embedding static dashboards

In this example, you'll embed a static dashboard into a new Visualforce page. Unlike [dynamic (parameterized) dashboards](#embedding-dynamic-dashboards), the content of static dashboards doesn't change.

<Steps titleSize="h3">
  <Step title="Create a new Visualforce page" id="create-visualforce-page">
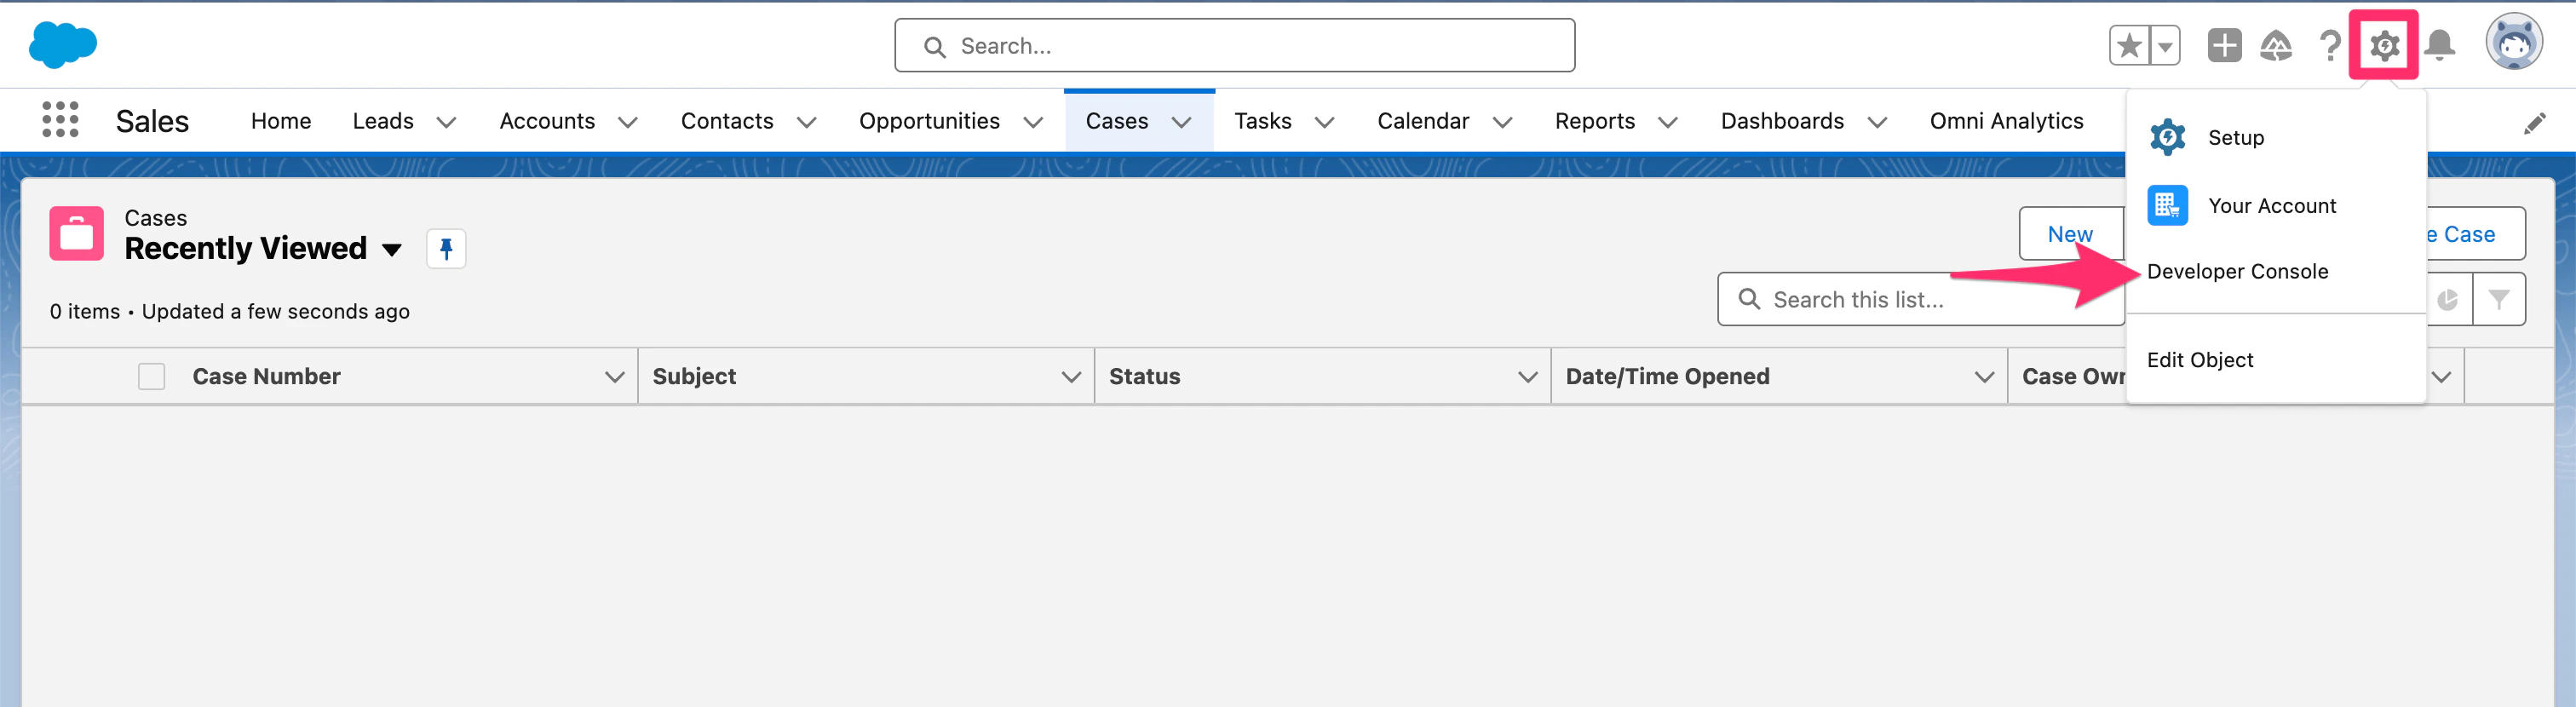
    1. In your Salesforce instance, navigate to the Developer Console:
           <img src="https://mintcdn.com/omni-e7402367/TQmDiBS3ovG-NUT5/guides/embed/images/developer-console.png?fit=max&auto=format&n=TQmDiBS3ovG-NUT5&q=85&s=8026da6c8b7170c2f5e472f2ba561e7e" alt="Salesforce Developer Console menu option" width="3024" height="830" data-path="guides/embed/images/developer-console.png" />
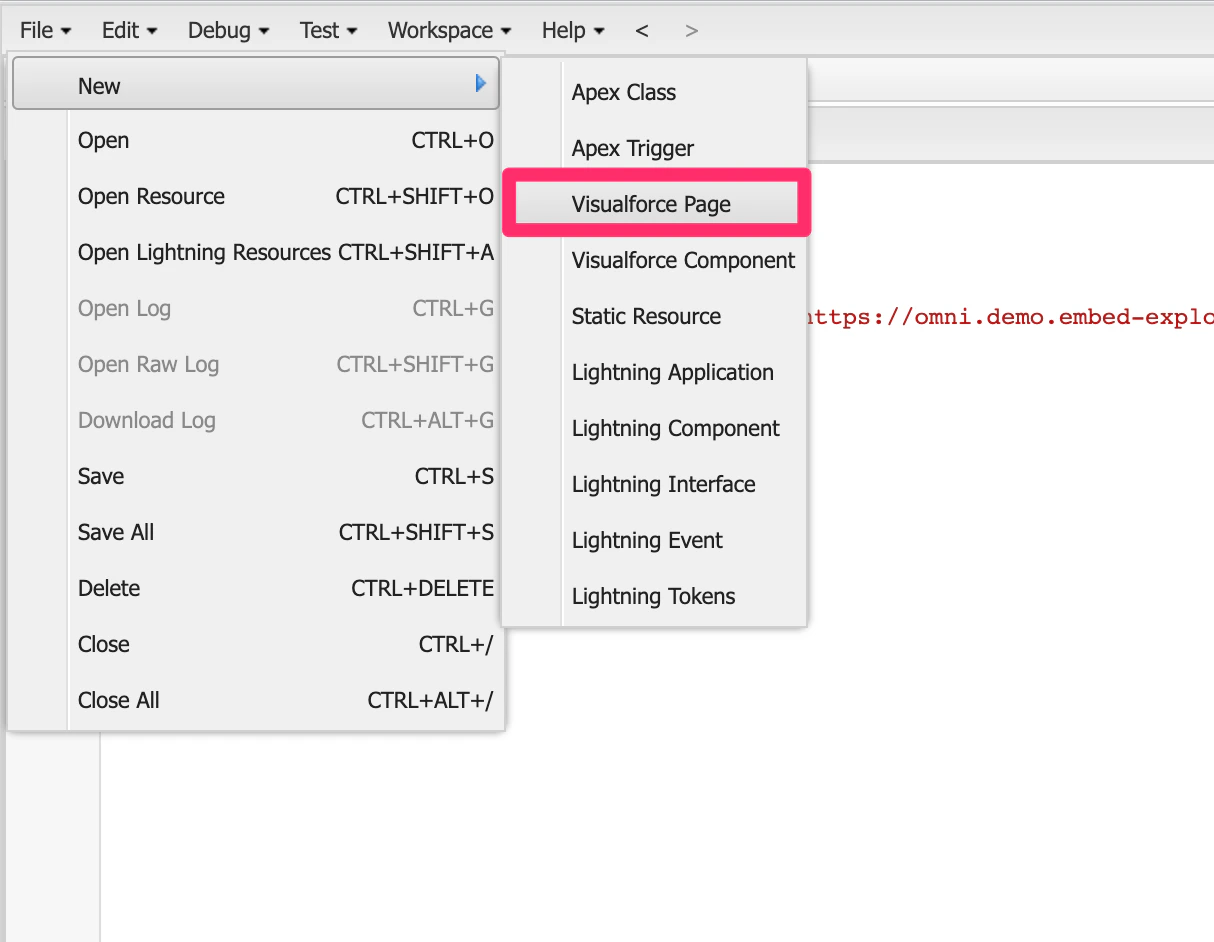
    2. Create a new Visualforce page:
           <img src="https://mintcdn.com/omni-e7402367/TQmDiBS3ovG-NUT5/guides/embed/images/visualforce-page.png?fit=max&auto=format&n=TQmDiBS3ovG-NUT5&q=85&s=f3326989defb29242ce05131199ee0ca" alt="Creating a new Visualforce page in the Salesforce Developer Console" width="1214" height="942" data-path="guides/embed/images/visualforce-page.png" />

    Leave the page open for now - you'll need it later in the guide.
  </Step>

  <Step title="Retrieve the dashboard's embed URL" id="retrieve-embed-url">
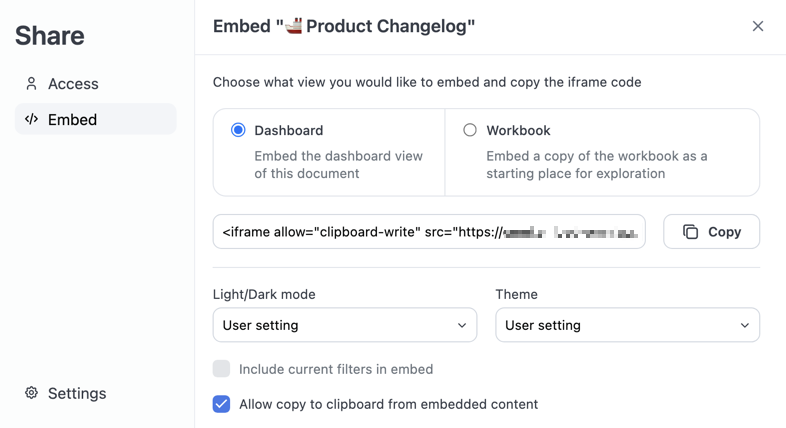
    1. In a [published](/content/develop/drafts#publishing-drafts) Omni workbook or dashboard, click the **Share** button to open the share modal. You can also navigate to **File > Document settings**.

    2. Click **Embed**.

    3. If desired, use the options in this tab to customize what content is embedded and how it displays for users. For example, you could embed a dashboard and only display it in dark mode. See [Customize embedded content](/share#customize-embed-content) for more information.

           <img src="https://mintcdn.com/omni-e7402367/VVbO0N3HRZOXstEa/share/images/dashboard-share-modal.png?fit=max&auto=format&n=VVbO0N3HRZOXstEa&q=85&s=6fb6fc99d3c9453f3bffcbae00974aa0" alt="Omni share modal with embed options" width="786" height="428" data-path="share/images/dashboard-share-modal.png" />

    4. Click the **Copy** button to copy the iframe URL. The example iframe URL below is for an Omni instance named `blobsrus` and includes settings for **Light/dark mode** (`prefersDark`) and **Theme** (`theme`):

       ```html wrap theme={null}
       <iframe src="https://blobsrus.omniapp.co/dashboards/a0554a7e?prefersDark=true&theme=dawn"></iframe>
       ```
  </Step>

  <Step title="Add the iframe to the Visualforce page" id="add-iframe">
    In Salesforce, add your `iframe` code to the Visualforce page you created.

    In this example, we added styling elements that will allow the dashboard to fill the whole page:

    ```html wrap title="Visualforce page with added styling elements" theme={null}
    <apex:page sidebar="false">
      <style>
        html { 
          width: 100%; 
          height: 100%;
        }
      </style>   
      
      <apex:iframe scrolling="true" width="100%" height="100%" src="https://blobsrus.omniapp.co/dashboards/a0554a7e">
      </apex:iframe>
    </apex:page>
    ```
  </Step>
</Steps>

## Embedding dynamic dashboards

To make your dashboards dynamic, you can parameterize the filters in the iframe URL with Apex variables. In this example, you'll embed a dashboard that dynamically filters data based on the Salesforce account that is currently being viewed and add it to an existing Salesforce object.

<Steps titleSize="h3">
  <Step title="Prepare your dashboard for embedding" id="prepare-dashboard">
    1. In your Omni dashboard, add a filter on the field you want to parameterize (for example, **Account ID**). This filter should **not** be one of your default filters.
    2. Click **Share** to open the share modal.
    3. Check the **Include current filters** option.
    4. Copy the `<iframe>` embed code.
    5. In a text editor, locate the filter value in the URL and replace it with the Apex variable you want Salesforce to pass through.

       For example, replace the hard-coded **Account ID** with `{!Account.Id}`:

       ```html wrap highlight={4} theme={null}
       <apex:page standardController="Account">
         <apex:iframe
           scrolling="true"
           src="https://blobsrus.omniapp.co/dashboards/a0554a7e?f--salesforce__account.id=%28%27kind%21%27EQUALS%27%7Etype%21%27string%27%7Evalues%21%5B%27{!Account.Id}%27%5D%7Eis_negative%21false%29O_O">
         </apex:iframe>
       </apex:page>
       ```

    Keep the code handy - you'll need it to complete the next step.
  </Step>

  <Step title="Create a new Visualforce page" id="create-visualforce-page-2">
    1. In your Salesforce instance, navigate to the Developer Console:
           <img src="https://mintcdn.com/omni-e7402367/TQmDiBS3ovG-NUT5/guides/embed/images/developer-console.png?fit=max&auto=format&n=TQmDiBS3ovG-NUT5&q=85&s=8026da6c8b7170c2f5e472f2ba561e7e" alt="Salesforce Developer Console menu option" width="3024" height="830" data-path="guides/embed/images/developer-console.png" />
    2. Create a new Visualforce page:
           <img src="https://mintcdn.com/omni-e7402367/TQmDiBS3ovG-NUT5/guides/embed/images/visualforce-page.png?fit=max&auto=format&n=TQmDiBS3ovG-NUT5&q=85&s=f3326989defb29242ce05131199ee0ca" alt="Creating a new Visualforce page in the Salesforce Developer Console" width="1214" height="942" data-path="guides/embed/images/visualforce-page.png" />
    3. Paste the `iframe` code you created in the previous step and save the page.
  </Step>

  <Step title="Optional: Create a Visualforce tab" id="create-visualforce-tab">
    If you want the dashboard to appear as its own tab in Salesforce:

    1. In Salesforce, navigate to **Setup > Tabs**:
           <img src="https://mintcdn.com/omni-e7402367/TQmDiBS3ovG-NUT5/guides/embed/images/visualforce-tabs.png?fit=max&auto=format&n=TQmDiBS3ovG-NUT5&q=85&s=5b8018e7cf82171f6632544c3415cdbe" alt="Salesforce Setup Tabs page for creating a new Visualforce tab" width="2988" height="1436" data-path="guides/embed/images/visualforce-tabs.png" />
    2. Create a new **Visualforce Tab**, selecting the Visualforce page you created in the previous step.

    The tab will now be available to users and will open an interactive, embedded dashboard.
  </Step>

  <Step title="Add the embedded dashboard to an existing Salesforce object" id="add-dash-salesforce-object">
    1. In Salesforce, navigate to **Setup > Object Manager**:
           <img src="https://mintcdn.com/omni-e7402367/TQmDiBS3ovG-NUT5/guides/embed/images/salesforce-object-manager.png?fit=max&auto=format&n=TQmDiBS3ovG-NUT5&q=85&s=db342dd192670c18cce9cb3baa147e65" alt="Salesforce Setup Object Manager page" width="3022" height="1476" data-path="guides/embed/images/salesforce-object-manager.png" />
    2. Select the object where you want the dashboard to appear (for example, **Account**).
    3. Open the **Page Layouts** section and choose the layout you want to edit.
    4. Add a new section to the layout to hold the embedded dashboard:
           <img src="https://mintcdn.com/omni-e7402367/TQmDiBS3ovG-NUT5/guides/embed/images/blank-section.png?fit=max&auto=format&n=TQmDiBS3ovG-NUT5&q=85&s=93fa7fe3956a3eb70309bebf1b309041" alt="A new, blank section added to a Salesforce page layout" width="3016" height="1492" data-path="guides/embed/images/blank-section.png" />
    5. Drag the **Visualforce Page** component into the new section:
           <img src="https://mintcdn.com/omni-e7402367/TQmDiBS3ovG-NUT5/guides/embed/images/add-visualforce-to-section.png?fit=max&auto=format&n=TQmDiBS3ovG-NUT5&q=85&s=6bbb8707ba1b225c14e11761c7d25c5f" alt="Dragging the Visualforce Page component into a Salesforce page layout section" width="3012" height="1488" data-path="guides/embed/images/add-visualforce-to-section.png" />
           <Tip>
             Click the <Icon icon="wrench" type="solid" /> wrench icon to adjust the size of the iframe.
           </Tip>
  </Step>

  <Step title="Confirm the embedded dashboard works" id="test-dashboard">
    Your dashboard should now load dynamically, using the Salesforce record's ID to parameterize the embedded Omni dashboard. 🎉

    Visit a record (e.g., an **Account** page) and verify that the correct data displays.
  </Step>
</Steps>