> ## Documentation Index
> Fetch the complete documentation index at: https://docs.omni.co/llms.txt
> Use this file to discover all available pages before exploring further.
# Embedding Omni's AI Assistant
> Integrate a whitelabeled version of the AI Assistant directly into your embedded application.
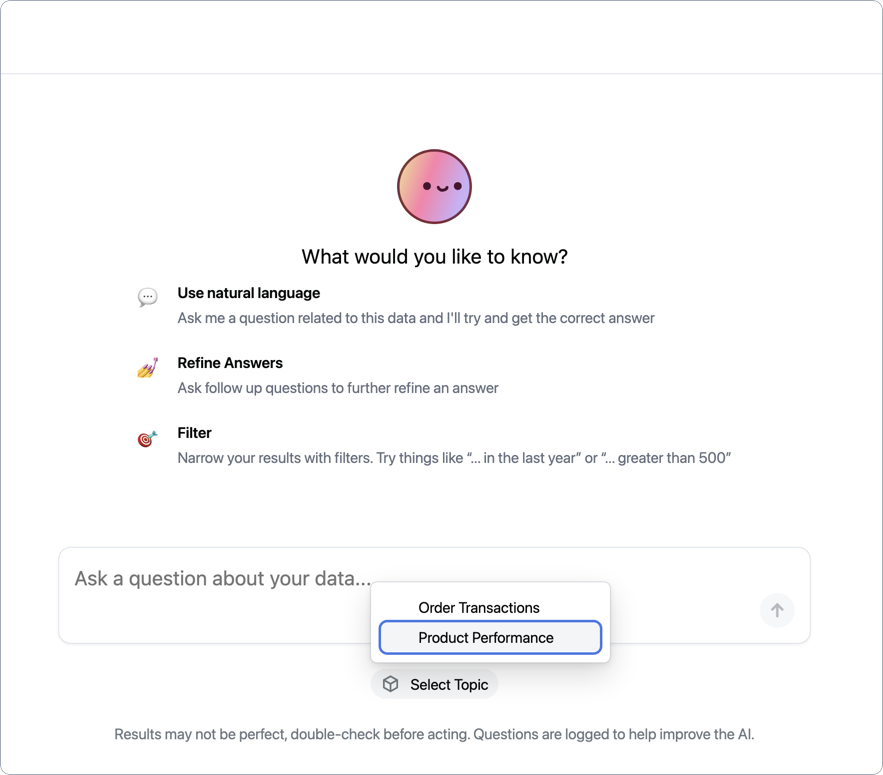
Omni's [AI Assistant](/ai/chat) can be embedded as a standalone page in your application, allowing your users to explore data outside of workbooks using the same AI-powered experience (aka Blobby) found in the native Omni app.
 ## How it works
The embedded AI Assistant uses the same [pickers and scoping behavior](/ai/chat#scoping-responses) as the native Omni app. When embedding, you can tailor the experience to include only the connections, models, and topics you specify.
## Steps
The first step is to decide which connections you want your users to have access to when using the AI Assistant. These connections will display in the **Connections** picker below the chatbox.
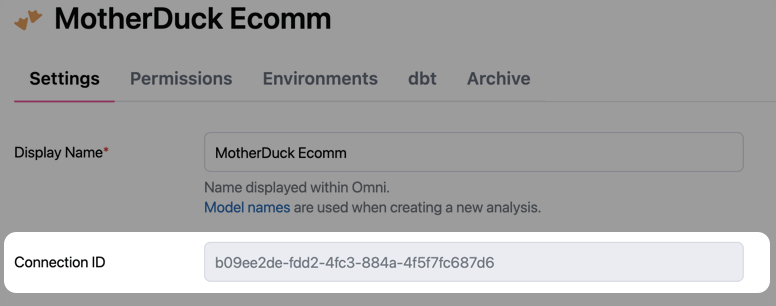
Start by retrieving the connections' unique IDs. Later in this guide, you'll use the IDs to construct a `connectionRoles` parameter and configure the embed session. You can retrieve connection IDs using either of the following methods:
In Omni:
1. Navigate to **Settings > Connections**.
2. Click on the connection.
3. At the top of the **Settings** tab, locate the **Connection ID** field:
## How it works
The embedded AI Assistant uses the same [pickers and scoping behavior](/ai/chat#scoping-responses) as the native Omni app. When embedding, you can tailor the experience to include only the connections, models, and topics you specify.
## Steps
The first step is to decide which connections you want your users to have access to when using the AI Assistant. These connections will display in the **Connections** picker below the chatbox.
Start by retrieving the connections' unique IDs. Later in this guide, you'll use the IDs to construct a `connectionRoles` parameter and configure the embed session. You can retrieve connection IDs using either of the following methods:
In Omni:
1. Navigate to **Settings > Connections**.
2. Click on the connection.
3. At the top of the **Settings** tab, locate the **Connection ID** field:
 To programatically retrieve connection IDs, use the [List connections API](/api/connections/list-connections).
If you want to retrieve a specific connection - such as a connection specific to a client - use the endpoint's filtering functionality. In this example, the request will retrieve a connection named `Blobs R Us`:
```shell wrap title="GET /api/v1/connections" theme={null}
curl -X GET 'https://blobsrus.omniapp.co/api/v1/connections?name=Blobs+R+Us' \
--H 'Authorization: Bearer ' \
--H 'Content-Type: application/json'
```
Valid requests to the API will return a `200 OK` status and a response body containing `connection` objects. Each object will the connection's unique `id`.
Next, you'll curate the list of topics you want users to have access to in the topic picker:
To programatically retrieve connection IDs, use the [List connections API](/api/connections/list-connections).
If you want to retrieve a specific connection - such as a connection specific to a client - use the endpoint's filtering functionality. In this example, the request will retrieve a connection named `Blobs R Us`:
```shell wrap title="GET /api/v1/connections" theme={null}
curl -X GET 'https://blobsrus.omniapp.co/api/v1/connections?name=Blobs+R+Us' \
--H 'Authorization: Bearer ' \
--H 'Content-Type: application/json'
```
Valid requests to the API will return a `200 OK` status and a response body containing `connection` objects. Each object will the connection's unique `id`.
Next, you'll curate the list of topics you want users to have access to in the topic picker:
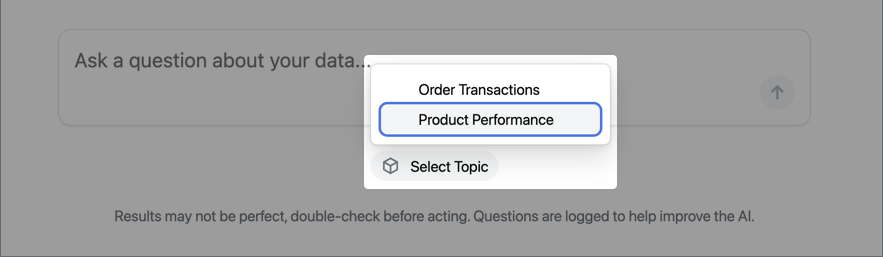 This is accomplished with the [`ai_chat_topics`](/modeling/models/ai-chat-topics) model parameter. This parameter accepts a list of topic names, which will limit access only to the specified topics.
In Omni, navigate to the models associated with the connections from step 1. Add the `ai_chat_topics` parameter and specify the topics that users should have access to:
```yaml title="Example model file" theme={null}
ai_chat_topics: [ Product Performance, Order Transactions]
```
Refer to [Scoping AI chat responses](/ai/chat#scoping-responses) for details on how topic configuration affects the picker display and AI behavior.
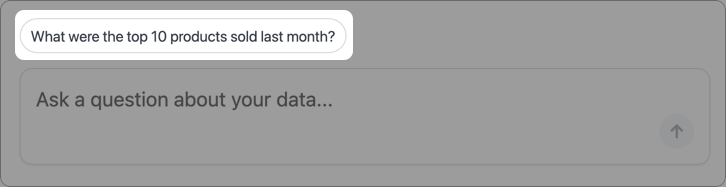
You can add [sample queries](/modeling/develop/ai-optimization#add-example-queries-as-context) to accessible topics, which will display in the chat interface as clickable questions:
This is accomplished with the [`ai_chat_topics`](/modeling/models/ai-chat-topics) model parameter. This parameter accepts a list of topic names, which will limit access only to the specified topics.
In Omni, navigate to the models associated with the connections from step 1. Add the `ai_chat_topics` parameter and specify the topics that users should have access to:
```yaml title="Example model file" theme={null}
ai_chat_topics: [ Product Performance, Order Transactions]
```
Refer to [Scoping AI chat responses](/ai/chat#scoping-responses) for details on how topic configuration affects the picker display and AI behavior.
You can add [sample queries](/modeling/develop/ai-optimization#add-example-queries-as-context) to accessible topics, which will display in the chat interface as clickable questions:
 Refer to the [Optimizing models for AI guide](/modeling/develop/ai-optimization) for more information about curating topics for AI.
The next step is to define the embed parameters to create the chat session for the user. Along with the [required parameters](/embed/setup/url-parameters#required-parameters) - `externalId`, `name`, and `nonce` - set the following parameters:
* [`contentPath`](/embed/setup/url-parameters/contentPath) - Set to `/chat`
* [`connectionRoles`](/embed/setup/url-parameters/connectionRoles) - Use the connection IDs from step 1 of this guide to build an object that specifies the connection roles available to the embed users. For example:
```json wrap theme={null}
{
"c0f12353-4817-4398-bcc0-d501e6dd2f64":"RESTRICTED_QUERIER"
}
```
If you're using [standard SSO embed](/embed/setup/standard-sso) to create embed sessions, the embed URL you build might look like the following:
```shell wrap theme={null}
https://omni.blobsrus.com/embed/login?&connectionRoles=%7B%22c0f12353-4817-4398-bcc0-d501e6dd2f64%22%3A%22RESTRICTED_QUERIER%22%7DcontentPath=%2Fchat&externalId=Blobs+R+Us&mode=SINGLE_CONTENT&name=Blobby&nonce=yRt9RbPRST1pKP0fv4hkZkOcyydnwmWX&signature=prfIqNKkUBYlXiAdXLe_E__w19QbM_-6o3CIi4kkV1s
```
After you've successfully configured and created an embed session, the last step is to apply your branding styles. While this last step is **optional**, it allows you to make the AI Assistant your own and blend it seamlessly with your application.
Navigate to **Settings > AI** and then click the [**Branding** tab](/ai/settings).
Refer to the [Optimizing models for AI guide](/modeling/develop/ai-optimization) for more information about curating topics for AI.
The next step is to define the embed parameters to create the chat session for the user. Along with the [required parameters](/embed/setup/url-parameters#required-parameters) - `externalId`, `name`, and `nonce` - set the following parameters:
* [`contentPath`](/embed/setup/url-parameters/contentPath) - Set to `/chat`
* [`connectionRoles`](/embed/setup/url-parameters/connectionRoles) - Use the connection IDs from step 1 of this guide to build an object that specifies the connection roles available to the embed users. For example:
```json wrap theme={null}
{
"c0f12353-4817-4398-bcc0-d501e6dd2f64":"RESTRICTED_QUERIER"
}
```
If you're using [standard SSO embed](/embed/setup/standard-sso) to create embed sessions, the embed URL you build might look like the following:
```shell wrap theme={null}
https://omni.blobsrus.com/embed/login?&connectionRoles=%7B%22c0f12353-4817-4398-bcc0-d501e6dd2f64%22%3A%22RESTRICTED_QUERIER%22%7DcontentPath=%2Fchat&externalId=Blobs+R+Us&mode=SINGLE_CONTENT&name=Blobby&nonce=yRt9RbPRST1pKP0fv4hkZkOcyydnwmWX&signature=prfIqNKkUBYlXiAdXLe_E__w19QbM_-6o3CIi4kkV1s
```
After you've successfully configured and created an embed session, the last step is to apply your branding styles. While this last step is **optional**, it allows you to make the AI Assistant your own and blend it seamlessly with your application.
Navigate to **Settings > AI** and then click the [**Branding** tab](/ai/settings).
 Use the settings to configure how you want the AI Assistant to look and then click **Save**.
Built with [Mintlify](https://mintlify.com).
Use the settings to configure how you want the AI Assistant to look and then click **Save**.
Built with [Mintlify](https://mintlify.com).