> ## Documentation Index
> Fetch the complete documentation index at: https://docs.omni.co/llms.txt
> Use this file to discover all available pages before exploring further.
# Managing embed secrets
> Create, view, edit, and delete embed secrets for your organization.
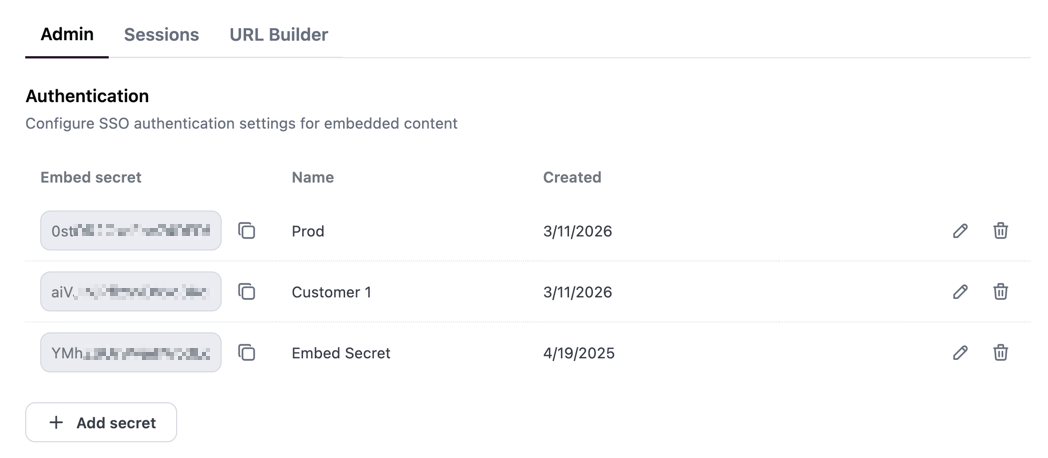
The **Settings > Embed > Admin** tab allows you to manage multiple embed secrets for your organization. Embed secrets are used to sign and authenticate embed URLs, ensuring that only authorized users can access your embedded content.
Omni supports creating multiple secrets, which can allow you to:
* **Rotate secrets safely** - Create a new secret, update your applications to use it, then delete the old secret after verifying the migration
* **Separate environments** - Use different secrets for production, staging, and development environments
## Requirements
To manage embed secrets, you'll need:
* **Organization Admin** permissions
* The **Embed** feature enabled in your Omni instance
## Viewing embed secrets
The embed secrets table displays the following information for each secret:
* **Secret** - The secret key value with a copy button for easy access. Click the copy button to copy the secret to your clipboard.
* **Name** - A descriptive name for the secret to help you identify its purpose
* **Created** - When the secret was created
* **Actions** - Edit and delete options for managing the secret
 ## Creating a new secret
To create a new embed secret:
1. Navigate to **Settings > Embed > Admin** in your Omni instance.
2. Click the **Add Secret** button below the secrets table.
3. In the dialog that appears:
* A 32-character secret key is automatically generated for you
* Enter a descriptive **Name** to identify the secret's purpose (e.g., "Production", "Staging", or "Partner Integration")
Use descriptive names for your secrets to make them easier to identify and manage, especially when rotating secrets or managing multiple environments.
4. Click **Add secret** to save the new secret.
The new secret will appear in the secrets table and can be used immediately for signing embed URLs.
## Renaming a secret
You can only edit a secret's name - the secret key value itself cannot be changed. If you need a new secret key, create a new secret instead.
1. Click the **Edit** button in the Actions column for the secret you want to modify.
2. Update the **Name** field in the dialog.
3. Click **Save** to apply your changes.
## Rotating secrets
Because Omni allows multiple active secrets at the same time, you can rotate a secret without disrupting active embed sessions:
1. Create a new secret in **Settings > Embed > Admin**.
2. Update your applications to sign embed URLs with the new secret. Both the old and new secret will continue to authenticate embed URLs during this phase.
3. Verify that all environments are signing with the new secret and that no traffic is still using the old one.
4. Delete the old secret to immediately invalidate any URLs still signed with it.
Skipping the verification step can break in-flight embed sessions signed with the old secret. Deleting a secret immediately invalidates every URL signed with it.
## Deleting a secret
To delete an embed secret:
1. Click the **Delete** button in the Actions column for the secret you want to remove.
2. Confirm the deletion in the dialog that appears.
Deleting a secret will immediately invalidate all embed URLs signed with that secret. Any existing embed sessions or URLs using the deleted secret will no longer work and will receive `403 (Forbidden)` errors.
Before deleting a secret, ensure you've updated all your applications to use a different secret to avoid disrupting access to embedded content.
## Next steps
* [Set up embed with standard SSO](/embed/setup/standard-sso)
* [Set up embed with 2-step SSO](/embed/setup/two-step-sso)
* [View embed URL parameters](/embed/setup/url-parameters)
## Creating a new secret
To create a new embed secret:
1. Navigate to **Settings > Embed > Admin** in your Omni instance.
2. Click the **Add Secret** button below the secrets table.
3. In the dialog that appears:
* A 32-character secret key is automatically generated for you
* Enter a descriptive **Name** to identify the secret's purpose (e.g., "Production", "Staging", or "Partner Integration")
Use descriptive names for your secrets to make them easier to identify and manage, especially when rotating secrets or managing multiple environments.
4. Click **Add secret** to save the new secret.
The new secret will appear in the secrets table and can be used immediately for signing embed URLs.
## Renaming a secret
You can only edit a secret's name - the secret key value itself cannot be changed. If you need a new secret key, create a new secret instead.
1. Click the **Edit** button in the Actions column for the secret you want to modify.
2. Update the **Name** field in the dialog.
3. Click **Save** to apply your changes.
## Rotating secrets
Because Omni allows multiple active secrets at the same time, you can rotate a secret without disrupting active embed sessions:
1. Create a new secret in **Settings > Embed > Admin**.
2. Update your applications to sign embed URLs with the new secret. Both the old and new secret will continue to authenticate embed URLs during this phase.
3. Verify that all environments are signing with the new secret and that no traffic is still using the old one.
4. Delete the old secret to immediately invalidate any URLs still signed with it.
Skipping the verification step can break in-flight embed sessions signed with the old secret. Deleting a secret immediately invalidates every URL signed with it.
## Deleting a secret
To delete an embed secret:
1. Click the **Delete** button in the Actions column for the secret you want to remove.
2. Confirm the deletion in the dialog that appears.
Deleting a secret will immediately invalidate all embed URLs signed with that secret. Any existing embed sessions or URLs using the deleted secret will no longer work and will receive `403 (Forbidden)` errors.
Before deleting a secret, ensure you've updated all your applications to use a different secret to avoid disrupting access to embedded content.
## Next steps
* [Set up embed with standard SSO](/embed/setup/standard-sso)
* [Set up embed with 2-step SSO](/embed/setup/two-step-sso)
* [View embed URL parameters](/embed/setup/url-parameters)