- Creating richly formatted tables such as financial statements, invoices, or planning sheets
- Performing ad hoc or exploratory analysis
How it works
Spreadsheets are enabled by default, but Organization Admins can disable (or re-enable) them in the Organization settings with the Create spreadsheets setting.You can enable and disable spreadsheet tabs for individual documents by navigating to File > Document settings > Abilities in a saved document.
Limitations
The most important limitation relates to data usability outside of a spreadsheet tab. Data in spreadsheets can’t be used in other queries or promoted to a shared model. While you can work with query data by connecting it to a spreadsheet tab, data created in the spreadsheet - for example, by manual entry or through the use of formulas - can’t be used elsewhere.Excel differences
- Some formulas may differ slightly from Excel. Omni expects the majority of formulas to be the same, but we recommend using the in-sheet formula builder to verify the correct syntax.
- Changes in spreadsheet tabs aren’t autosaved. You’ll need to manually save your work to ensure changes are persisted.
- Hotkeys aren’t an exact match
- References may not reflect structural changes the same way as Excel. Refer to the Handling query changes section for more information and examples.
- Creating pivot tables isn’t supported. If you need to create pivot tables, create a “regular” or SQL query tab to use Omni’s native pivot functionality. Note: You can connect queries containing pivots to spreadsheets as a data source.
- Creating in-sheet charts isn’t supported. If you need to create a visualization, create a “regular” or SQL query tab to use Omni’s native chart functionality.
Adding spreadsheets to workbooks
When spreadsheet tabs are enabled, you’ll see a Spreadsheet option when you create a new workbook or query tab. Click this option to add a Sheet tab to the workbook. The tab will display a blank sheet similar to what you’d see in an Excel workbook. At this point, you can connect other workbook queries to the spreadsheet to interact with your data.Adding data to spreadsheets
You can add data to spreadsheets by:- Connecting workbook queries - Recommended. Creates additional sheets containing query data in the spreadsheet, which are automatically updated when a query or its results change.
- Importing existing CSVs & XLSX files - Recreate existing formatting and formulas in Omni
- Manually entering data
Connecting workbook queries
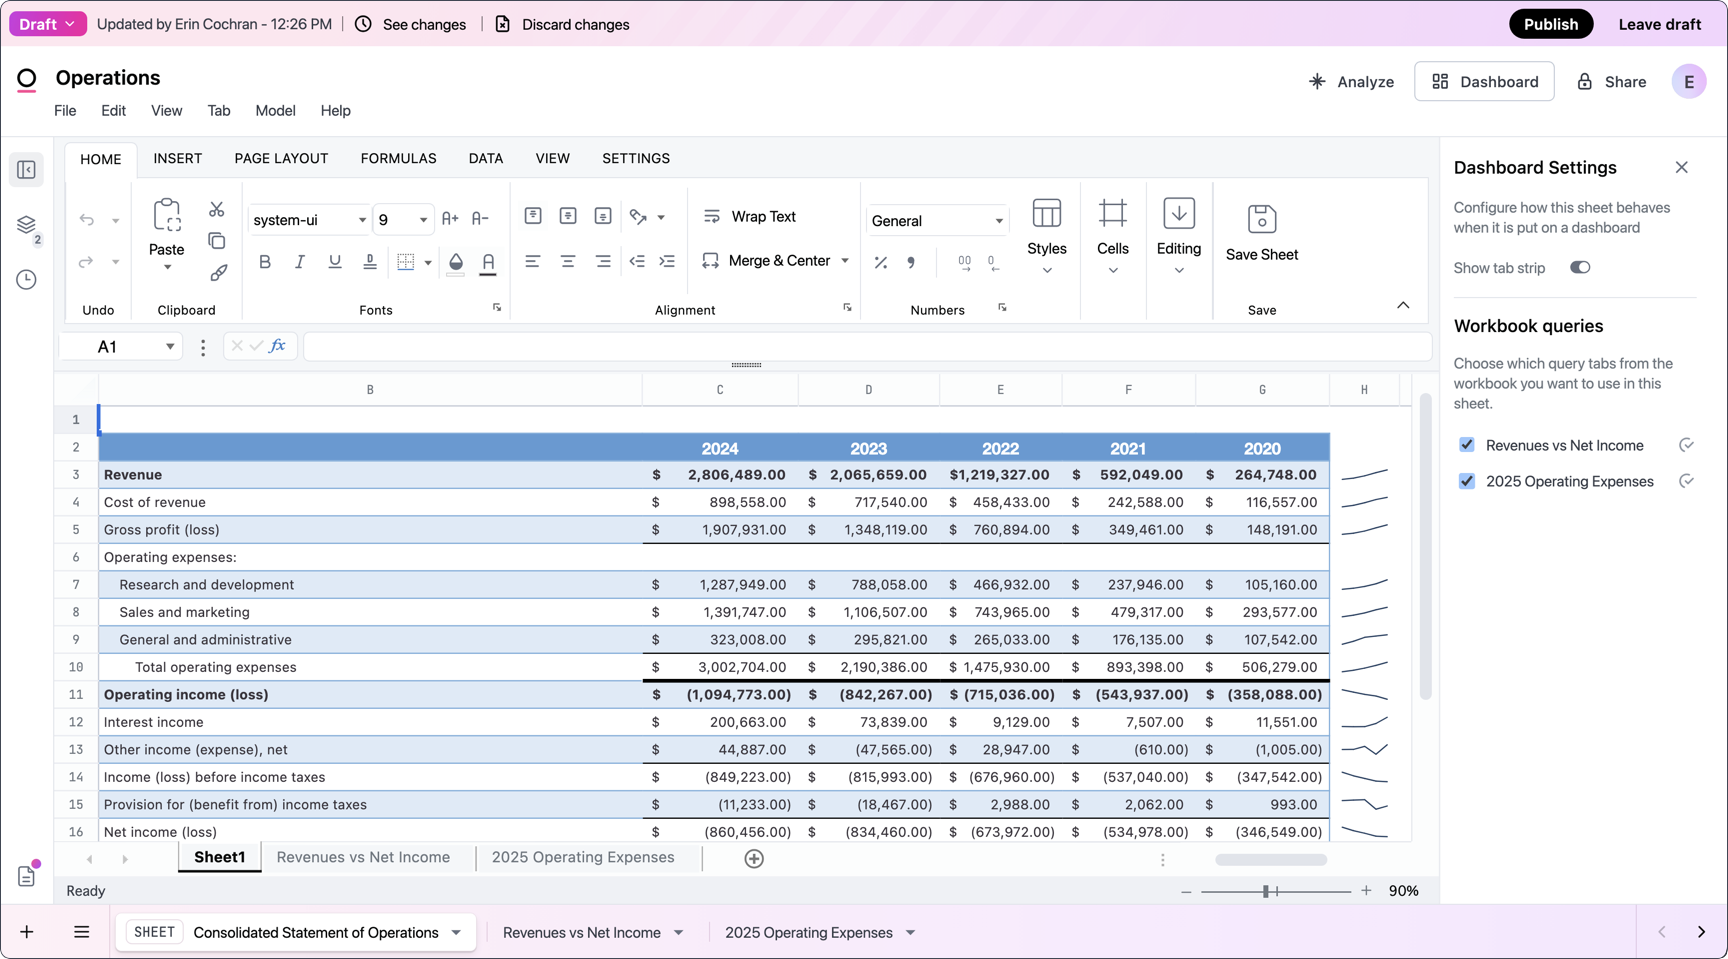
The recommended way to add data to a spreadsheet tab is to connect an existing workbook query. This allows you to manipulate and format data while taking advantage of your existing data model. Open the spreadsheet’s settings by clicking the drawer icon (highlighted in the following image) in the left navigation: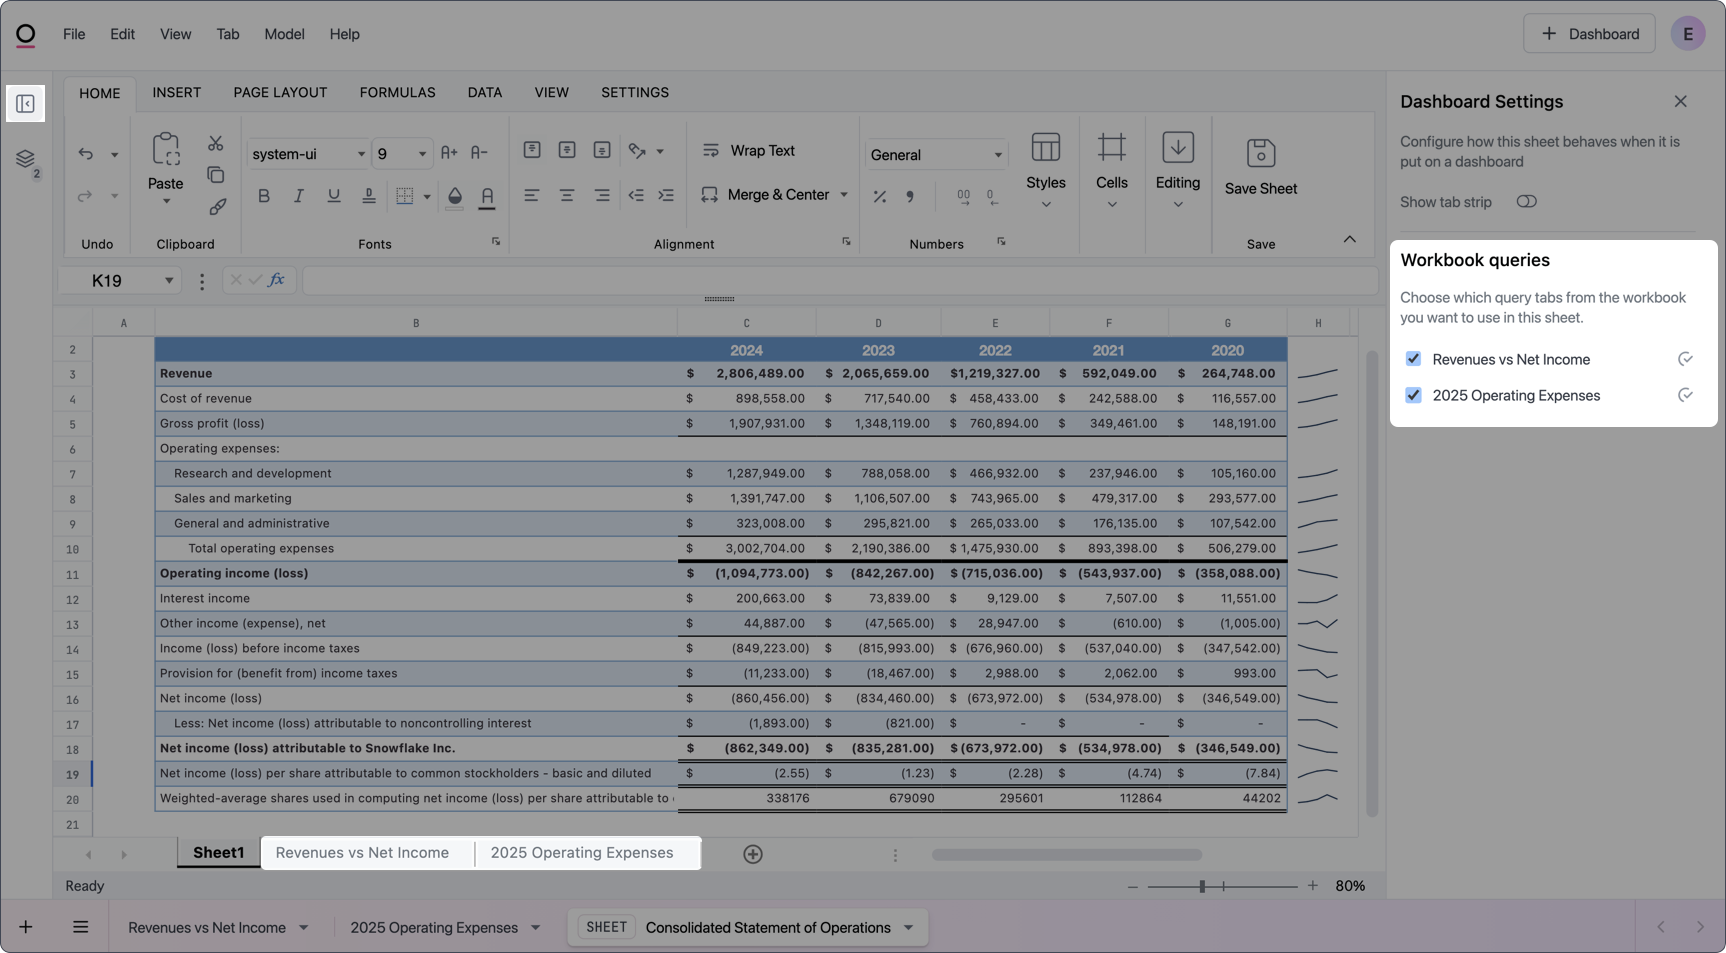
Importing existing CSVs and XLSX files
Data added using this method only lives in the spreadsheet tab where you upload it. If you need to use CSV or XLSX data outside of a spreadsheet tab, consider using data input tables instead.
- In a workbook, create a new spreadsheet tab or add a blank sheet to an existing spreadsheet tab.
- Drag the file into the blank sheet. A Drag CSV or XLSX here message should display.
- Drop (release) the file to begin the import.
Get started quickly by importing an an Excel template - you can then customize it using your own Omni data.
Manually entering data
To manually enter data, click into a cell and type or paste the data. Note: Data added using this method only lives in the spreadsheet tab you enter it into. It will not be accessible outside of the spreadsheet tab.Referencing query data
Data in other sheets in a spreadsheet tab can be referenced just like you would in Excel. This includes direct references like'<SHEET_NAME>'!A1 or as arguments in formulas.
Creating formulas
The formulas described in this section are not the same as Omni’s table calculations. Spreadsheet tabs support additional formulas, and the syntax between Omni table calculations and spreadsheet tab formulas may differ slightly.

= to start building the formula. For example:
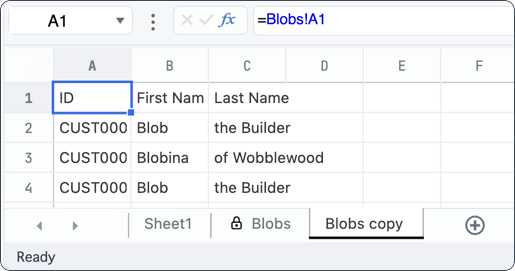
Copying with references
Omni supports copying a sheet connected to a workbook query to a new, editable sheet in a spreadsheet tab. Right-click on the protected query sheet and select Copy with references: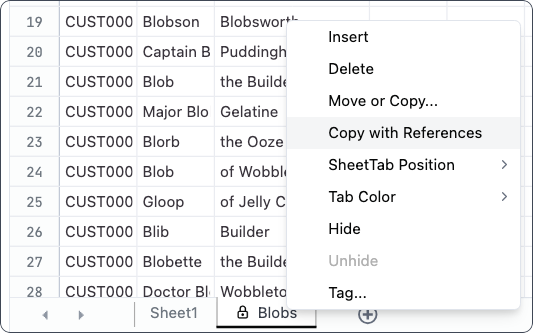
Unlocking spreadsheets for dashboard editing
By default, spreadsheets on dashboards are read-only. If you want dashboard viewers to be able to edit cells - for example, to perform what-if analysis - you can unlock a spreadsheet tab. When a spreadsheet is unlocked and viewed on a dashboard, viewers can edit all cells in the spreadsheet. To unlock a spreadsheet:- Open the spreadsheet’s settings by clicking the drawer icon in the left navigation.
- Toggle Unlock spreadsheet to on.
Unlocking a spreadsheet only affects how it behaves on a dashboard. In the workbook editor, all cells remain fully editable regardless of the toggle state.
Handling query changes
When a workbook query is updated, the sheet associated with it in a spreadsheet tab will also be updated to reflect the changes. This includes - but isn’t limited to - structural changes like adding columns, changing a filter value, or adding pivots. Omni spreadsheets differ from Excel in the way that underlying data changes are “absorbed.” For example, if you have a hardcoded reference for columnsA:D and a new column (E) is added, only the query sheet will be updated to include the new column. The sheet containing the reference will have to be manually updated to A:E.
Let’s take a look at another example, this time with a query that uses pivots.
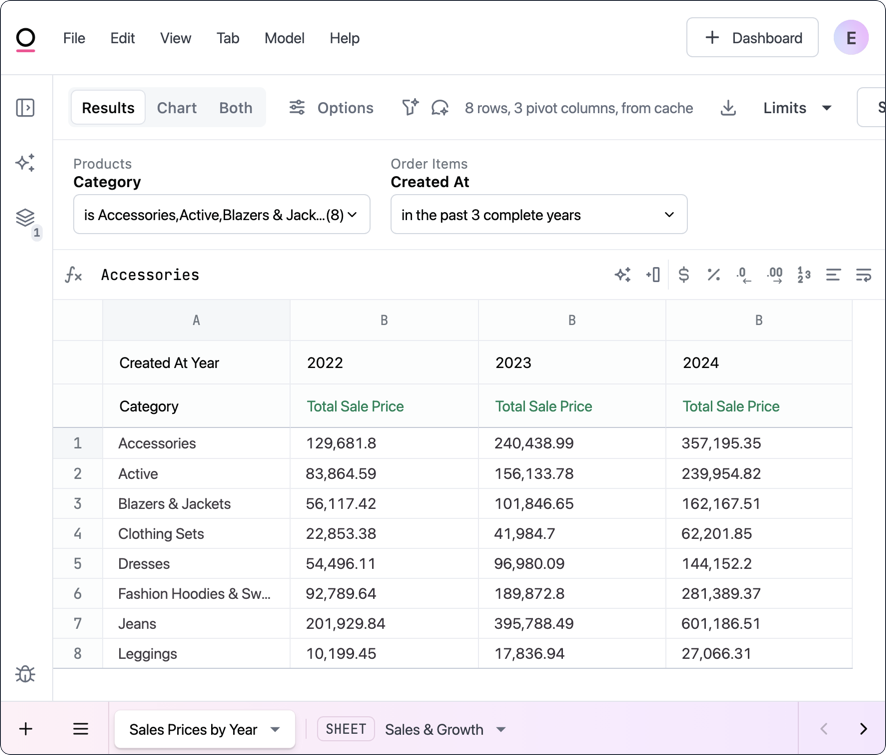
1. Workbook query with filters and pivots
The image below displays the results of a query with two filters:- Category - Only include specified product categories
- Created At - Only include records for the past 3 complete years
2022, 2023, and 2024.
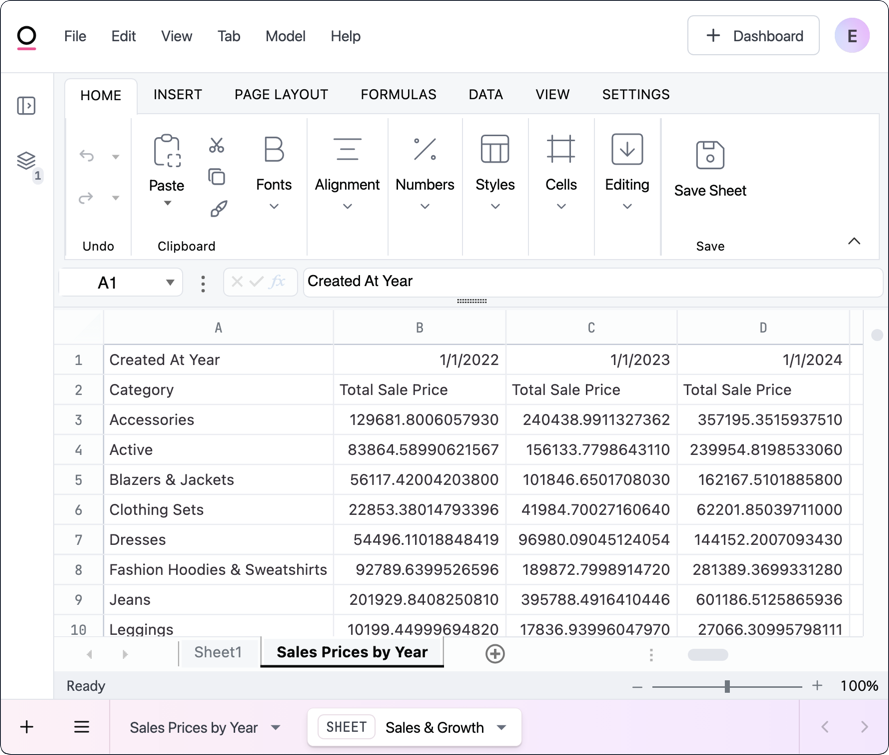
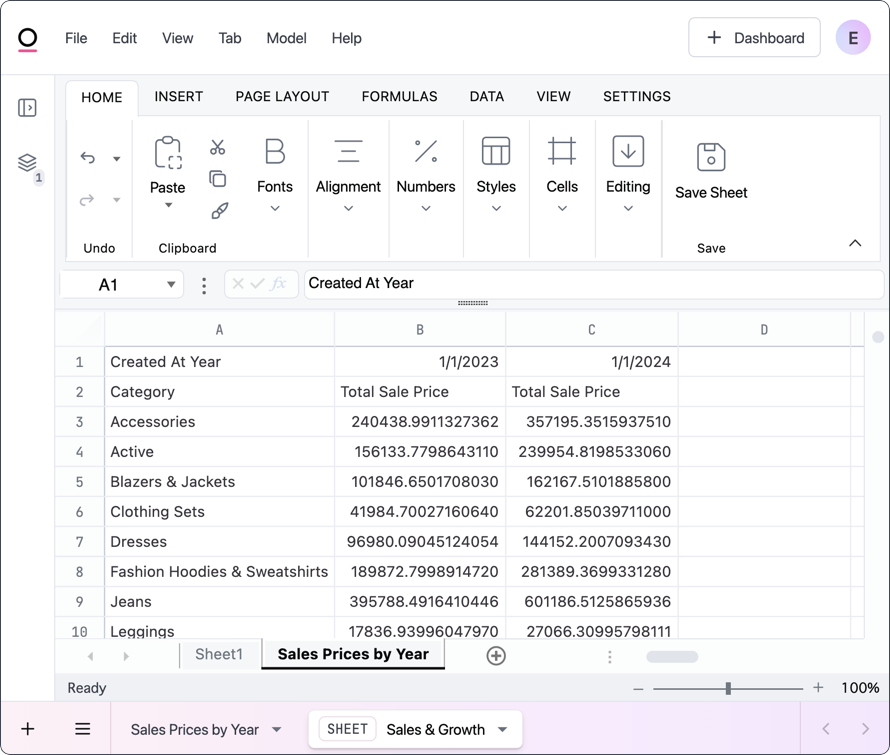
2. Query results sheet
This image displays the sheet in a spreadsheet tab associated with the Sale Prices by Year workbook query. Notice that the years are in theB, C, and D columns, which matches the results table in the actual workbook tab.
3. Reference query results data
This image displays a formatted sheet that references cells in theSale Prices by Year sheet. Just like in the query results, this sheet contains a column for each year (or pivot).
For example, data for 2022 is pulled from the B column in the Sale Prices by Year sheet.

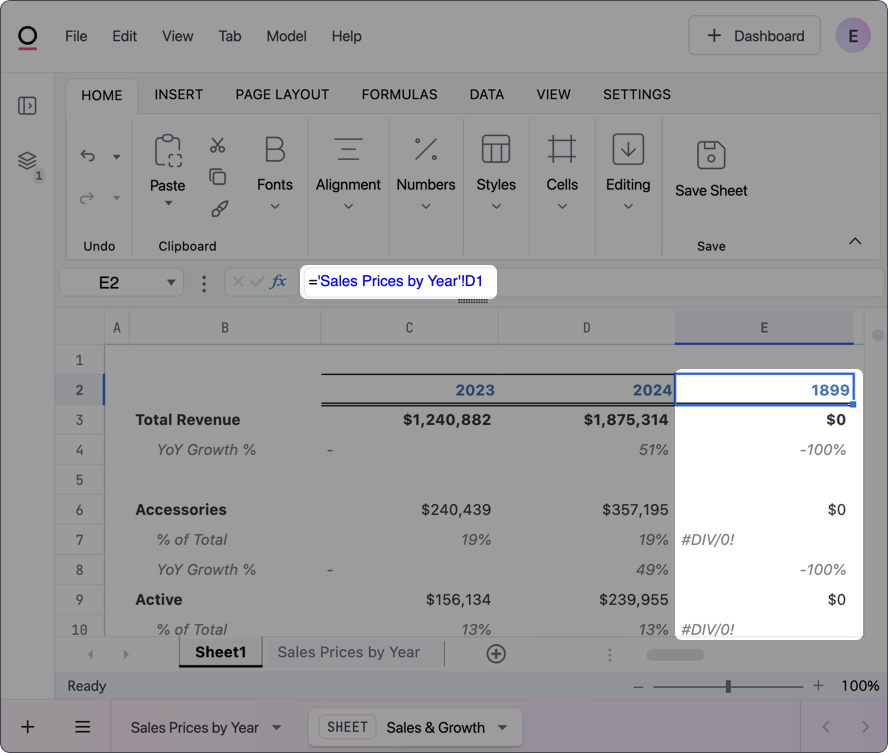
4. Change filter in workbook query
Let’s look at what happens to a sheet when the underlying structure of the query results changes. In this example, the Created At filter has been changed to include only the past 2 complete years, resulting in the2022 column being removed from the query results.
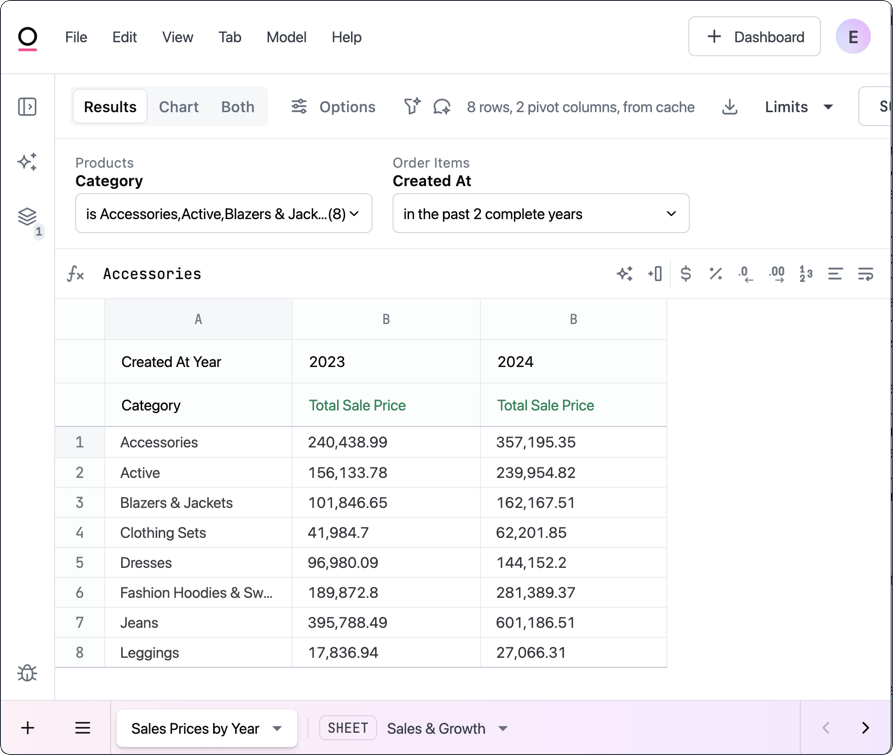
5. Updated query results sheet
When query results change, the sheet associated with the query will automatically be updated. This image shows the updatedSale Prices by Year sheet in the spreadsheet tab.
Notice that it now only contains columns for 2023 and 2024, which matches the results in the actual workbook tab.
6. Impact on query data references
In this last image, you can see what happened to the formatted sheet when the query results sheet it references changed. The references and formulas in the highlighted column are now incorrect. When the query’s filter included the past 3 complete years, theD column in the Sale Prices by Year sheet was populated. Because it was changed to the past 2 complete years, a column was removed and the data shifted to the left, leaving the D column empty.
Removing query data
You can remove workbook queries from a spreadsheet by unchecking them in the spreadsheet’s settings panel. Note: When a workbook query is removed from a spreadsheet, the sheet referencing the query will also be removed. This doesn’t delete the query from the workbook.Saving your work
Changes in spreadsheet tabs aren’t autosaved. Periodically save your work by clicking Save Sheet in the spreadsheet’s Home tab:
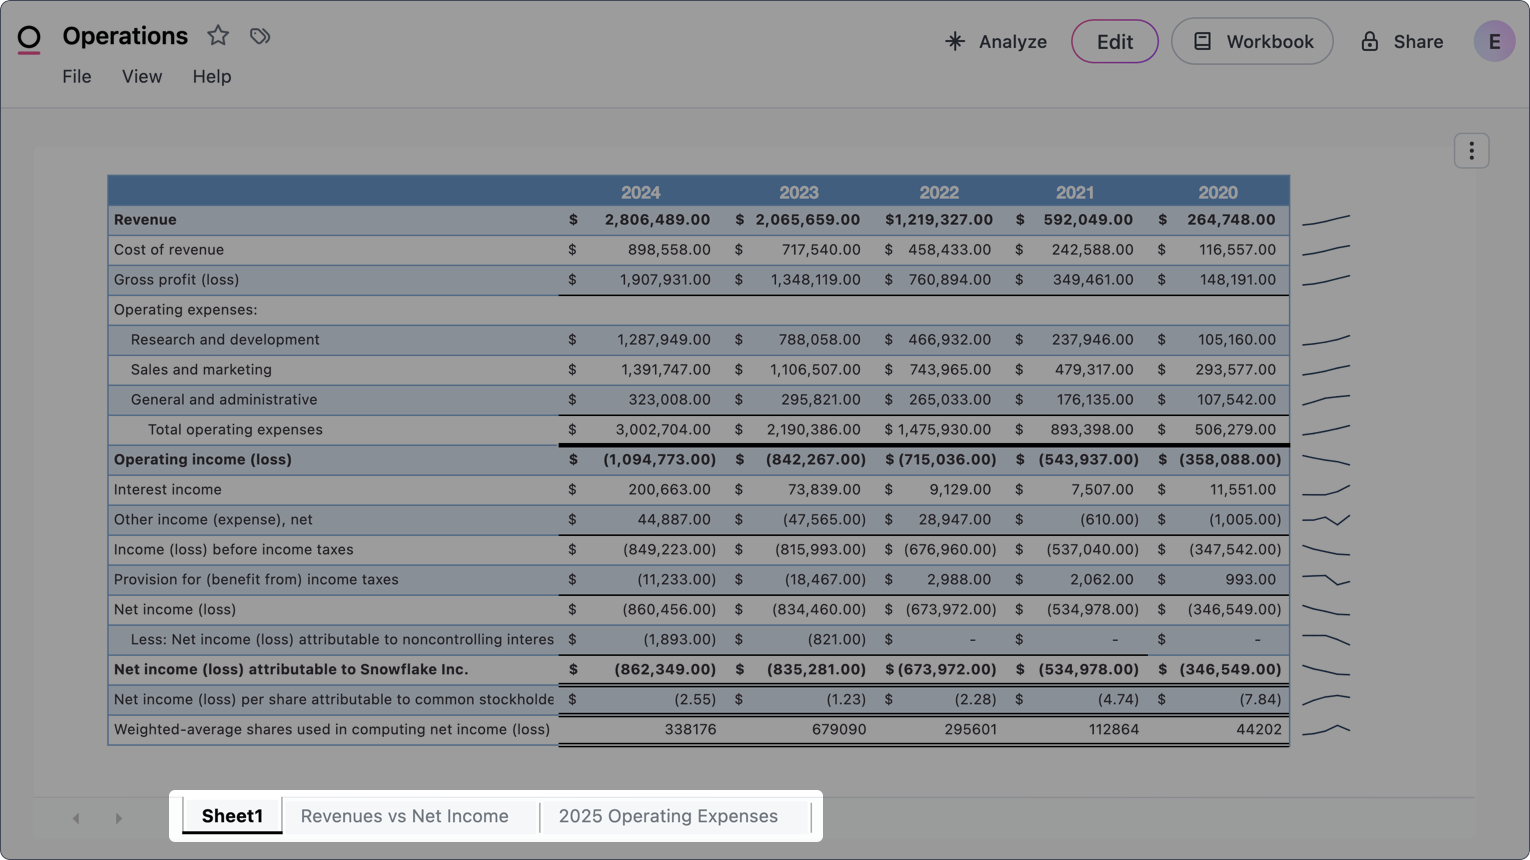
Displaying spreadsheets on dashboards
Spreadsheets on dashboards are read-only by default. To allow dashboard viewers to edit cells, unlock the spreadsheet in the workbook editor. To edit the full spreadsheet, click File > Edit or the Edit button to open a draft of the document.
Including all sheets
To display all sheets on a dashboard, first open the spreadsheet’s settings by clicking the drawer icon in the workbook’s left navigation panel. Then in the Dashboard settings section, toggle Show tab strip to on: