Requirements
To follow the steps in this guide, you’ll need:- Organization Admin permissions in Omni
- Permissions in Snowflake that allow you to:
- Create database users and grant permissions
- Allowlist IP addresses
- Set up key-pair authentication
Setup
Create a database user for Omni
- Sign in to your Snowflake account.
- Create a new worksheet.
-
Run the following to create a role and user for Omni, and grant privileges:
Create Omni role & user and grant privileges
Omni supports Snowflake semantic views, but they require additional connection settings to enable. If you use semantic views, refer to the setup guide after completing your connection.
Set up a table upload schema
This step is optional. However, we recommend completing it as part of the initial set up or you won’t be able to use uploaded files like CSVs in joins.
- Create the schema in Snowflake. This can be in its own database or the same database as other schemas to be used in modeling.
- Run the following commands to grant the Omni user the required privileges:
Grant Omni user permissions to upload schema
Allowlist Omni's IP addresses
If access to the Snowflake database is limited by IP address, you’ll need to add Omni’s IPs to the allowlist before you create the database connection.Omni’s IP addresses can be found on an individual connection’s page, accessed by navigating to Settings > Connections and clicking a connection.
Retrieve your Snowflake account identifier
- In Snowflake, click your user icon in the bottom left corner of the page and then hover over Account.
- In the account selector, click the View account details link under the account:
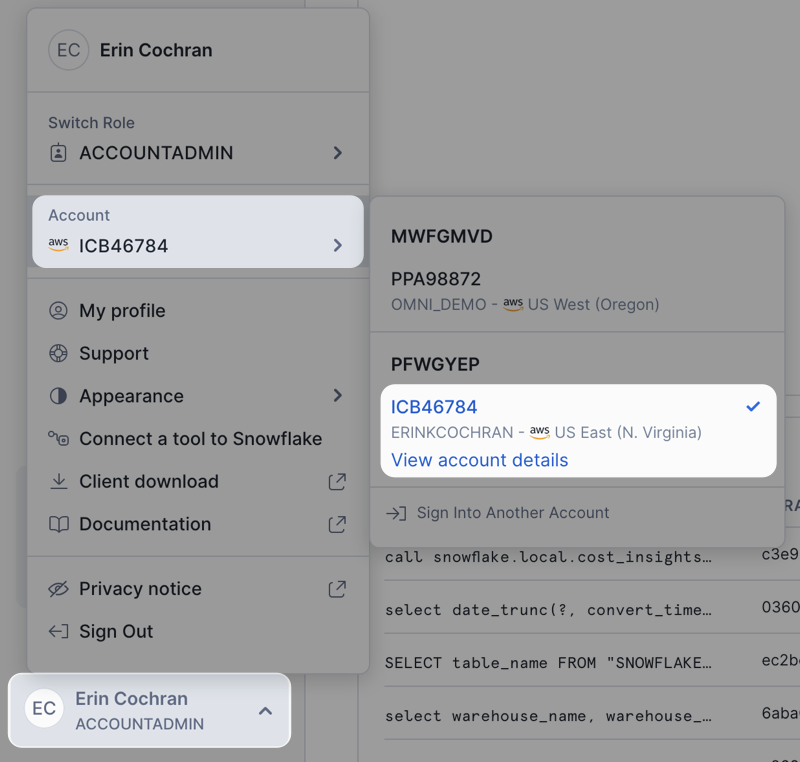
- In the Account Details dialog, locate and copy the Account Identifier.
Create the connection in Omni
Snowflake connection parameters can be case sensitive and are often capitalized. If you see errors on connection, confirm your connection parameters match your Snowflake environment exactly.
- In Omni, click Settings > Connections.
- Click the Snowflake option.
-
On the connection setup page, fill in the connection details:
requiredControls how you provide warehouse information to Omni. Supported options are an Account Identifier or a Host and Port.requiredThe Snowflake warehouse to use for queries.OAuth connections only: You can leave this field blank to use each user’s
DEFAULT_WAREHOUSEsetting from Snowflake. This enables per-user warehouse routing for organizations using Snowflake’s role-to-warehouse mappings for cost attribution. Non-OAuth connections (password, keypair, or PAT) still require a warehouse value.requiredThe type of authentication to use.Programmatic access token (PAT)
Snowflake programmatic access tokens (PATs) provide a secure, non-interactive way to authenticate to Snowflake without a traditional password. To use a PAT, select Password as the authentication type and enter:- Username - The Omni database user you created in step 1.
- Password - Paste the Snowflake PAT value. No additional configuration is needed — PATs work out of the box in the password field.
Key-pair authentication
To use this authentication type, you’ll need to specify a Username and set up a key-pair:- Username - This is the Omni database user you created in step 1.
- Key-pair configuration - Click the link to set up keys for the connection. Refer to step 6 for more information.
Password authentication
Password authentication uses a username and password to authenticate to Snowflake. - When finished, click Create connection.
Set up Snowflake key-pair authentication
If you selected Keypair authentication as the Authentication type, you’ll need to configure keys before you can save the connection.Omni can generate the keypair for you, or you can provide an existing private key.
Running
alter user omni_user set RSA_PUBLIC_KEY='...' replaces any key currently assigned to that slot on the Snowflake user. If omni_user already has an active key you need to preserve during a rotation, assign the new public key to the second slot instead by running alter user omni_user set RSA_PUBLIC_KEY_2='...'. Refer to Snowflake’s key-pair rotation guide for the full rotation flow.Omni-generated key-pair
Let Omni generate the key-pair on your behalf
Omni-generated key-pair
Let Omni generate the key-pair on your behalf
- In the Keypairs tab, click Generate key-pair.
- Click Copy next to the public key.
-
Navigate back to your Snowflake account and run:
If the
omni_userhas an existing key and you need to rotate keys, run the following instead: - In the Keypair tab in Omni, click the toggle in the Active column to enable the keypair.
Existing private key
Provide an existing private key
Existing private key
Provide an existing private key
- In the Keypairs tab, click Add existing key.
-
Paste the private key into the dialog. For example:
Note: Omni will automatically add
-----BEGIN PRIVATE KEY-----and-----END PRIVATE KEY-----if the key doesn’t have them. - Click Add keypair. Omni will automatically generate the public key and redirect you back to the Keypairs tab.
- Click Copy next to the newly-generated public key.
-
Navigate back to your Snowflake account and run the following:
If the
omni_userhas an existing key and you need to rotate keys, run the following instead: - In the Keypair tab in Omni, click the toggle in the Active column to enable the keypair.
What’s next?
Now that your database is set up, you can:- Use the Omni Agent’s quickstart skill to create your first topic from business questions
- Configure user permissions, schema refreshes, environments and timezone settings
- Learn how Omni generates the model associated with the connection
- If you use Snowflake semantic views, refer to Snowflake semantic views for additional setup steps to import and query them in Omni.
- Use the Model Assistant’s Suggest model from query history skill to generate semantic models based on actual SQL query patterns run against the database