Requirements
To follow the steps in this guide, you’ll need:- Organization Admin permissions in Omni
- Permissions in ClickHouse that allow you to access connection credentials
Setup
Retrieve ClickHouse connection details
- In ClickHouse, navigate to the warehouse you want to connect to Omni.
- Click Connect in the side navigation.
-
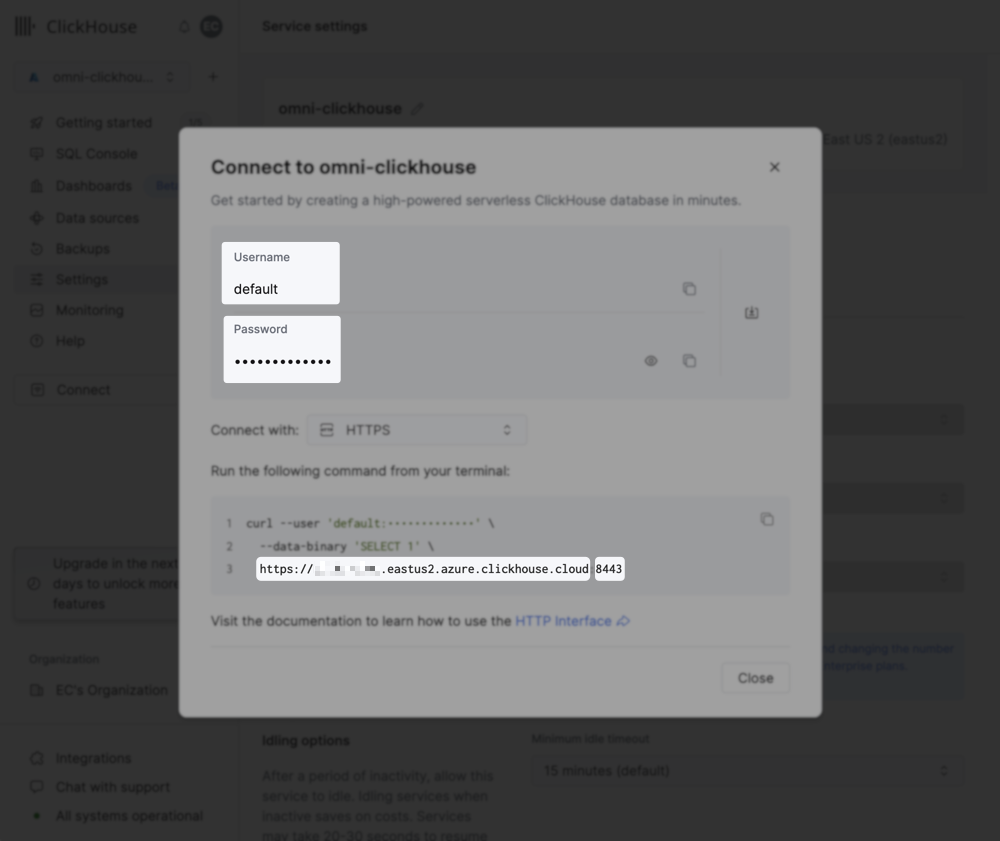
A dialog like the following will display:

-
Username - In the above image, the username is ClickHouse’s default (
default), but this may differ for you.If you want to use a different (non-default) Clickhouse user, verify that the user has, at a minimum,SELECTpermissions for:- All schemas you want to include in the Omni model
INFORMATION_SCHEMA.SCHEMATAINFORMATION_SCHEMA.TABLES
- Password
-
Host - This is a string similar to
https://<some-string>.eastus2.azure.clickhouse.cloud -
Port - In the above image, the port is
8443
Allowlist Omni's IP addresses
If access to ClickHouse is limited by IP address, you’ll need to add Omni’s IPs to the allowlist before you create the database connection.Omni’s IP addresses can be found on an individual connection’s page, accessed by navigating to Settings > Connections and clicking a connection.
Create the connection in Omni
- In Omni, click Settings > Connections.
- Click the ClickHouse option.
-
On the connection setup page, fill in the connection details:
Name Required? Description Display Name Yes A user-friendly name for the connection, which will be used throughout Omni Host Yes The hostname or IP address of the database server Port Yes The port number for the database connection Default Schema Yes The default schema to use for queries Include Schemas No A comma-separated list of schemas to include in the connection Offloaded Schemas No A comma-separated list of schemas to include in the connection, which will only load on demand. This setting is good for very large schemas or dbt dev schemas. Schema for Table Uploads No The name of the schema to use for table (CSV) uploads. If left blank, you can upload tables but they won’t be pushed to the database or be available for use in joins. Username Yes The username for database authentication Password Yes The password for database authentication Trust Server Certificate No Whether to trust the server’s SSL/TLS certificate without validation Database Timezone Yes The timezone used by the database Query Timezone Yes The timezone to use for Omni queries. If a timezone is specified, data will be converted from the Database timezone to the selected timezone. Allow User-Specific Timezones No Allow users to override the connection timezone with their own when querying Base Access Yes Select the minimum level of access users should have to models in the connection - When finished, click Create connection.
What’s next?
Now that your database is set up, you can:- Configure user permissions, schema refreshes, environments and timezone settings
- Learn how Omni generates the model associated with the connection

