- Access key - Uses an IAM user to authenticate to Amazon Web Services (AWS) by providing Omni with the user’s Access key ID and Secret access key
- Cross-account role - Enables Omni services to assume an IAM role in your account
Requirements
To follow the steps in this guide, you’ll need:- An existing Athena database. Additionally, this database should have an S3 bucket configured to store query results. Refer to the AWS documentation to get started.
- Omni Organization Admin permissions. This is required to create the Athena connection in Omni.
- Allow you to create access keys
- Allow you to create IAM permission policies and roles
Option 1: Access key authentication
To use this method of authentication, you’ll need to create an access key in the AWS console and then add it to the Athena configuration in Omni.Create the access key in AWS
To complete this step, you need permissions in AWS that allow you to create access keys.
Create the connection in Omni
- In Omni, click Settings > Connections.
- Click the Athena option.
-
On the connection setup page, fill in the connection details:
Name Required? Description Display Name Yes A user-friendly name for the connection, which will be used throughout Omni S3 Output Bucket Yes The Amazon S3 bucket used to store query results for the Athena database Data Catalog Yes The lowercase name of the data catalog to connect to Include Other Data Catalogs No A comma-delimited list of data catalogs you want to generate models for, ex: catalog1,catalog2Include Schemas No A comma-separated list of schemas to include in the connection Default Schema No The default schema to use for queries Authentication Type Yes Select AWS Access Key AWS Access Key ID Yes The ID of the AWS access key, which you created in the previous step AWS Secret Access Key Yes The secret access key for AWS authentication, which you created in the previous step Database Timezone Yes The timezone used by the database Query Timezone No The timezone to use for Omni queries Allow User-Specific Timezones No Allow users to override the connection timezone with their own Region No The AWS region the database is in. Defaults to us-east-1.Base Access Yes Select the minimum level of access users should have to models in the connection - When finished, click Create connection.
Option 2: Cross-account role authentication
Cross-account role authentication allows you to specify an IAM role for Omni to assume when connecting to Athena.Create an IAM policy
To complete this step, you need permissions in AWS that allow you to create IAM policies.
- Sign into your AWS console.
- Navigate to IAM, then click Roles in the left navigation.
- On the page that displays, click Create policy.
-
In the Policy editor section, click the toggle to JSON:

-
In the policy editor, paste the following policy. Replace
<NAME-OF-ATHENA-QUERY-RESULTS-BUCKET>with the name of the S3 bucket used to store Athena query results:If your data is stored in a separate bucket than the query results, you’ll need to add an additional permissions block to the policy.Replace<NAME-OF-BUCKET-CONTAINING-DATA>with the name of the bucket that contains the data:Additional permissions for different data & query buckets - Click Next.
- On the Policy details page, enter a name and description for the policy.
- When finished, click Create policy.
Create the IAM role
To complete this step, you need permissions in AWS that allow you to create IAM roles.
- You should still be in the IAM section of the AWS console. If not, navigate there.
- Click Roles in the left navigation.
- On the page that displays, click Create role.
-
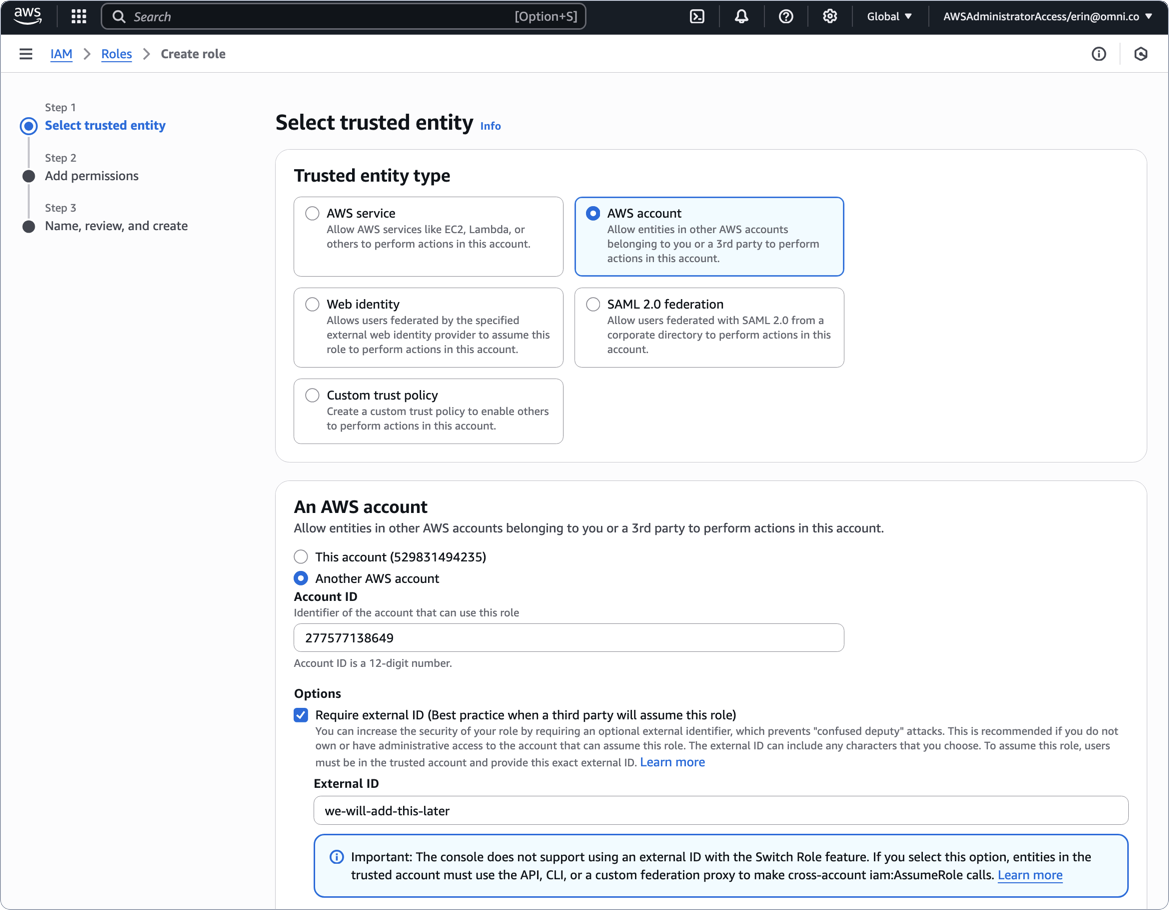
Define the trusted entity for the role as follows:
- Trusted entity type - Select AWS account
- In An AWS account, click Another AWS account
- Account ID field - Paste the AWS Account ID value from the Omni setup page
- In Options, check Require external ID
- External ID - Enter a placeholder value - we used
we-will-add-this-laterin the below image. You will update this after you save the connection in Omni!
- On the Add permissions page, locate and select the policy you created in the previous section.
- Click Next.
- In the Role details section, enter a name for the role.
- Review the selections and click Create role when finished.

Create the connection in Omni
Navigate back to the Athena setup page in Omni and fill in the connection details:
When finished, click Create connection.
| Name | Required? | Description |
|---|---|---|
| Display Name | Yes | A user-friendly name for the connection, which will be used throughout Omni |
| S3 Output Bucket | Yes | The Amazon S3 bucket used to store query results for the Athena database |
| Data Catalog | Yes | The lowercase name of the data catalog to connect to |
| Include Other Data Catalogs | No | A comma-separated list of data catalogs you want to generate models for, ex: catalog1, catalog2 |
| Include Schemas | No | A comma-separated list of schemas to include in the connection |
| Default Schema | No | The default schema to use for queries |
| Authentication Type | Yes | Select AWS Cross Account Role |
| AWS Role ARN | Yes | The ARN of the IAM role for Omni to assume, which you created in step 3 |
| Database Timezone | Yes | The timezone used by the database |
| Query Timezone | No | The timezone to use for Omni queries |
| Allow User-Specific Timezones | No | Allow users to override the connection timezone with their own |
| Region | No | The AWS region the database is in. Defaults to us-east-1. |
| Base Access | Yes | Select the minimum level of access users should have to models in the connection |
After you save the connection, you’ll likely see an error similar to
System message: AWS Role must be configured to check for an External ID - don’t worry! You’re going to address this in the next step.Add the Omni external ID to the IAM role
- In AWS, navigate back to the IAM role page.
-
On the role’s details page, click the Trust relationships tab in the middle of the page:
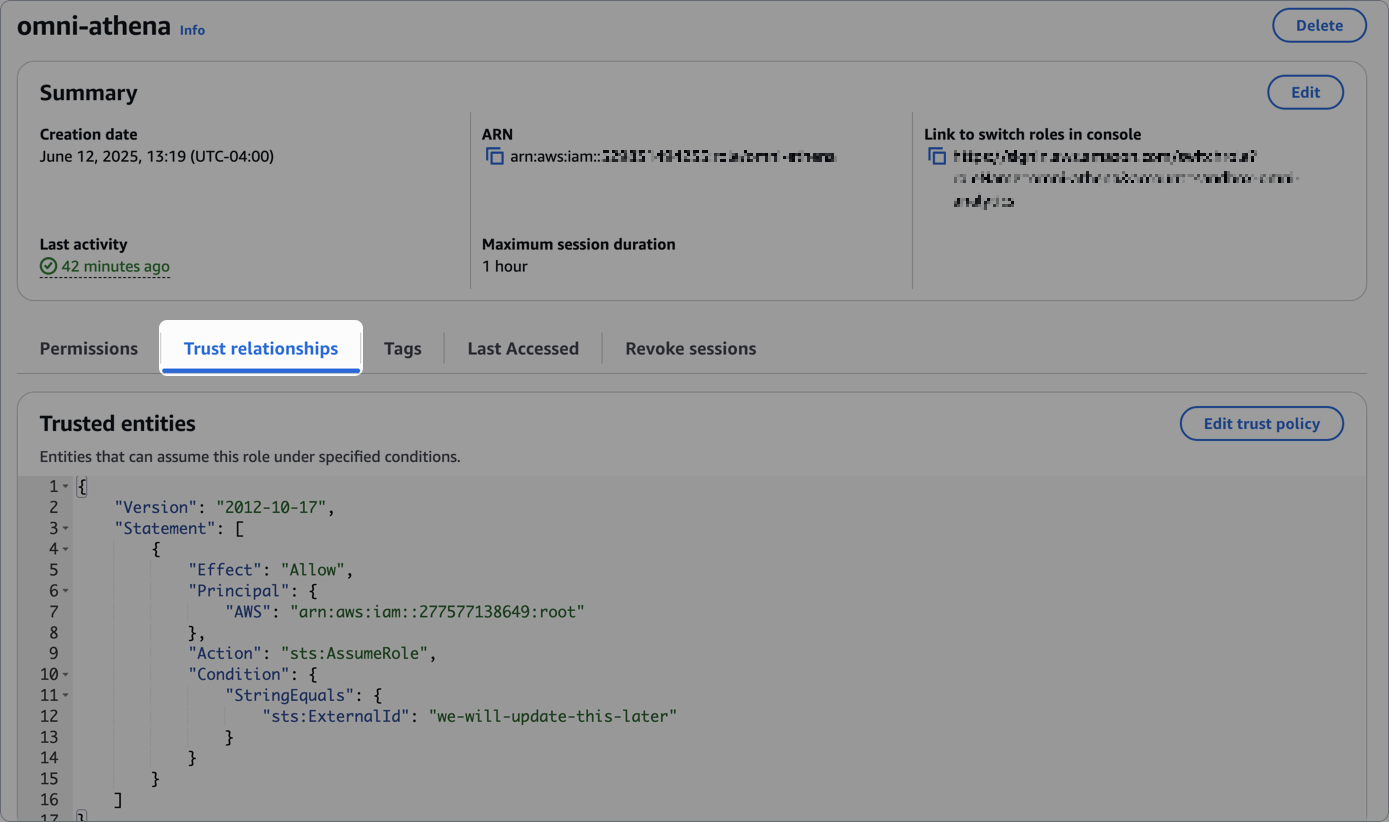
- Click Edit trust policy.
-
Locate the
sts:ExternalIdproperty. Replace its value with the AWS External ID value from the Omni setup page:Add AWS external ID from Omni - Click Update policy when finished.
What’s next?
Now that your database is set up, you can:- Configure user permissions, schema refreshes, environments and timezone settings
- Learn how Omni generates the model associated with the connection
Troubleshooting
Data & query results in different S3 buckets
Data & query results in different S3 buckets
Applicable if using cross-account role authentication. If the S3 bucket containing your data is different than the bucket Athena is configured to use for query results, you may encounter an error in Omni.Adding a block like the following to the IAM permissions policy attached to the IAM role you created can help resolve the issue.Replace
<NAME-OF-BUCKET-CONTAINING-DATA> with the name of the bucket that contains the data:Additional permissions for different data & query buckets