> ## Documentation Index
> Fetch the complete documentation index at: https://docs.omni.co/llms.txt
> Use this file to discover all available pages before exploring further.
# Organizing content with folders & labels
> Organize dashboards and workbooks in Omni using folders for hierarchical access control and labels for cross-folder findability.
As your team creates content, finding the right balance between access and discoverability becomes crucial. Omni's content system allows you to efficiently manage your content with:
* **Folders**, which provide a simple, hierarchical structure for organizing content and controlling access
* **Labels**, which can enhance findability without the need for duplicating content across folders
By combining folders and labels, you can create an intuitive content organization system that supports your team’s collaboration by ensuring that the right content is always easy to find.
## Folders
Using folders for content organization allows you to maintain structure and determine how users access content. For example, folders could allow you to organize content and access for:
* Teams, such as **Operations** or **Finance**
* Employee level, such as **Manager** or **Executive**
* Projects
* Clients
Folders can contain documents and subfolders.
### Creating folders
To create a folder, click **Add folder** in the **My documents** folder or your organization's **Shared** hub. **Note**: Your [organization's **Content organization** setting](/administration/settings) determines if users can create content in the root of the shared space.
Creating subfolders in folders is supported. The parent folder can contain up to seven levels of nesting, for example:
```text theme={null}
. Shared (root) ## Parent folder
└── Folder 1
└── Folder 2
└── Folder 3
└── Folder 4
└── Folder 5
└── Folder 6
└── Folder 7 ## Nesting limit
```
### Moving folders
To move a folder:
* Open the folder and click the icon next to the **Share** icon, or
* On a page like the shared **Hub** or **My Documents**, click the icon next to the folder: 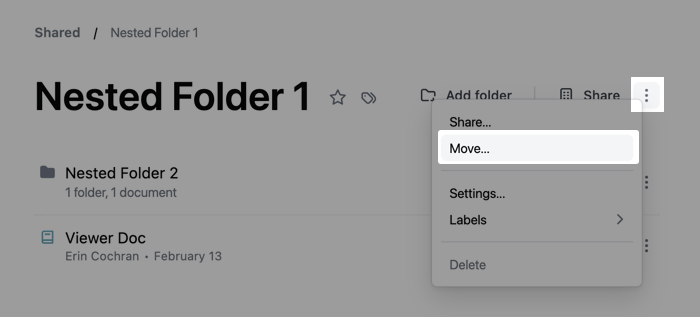 Click **Move**.
Select the folder to move to.
Click **Save**.
### Accessing and sharing folders
When you share a folder, permissions cascade to all documents and subfolders inside it. This means that the access role you assign to a folder applies to everything the folder contains.
Content access roles on folders work differently than on individual documents. For a detailed comparison of folder and document permissions, and information about inheriting access roles, refer to the [Sharing content guide](/share#content-access-permissions).
### Deleting folders
Folders can only be deleted if they're empty. Who can delete a folder depends on their [content access role](/share#content-access-permissions):
* **Editors** can delete empty folders they created
* **Managers** can delete any empty folder they have access to
To delete a folder, click the folder's icon and then **Delete**.
## Labels
While folders are helpful for maintaining structure and access, a document can only be in one folder at a time. For example, a dashboard is relevant to multiple teams, each of which has their own folder. Where should the document be located?
With labels, you could place the dashboard in a shared folder and add relevant labels, ensuring the right people can find the content. Labels allow you to organize your content in a way that doesn't require duplication or sacrifice findability.
Using labels, you can:
* Organize content by subject area, such as **Marketing** or **Support**
* Indicate the current working state of a document, such as **In progress**
* Use [label settings](#label-options) to:
* Curate **Home** page content for your organization
* Mark important content as **Verified**
### Applying labels
You must be in the published version of a document to apply labels.
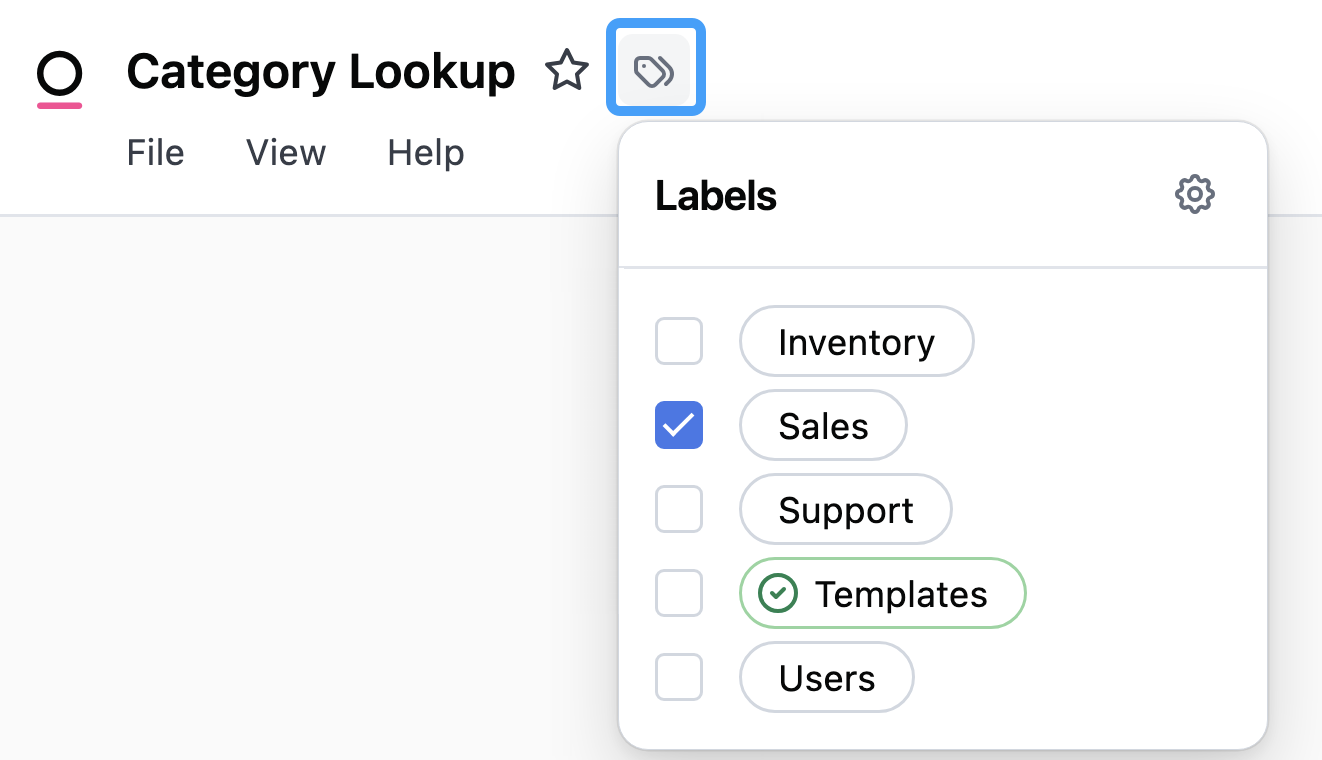
To apply a label to a document or a folder, click the **Labels** icon to the right of the document/folder name:
Click **Move**.
Select the folder to move to.
Click **Save**.
### Accessing and sharing folders
When you share a folder, permissions cascade to all documents and subfolders inside it. This means that the access role you assign to a folder applies to everything the folder contains.
Content access roles on folders work differently than on individual documents. For a detailed comparison of folder and document permissions, and information about inheriting access roles, refer to the [Sharing content guide](/share#content-access-permissions).
### Deleting folders
Folders can only be deleted if they're empty. Who can delete a folder depends on their [content access role](/share#content-access-permissions):
* **Editors** can delete empty folders they created
* **Managers** can delete any empty folder they have access to
To delete a folder, click the folder's icon and then **Delete**.
## Labels
While folders are helpful for maintaining structure and access, a document can only be in one folder at a time. For example, a dashboard is relevant to multiple teams, each of which has their own folder. Where should the document be located?
With labels, you could place the dashboard in a shared folder and add relevant labels, ensuring the right people can find the content. Labels allow you to organize your content in a way that doesn't require duplication or sacrifice findability.
Using labels, you can:
* Organize content by subject area, such as **Marketing** or **Support**
* Indicate the current working state of a document, such as **In progress**
* Use [label settings](#label-options) to:
* Curate **Home** page content for your organization
* Mark important content as **Verified**
### Applying labels
You must be in the published version of a document to apply labels.
To apply a label to a document or a folder, click the **Labels** icon to the right of the document/folder name:
 ### Viewing label information
When you hover over a label, a tooltip displays additional information about the label, including:
* The label's description (if one has been added)
* Who applied the label and when it was applied
This metadata helps you understand the context and history of labels applied to content. You can view this information wherever labels appear in Omni, including:
* Document and folder detail pages
* Content listings (Home page, My Documents, folders)
* Search results
* The curation popover
In embedded Omni instances, the tooltip shows the label description and timestamp, but not the name of the user who applied the label.
### Managing labels
Labels are managed in the **Label settings** page, which can be accessed by:
* Navigating to **Settings > Labels**, or
* Clicking the **Labels** icon in a document or folder, then the **gear icon**
On the **Label settings** page, you can:
* **Add a label** by clicking the **Add Label** button.
* **Edit a label** by clicking on it or selecting **Edit** from the options menu ( icon). This opens the label editor where you can:
* **Rename the label**
* **Choose a color** using the color picker, which includes preset color swatches, a custom color picker, and an eyedropper tool
* **Add a description** to provide additional context about the label's purpose or usage
* **Set label options** using the [Verified and Homepage checkboxes](#label-options) (requires appropriate permissions)
* **Delete a label** by clicking the **options menu** ( icon) next to the label and selecting **Delete**. **Note**: Labels can't be deleted if they're currently in use.
When you add a color to a label, it will be displayed with that background color throughout Omni. Text on colored labels automatically adjusts for optimal contrast and readability. For information about viewing label descriptions and metadata, see [Viewing label information](#viewing-label-information).
### Label options
**Organization Admin** permissions are required to apply the options outlined in this section to labels.
Labels can be configured with special options that provide additional functionality. These options are set in the label edit dialog and require specific permissions.
#### Homepage
Enabling the **Homepage** option allows you to select content to display on your users' **Home** page, in the **For you** section.
This can be useful for:
* Providing helpful starting points for new users in your organization
* Ensuring content relevant to all users is easily accessible
#### Verified
Enabling the **Verified** option allows you to mark important content, such as dashboards that are monitored for correctness. This can be helpful for conveying to your users which content is actively maintained or has been vetted.
To apply these options to a label:
Open the **Label settings** page by navigating to **Settings > Labels** or by clicking the **Labels** icon in a document and then the icon.
Click the label you want to edit, or select **Edit** from the label's **options menu** ( icon).
In the edit dialog, check the **Homepage** and/or **Verified** checkboxes as needed.
Click **Save** to apply your changes.
When these options are enabled, the corresponding label will be highlighted to increase prominence. Labels with the **Verified** option will be highlighted green with a checkmark, while those with the **Homepage** option will have a **Home Page** badge:
### Viewing label information
When you hover over a label, a tooltip displays additional information about the label, including:
* The label's description (if one has been added)
* Who applied the label and when it was applied
This metadata helps you understand the context and history of labels applied to content. You can view this information wherever labels appear in Omni, including:
* Document and folder detail pages
* Content listings (Home page, My Documents, folders)
* Search results
* The curation popover
In embedded Omni instances, the tooltip shows the label description and timestamp, but not the name of the user who applied the label.
### Managing labels
Labels are managed in the **Label settings** page, which can be accessed by:
* Navigating to **Settings > Labels**, or
* Clicking the **Labels** icon in a document or folder, then the **gear icon**
On the **Label settings** page, you can:
* **Add a label** by clicking the **Add Label** button.
* **Edit a label** by clicking on it or selecting **Edit** from the options menu ( icon). This opens the label editor where you can:
* **Rename the label**
* **Choose a color** using the color picker, which includes preset color swatches, a custom color picker, and an eyedropper tool
* **Add a description** to provide additional context about the label's purpose or usage
* **Set label options** using the [Verified and Homepage checkboxes](#label-options) (requires appropriate permissions)
* **Delete a label** by clicking the **options menu** ( icon) next to the label and selecting **Delete**. **Note**: Labels can't be deleted if they're currently in use.
When you add a color to a label, it will be displayed with that background color throughout Omni. Text on colored labels automatically adjusts for optimal contrast and readability. For information about viewing label descriptions and metadata, see [Viewing label information](#viewing-label-information).
### Label options
**Organization Admin** permissions are required to apply the options outlined in this section to labels.
Labels can be configured with special options that provide additional functionality. These options are set in the label edit dialog and require specific permissions.
#### Homepage
Enabling the **Homepage** option allows you to select content to display on your users' **Home** page, in the **For you** section.
This can be useful for:
* Providing helpful starting points for new users in your organization
* Ensuring content relevant to all users is easily accessible
#### Verified
Enabling the **Verified** option allows you to mark important content, such as dashboards that are monitored for correctness. This can be helpful for conveying to your users which content is actively maintained or has been vetted.
To apply these options to a label:
Open the **Label settings** page by navigating to **Settings > Labels** or by clicking the **Labels** icon in a document and then the icon.
Click the label you want to edit, or select **Edit** from the label's **options menu** ( icon).
In the edit dialog, check the **Homepage** and/or **Verified** checkboxes as needed.
Click **Save** to apply your changes.
When these options are enabled, the corresponding label will be highlighted to increase prominence. Labels with the **Verified** option will be highlighted green with a checkmark, while those with the **Homepage** option will have a **Home Page** badge:
