> ## Documentation Index
> Fetch the complete documentation index at: https://docs.omni.co/llms.txt
> Use this file to discover all available pages before exploring further.
# Developing content and models with Branch Mode
> Use Branch Mode to safely test model and content changes in isolation before merging them into your production environment.
More structured than draft-only mode but less complex than the git integration, Branch Mode brings lightweight version control to Omni, letting you test changes to models and content before making them visible to your teammates.
By creating a separate space to experiment with updates, you can develop confidently without disrupting production data. This approach supports scalable and reliable workflows, reducing the need for reactive fixes while improving traceability and accountability in the development process.
## Branching in Omni
If you're familiar with version control systems like git - and it's okay if you're not! - branches in Omni are similar.
In Omni, a branch is an isolated space that allows you to make changes to a model and/or content without affecting the live versions, typically referred to as production. This enables you to experiment, update, and refine your changes before applying any modifications to the live environment.
To demonstrate why branches are useful, let's look at an example that starts with a change to a shared model.
When changes are made directly to a shared model, the model's history might look like this:
```mermaid theme={null}
---
title: "Model changes without Branch Mode"
---
%%{init: { 'theme': 'default' ,
'themeVariables': {
'git0': '#3F4755',
'commitLabelFontSize': '14px',
'commitLabelColor': '#000000',
'commitLabelBackground': '#ffffff'
},
'gitGraph': {
'showBranches': true,
'showCommitLabel': true,
'mainBranchName': 'Production'
}
}
}%%
gitGraph TB:
commit id: "Add topic"
commit id: "Add field"
commit id: "Change field logic"
commit id: "..."
```
**The changes in this example were immediately applied to the model.** If a query had been using the modified field, its logic and results could have changed unexpectedly. These differences might not be noticed right away, potentially leading to incorrect conclusions or broken content.
Now consider this example, where changes to the model and impacted documents were made together in a branch:
```mermaid theme={null}
---
title: "Model & document changes with Branch Mode"
---
%%{init: { 'theme': 'default' ,
'themeVariables': {
'git0': '#FF5FA2',
'git1': '#3F4755',
'gitBranchLabel1': '#ffffff',
'commitLabelFontSize': '14px',
'commitLabelColor': '#000000',
'commitLabelBackground': '#ffffff'
},
'gitGraph': {
'showBranches': true,
'showCommitLabel': true,
'mainBranchName': 'Production model',
'mainBranchOrder': 1
}
}
}%%
gitGraph TB:
commit id: "Add topic "
commit id: "Add field "
branch "Omni branch"
checkout "Omni branch"
commit id: "Change field logic "
commit id: "Update Document A"
commit id: "Update Document B"
checkout "Production model"
merge "Omni branch" id: "Merge "
commit id: "..."
```
In this example, **the branch contained updates to the field logic and impacted documents**. You could navigate to documents that use the field, open the branch, and make the changes required to ensure the updated data was correct.
When everything worked as expected, you would then merge the branch, applying the changes to the live version of the model and publishing new versions of the documents at the same time.
Check out [our blog post](https://omni.co/blog/why-the-software-development-lifecycle-is-critical-for-bi) to learn more about why traditional development practices - like branches - are useful for modern data teams.
Unlike a document draft which is specific to a single document, branches can include changes to a model and multiple documents. This makes branches especially useful for updating a model and any impacted content at the same time.
Branches shouldn't be thought of as entirely separate from document drafts - they act more as a layer of additional functionality on top of document drafts. When content changes are made in a branch, a draft of each modified document is attached to the branch. Publishing the branch publishes new versions of the documents.
Refer to the [Editing and publishing guide](/content/develop) for a detailed overview, including a comparison between drafts and branches.
Branches can be used in the [model IDE](/modeling/develop/model-management) and documents.
Your [connection permissions](/administration/users/permissions) determine the level of access you have to branches:
| | View branches | Create branches | Merge branches |
| ----------------------- | ------------- | --------------- | -------------- |
| **Viewer** | X No | X No | X No |
| **Restricted Queriers** | X No | X No | X No |
| **Queriers** | ✓ Yes | ✓ Yes | X No |
| **Modelers** | ✓ Yes | ✓ Yes | ✓ Yes |
| **Connection Admins** | ✓ Yes | ✓ Yes | ✓ Yes |
**Note**: **Create branches** also includes the ability to make changes within a branch.
Yes, but only for changes to models. If a branch includes content changes, those changes will not be pushed to the connected git repository. However, the drafts of the content will be published when the branch is merged.
When the [git](/integrations/git) is configured for a connection, Branch Mode is required to make changes to the connection's models. The [dbt integration](/integrations/dbt) uses branches to enable switching [dbt environments](/integrations/dbt#dbt-environments).
Yes. Extension models that use the `extends` parameter can be configured to support isolated branches. These branches are scoped to the extension model and remain separate from the parent shared model's branches.
Refer to [Using isolated branches with extension models](/modeling/develop/shared-extensions/extension-branches) for more information.
## Creating branches
**Connection Admin**, **Modeler**, or **Querier** permissions are required to create branches.
1. In a workbook or the model IDE, click **Model > New branch** or **Model > Branch > New branch**.
2. When prompted, enter a name for the branch.
To group (or nest) branches in the branch menu, you can use forward slashes. For example, these branch names:
```text theme={null}
- add-new-topic
- field-updates/add-new-calc
- field-updates/rename-fields
- field-updates/update-field-def
- remove-topic
```
Would create this structure in the branch menu:
```text theme={null}
- add-new-topic
- field-updates
- add-new-calc
- rename-fields
- update-field-def
- remove-topic
```
3. Use the **Branch from** dropdown to select the starting point for the branch:
* **Shared model (latest)** - Creates a branch from the latest version of the shared model
* **Existing branch** - Creates a branch from an existing branch
* **Specific version** - Creates a branch from a specific version of the underlying model
4. Click **Create**.
5. A green and pink header will display at the top of the page, indicating that you're in the branch:
 At this point, you can begin making changes. **Note**: If you created the branch in a workbook, you'll be automatically placed in a document draft.
## Editing documents
**Connection Admin**, **Modeler**, or **Querier** permissions are required to edit documents in branches.
To open an existing branch in a document, click **Model > Branch** and select your branch. If your model has 10 or more branches, you can use the **Search branches...** option to quickly find the branch you need.
You'll be placed in a draft and any changes will be auto-saved as you work.
You can add changes to the model associated with the document by opening the branch in the [model IDE](#editing-models).
### Moving drafts to branches
Branches can include changes to multiple documents. If the draft you want to move uses the same model as any documents in the branch, you can attach it to a branch.
To attach an existing draft to a branch:
1. Open the draft.
2. Click **File > Move to branch**.
3. Select the branch. The draft header at the top of the page will be updated to include the branch.
You can detach a draft from the branch at any time by clicking **File > Move to different branch > Detach from branch** in the workbook.
If a draft for a document is already attached to the branch, it will be overwritten if another draft for the same document is moved. For example, a branch has a draft for **Document A** attached to it. If a different draft for **Document A** is moved to the branch, the original draft will be overwritten.
The opposite is also true - if you detach a draft from a branch and the source document already has a draft, it will be overwritten. You'll be prompted to confirm the detachment when this occurs.
### Viewing document changes
For every change you make in a document, an entry will be added to the **Draft changes** panel. Click **See changes** in the branch header or **View workbook changes** on the left side of the page to open the panel:
At this point, you can begin making changes. **Note**: If you created the branch in a workbook, you'll be automatically placed in a document draft.
## Editing documents
**Connection Admin**, **Modeler**, or **Querier** permissions are required to edit documents in branches.
To open an existing branch in a document, click **Model > Branch** and select your branch. If your model has 10 or more branches, you can use the **Search branches...** option to quickly find the branch you need.
You'll be placed in a draft and any changes will be auto-saved as you work.
You can add changes to the model associated with the document by opening the branch in the [model IDE](#editing-models).
### Moving drafts to branches
Branches can include changes to multiple documents. If the draft you want to move uses the same model as any documents in the branch, you can attach it to a branch.
To attach an existing draft to a branch:
1. Open the draft.
2. Click **File > Move to branch**.
3. Select the branch. The draft header at the top of the page will be updated to include the branch.
You can detach a draft from the branch at any time by clicking **File > Move to different branch > Detach from branch** in the workbook.
If a draft for a document is already attached to the branch, it will be overwritten if another draft for the same document is moved. For example, a branch has a draft for **Document A** attached to it. If a different draft for **Document A** is moved to the branch, the original draft will be overwritten.
The opposite is also true - if you detach a draft from a branch and the source document already has a draft, it will be overwritten. You'll be prompted to confirm the detachment when this occurs.
### Viewing document changes
For every change you make in a document, an entry will be added to the **Draft changes** panel. Click **See changes** in the branch header or **View workbook changes** on the left side of the page to open the panel:
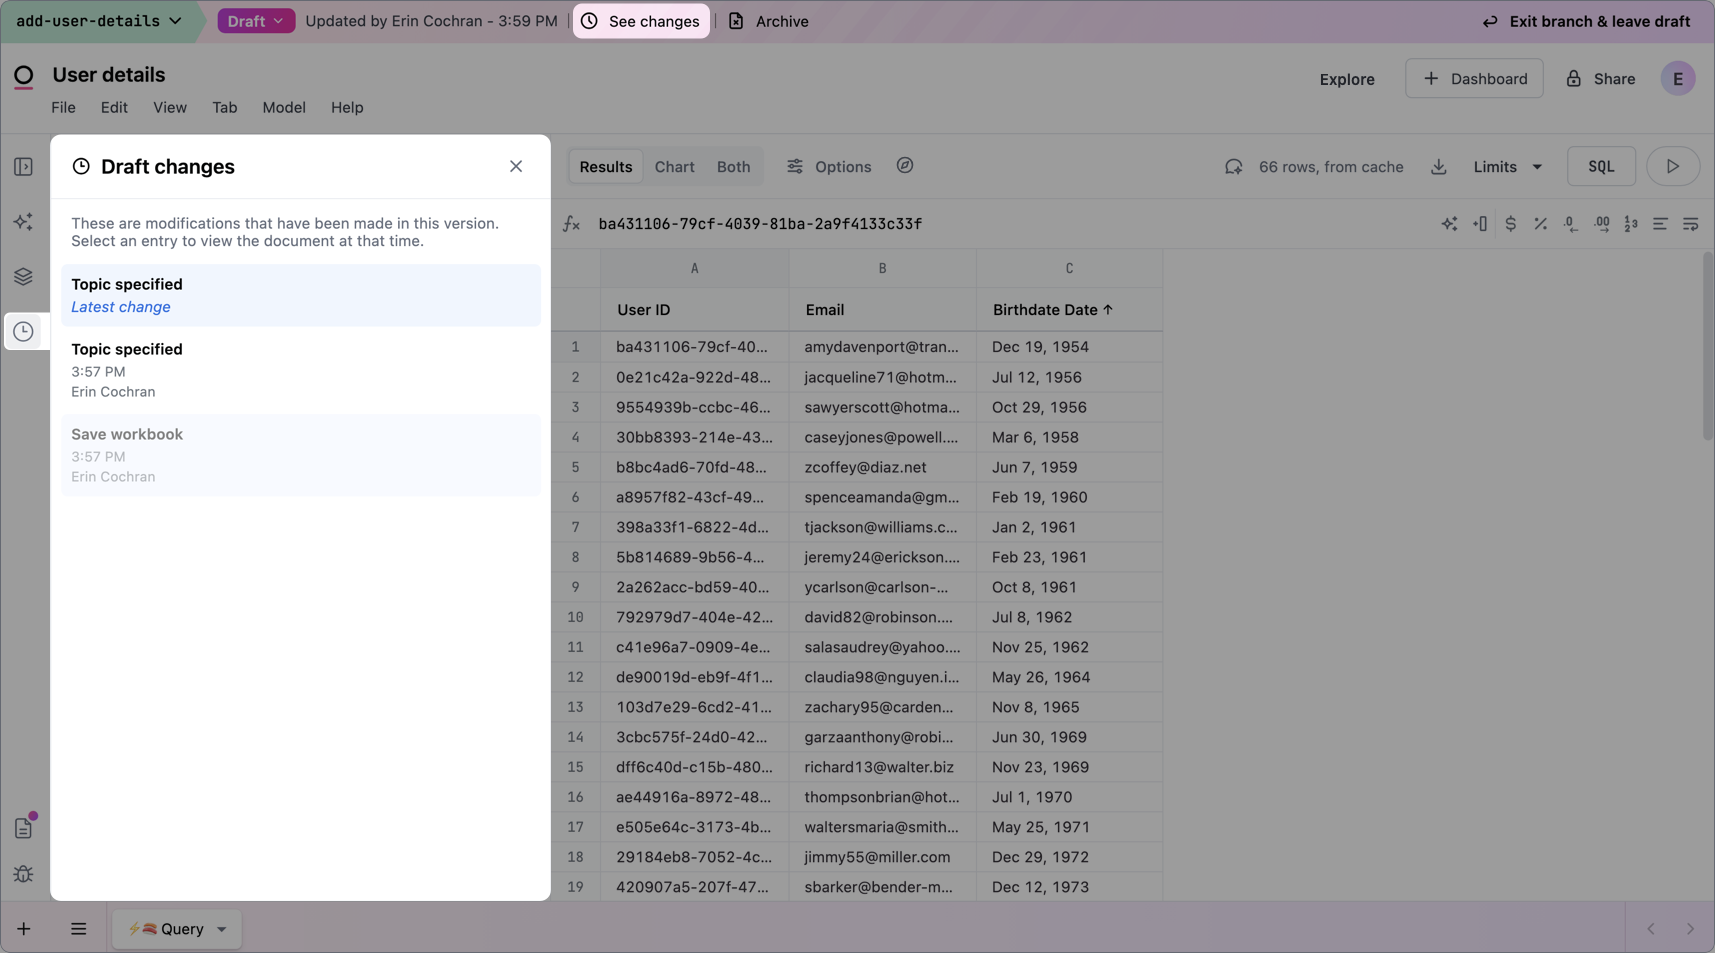 **Note**: The **Draft changes** panel will only display changes for the current document.
### Requiring pull requests to publish document changes
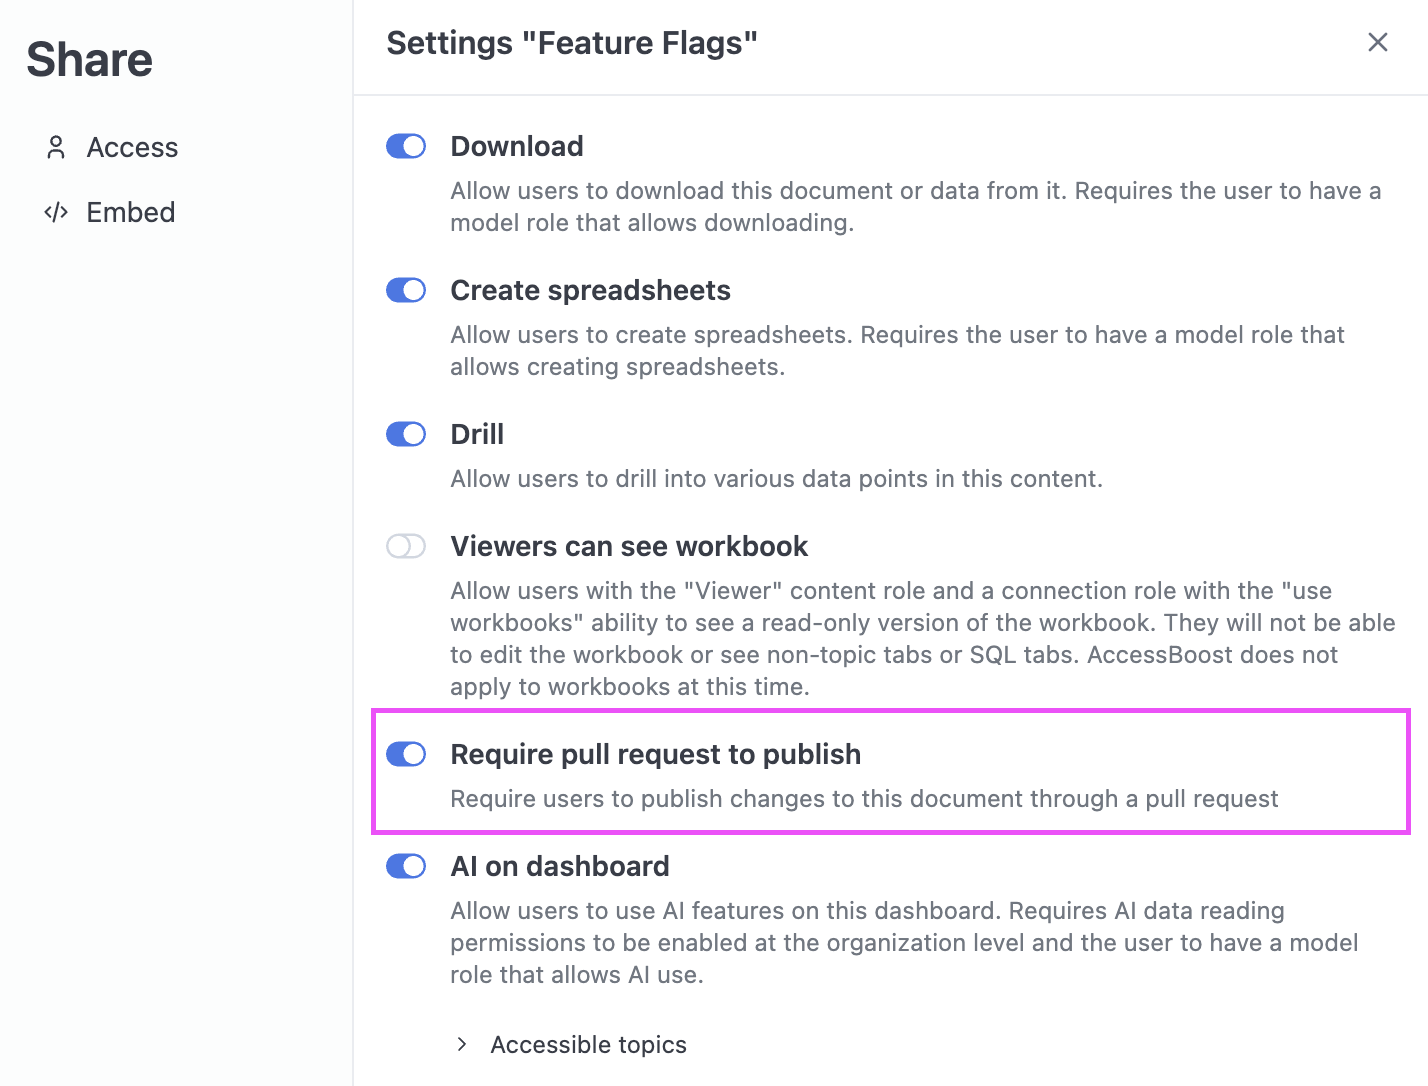
For high-impact or sensitive documents, you may want to ensure that all changes are reviewed before they go live. Enabling **Require pull requests to publish** enforces a pull request–based workflow, so updates must be proposed, reviewed, and approved before they are published.
When this setting is enabled:
* Direct edits to the published document are blocked
* Any change requires opening a branch and submitting a pull request
* The document is only updated once the pull request is approved and merged
**Note**: The **Draft changes** panel will only display changes for the current document.
### Requiring pull requests to publish document changes
For high-impact or sensitive documents, you may want to ensure that all changes are reviewed before they go live. Enabling **Require pull requests to publish** enforces a pull request–based workflow, so updates must be proposed, reviewed, and approved before they are published.
When this setting is enabled:
* Direct edits to the published document are blocked
* Any change requires opening a branch and submitting a pull request
* The document is only updated once the pull request is approved and merged
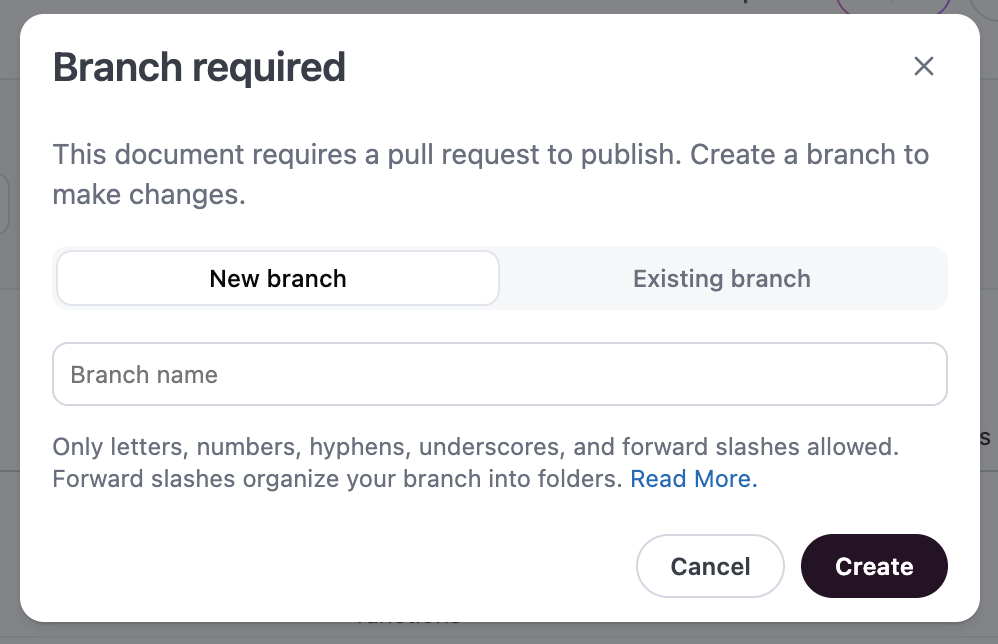 This setting is applied per document, allowing you to selectively enforce review workflows only where they’re needed. First enable the document setting under **Settings > Content Permissions**. Then turn it on for a given document from the **File > Document settings** menu.
 To use this feature:
* The git integration must be configured for the model the document is built on
* You must have the Content Manager role on the document to enable or disable this setting
* Users making changes must have the **Querier** role or higher, as changes require creating a branch
## Finding and managing branches
When working with branches in the model IDE, you have two ways to find and select the branch you need:
* **Click Model > Branch** and select your branch from the dropdown menu. To search for a branch, click the **Search branches** option to open a searchable dialog that makes it easier to find the branch you need. You can filter branches by name, then either switch to the branch or press **Enter** to select it.
* **The Branch management page**, accessed by clicking the icon in the left navigation of the IDE:
To use this feature:
* The git integration must be configured for the model the document is built on
* You must have the Content Manager role on the document to enable or disable this setting
* Users making changes must have the **Querier** role or higher, as changes require creating a branch
## Finding and managing branches
When working with branches in the model IDE, you have two ways to find and select the branch you need:
* **Click Model > Branch** and select your branch from the dropdown menu. To search for a branch, click the **Search branches** option to open a searchable dialog that makes it easier to find the branch you need. You can filter branches by name, then either switch to the branch or press **Enter** to select it.
* **The Branch management page**, accessed by clicking the icon in the left navigation of the IDE:
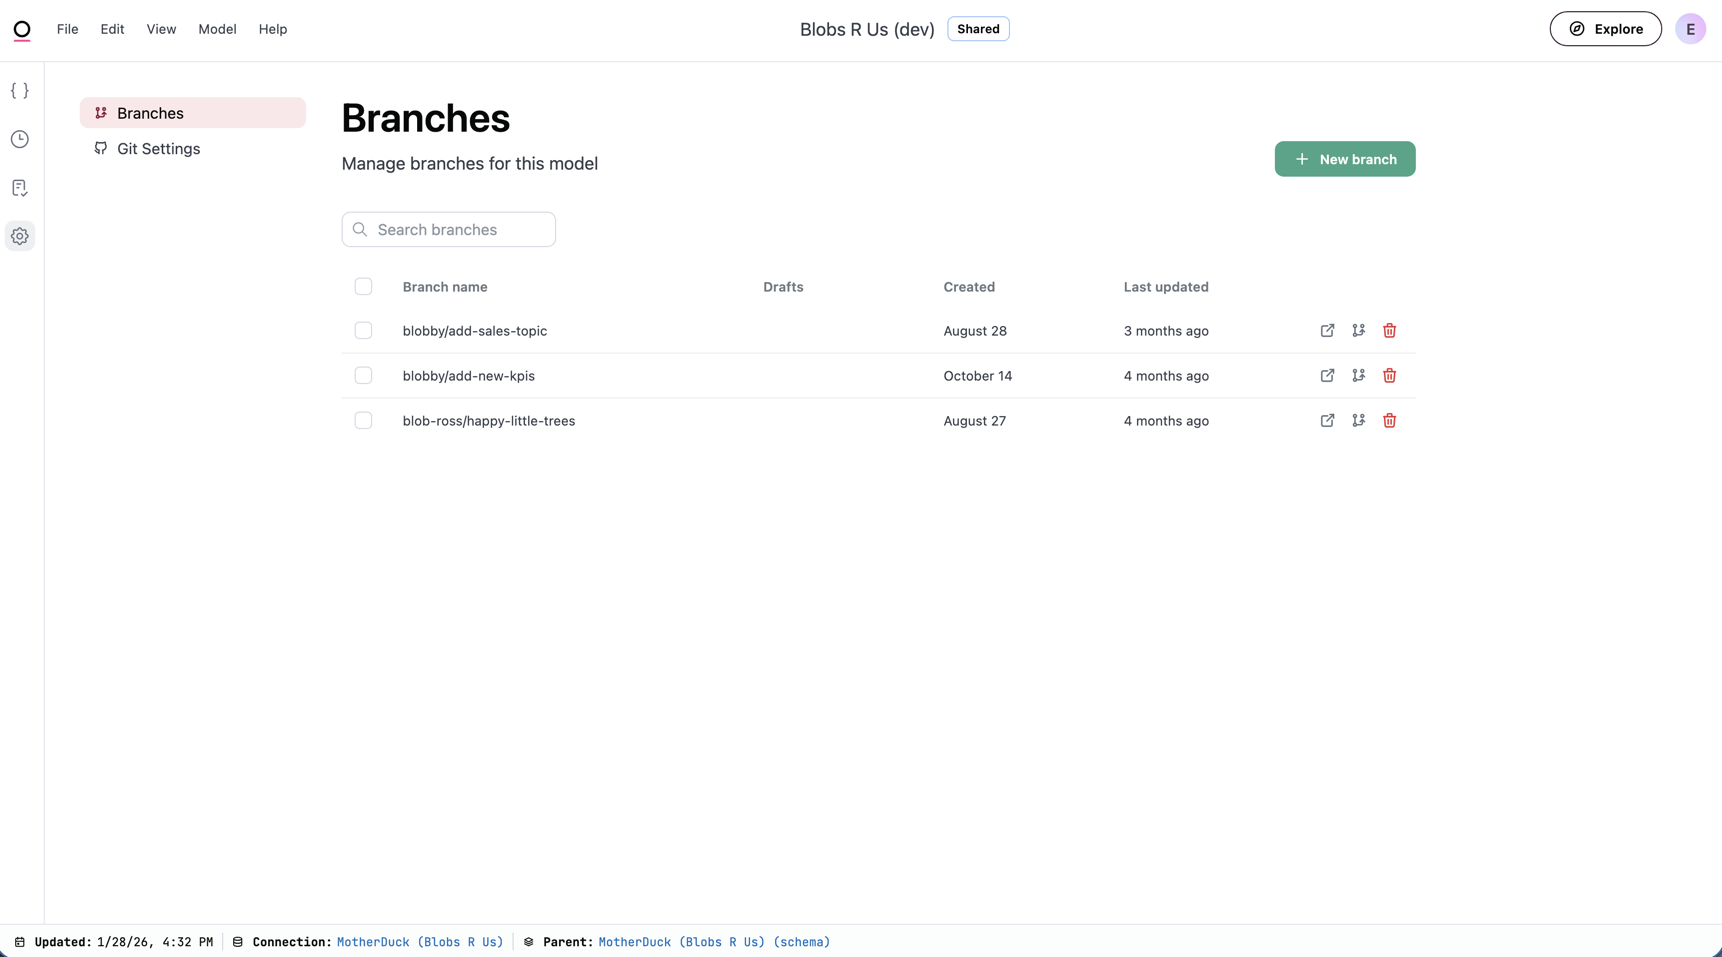 You can view and manage all branches for a model on the **Branches** page. This page displays a list of all branches with key information like branch name, creator, and last updated time.
## Switching branches via URL
This section is only applicable to **workbooks and dashboards**. To switch branches in the model IDE, use the **Model > Branch** menu.
You can load a document on a specific, existing branch by appending the `?branch=` query parameter to its URL. This approach is useful when you want to:
* Bookmark a direct link to a document on a specific branch
* Share a branch-specific view of a document with a colleague
* Quickly switch between branch states without navigating the UI
For example:
```text wrap theme={null}
https:///dashboards/?branch=
```
Replace `` with the exact name of the **existing** branch you want to load. For example, if you want to load a workbook on a branch named `feature/new-metrics`:
```text wrap theme={null}
https://yourcompany.omniapp.co/workbooks/abc123?branch=feature%2Fnew-metrics
```
When adding the name of the branch, keep in mind that:
* **The branch must already exist**. This parameter doesn't create new branches. Additionally, if the branch name does not match an existing branch, the document will load without a branch.
* **You'll need to URL-encode special characters**. For example, `/` becomes `%2F`.
## Editing models
**Connection Admin**, **Modeler**, or **Querier** permissions are required to edit models in branches.
After selecting your branch using one of the methods above, you can begin making changes to the model.
Click **Save to branch** to add your changes to the branch:
You can view and manage all branches for a model on the **Branches** page. This page displays a list of all branches with key information like branch name, creator, and last updated time.
## Switching branches via URL
This section is only applicable to **workbooks and dashboards**. To switch branches in the model IDE, use the **Model > Branch** menu.
You can load a document on a specific, existing branch by appending the `?branch=` query parameter to its URL. This approach is useful when you want to:
* Bookmark a direct link to a document on a specific branch
* Share a branch-specific view of a document with a colleague
* Quickly switch between branch states without navigating the UI
For example:
```text wrap theme={null}
https:///dashboards/?branch=
```
Replace `` with the exact name of the **existing** branch you want to load. For example, if you want to load a workbook on a branch named `feature/new-metrics`:
```text wrap theme={null}
https://yourcompany.omniapp.co/workbooks/abc123?branch=feature%2Fnew-metrics
```
When adding the name of the branch, keep in mind that:
* **The branch must already exist**. This parameter doesn't create new branches. Additionally, if the branch name does not match an existing branch, the document will load without a branch.
* **You'll need to URL-encode special characters**. For example, `/` becomes `%2F`.
## Editing models
**Connection Admin**, **Modeler**, or **Querier** permissions are required to edit models in branches.
After selecting your branch using one of the methods above, you can begin making changes to the model.
Click **Save to branch** to add your changes to the branch:
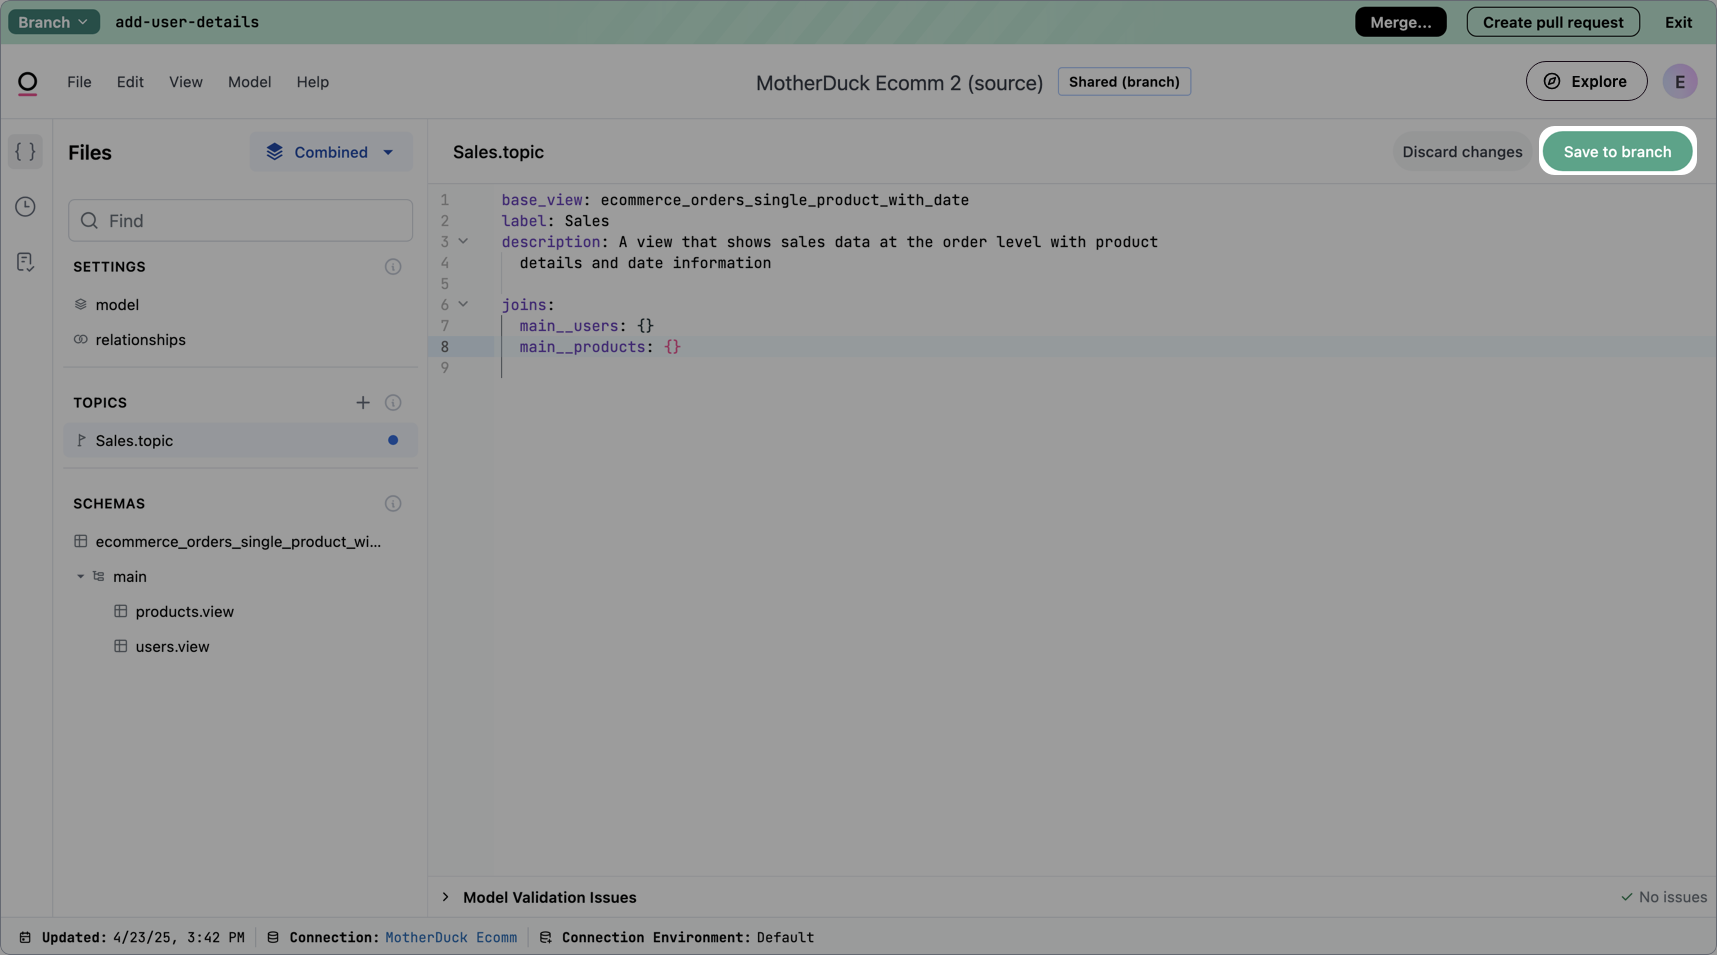 While you're working, you may want to periodically see how your changes will impact documents. You can do this by using the [Content Validator](/modeling/develop/content-validator) or [opening the branch in a workbook](#editing-documents).
### Viewing staged model changes
Each time you save a change in the IDE, an entry will be added to the **Model history** panel. Open this panel to view the changes currently on the branch, as well as the before and after (also called a diff) of each change:
While you're working, you may want to periodically see how your changes will impact documents. You can do this by using the [Content Validator](/modeling/develop/content-validator) or [opening the branch in a workbook](#editing-documents).
### Viewing staged model changes
Each time you save a change in the IDE, an entry will be added to the **Model history** panel. Open this panel to view the changes currently on the branch, as well as the before and after (also called a diff) of each change:
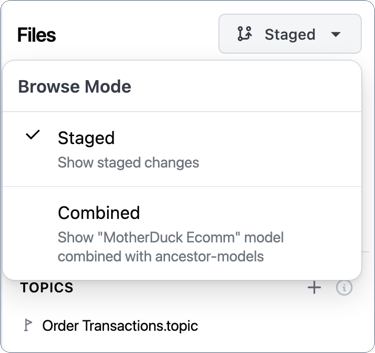
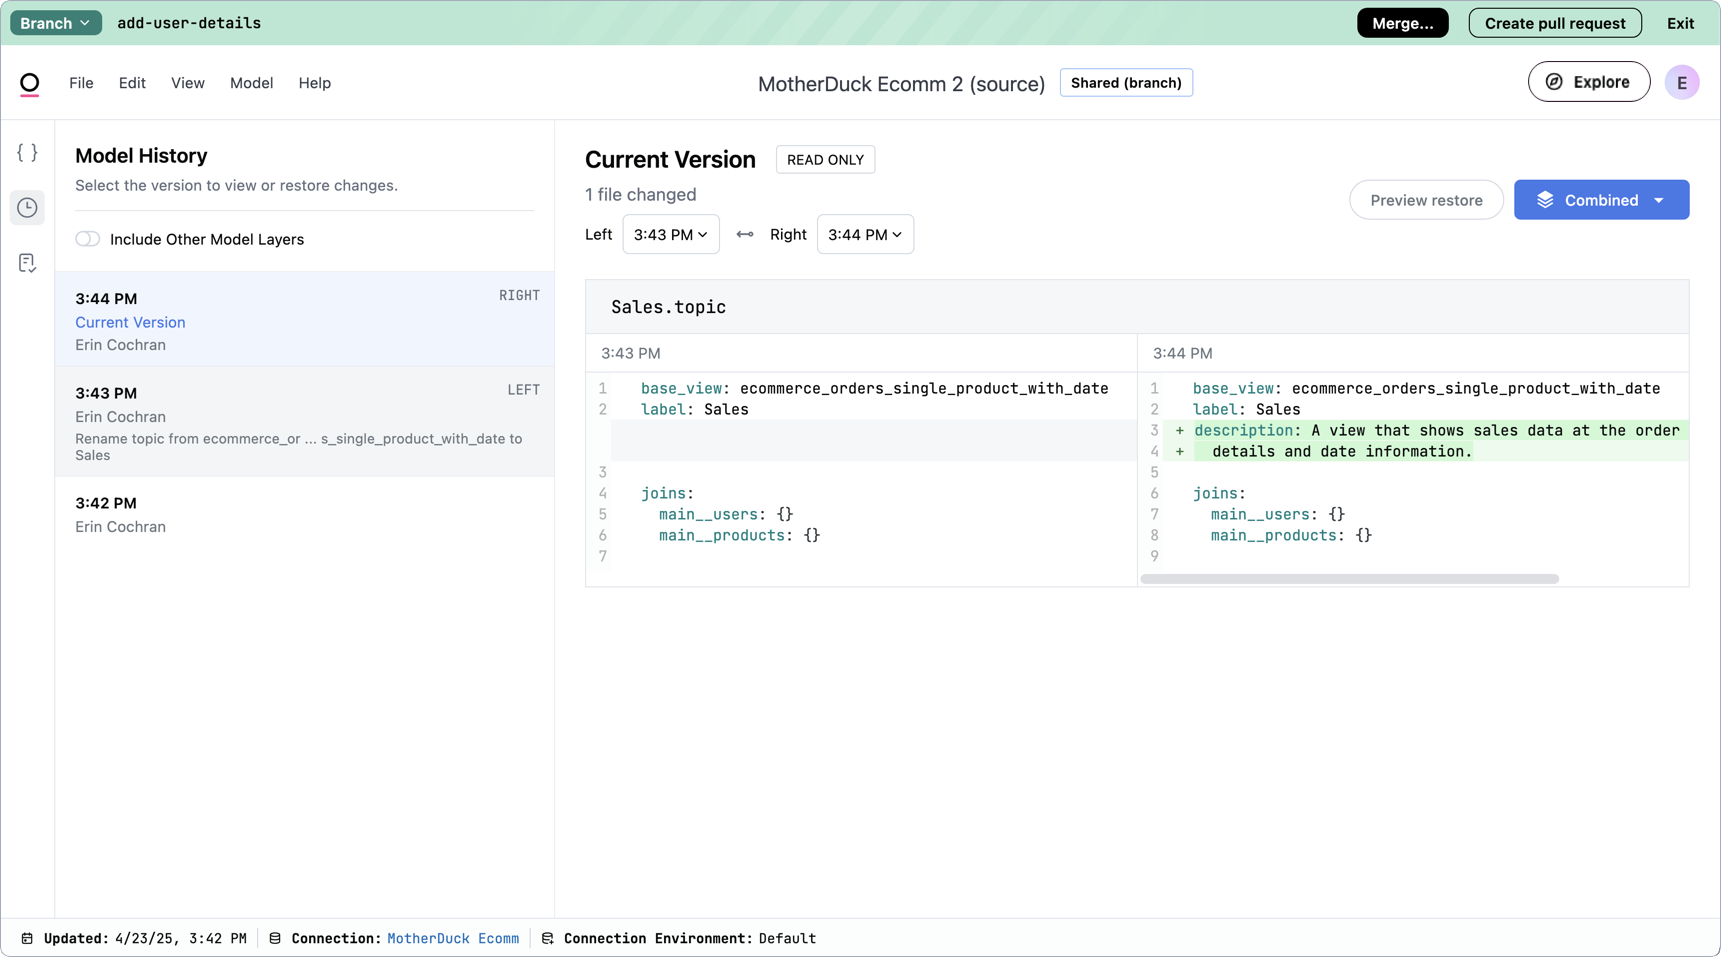 To view only the model files you've changed (and saved) in the branch, click the **Browse mode** dropdown in the file picker, then **Staged**. The IDE will update to filter out any unchanged files:
 ### Validating changes with the Content Validator
As you make changes to the model, Omni recommends using the **Content Validator** to check your work. This tool makes it easy to identify issues in content and proactively address them.
Refer to the [Content Validator guide](/modeling/develop/content-validator) for more information and the [Common publishing workflows guide](/content/develop/workflows) to learn how to incorporate validation into your development strategy.
## Publishing and merging branches
**Connection Admin** or **Modeler** permissions are required to merge branches.
After you've verified your changes work as expected, you'll need to merge the branch to apply them. The steps to merge a branch will vary if the git integration is enabled.
If the integration is enabled, you'll see a **Create pull request button** in the branch header:
### Validating changes with the Content Validator
As you make changes to the model, Omni recommends using the **Content Validator** to check your work. This tool makes it easy to identify issues in content and proactively address them.
Refer to the [Content Validator guide](/modeling/develop/content-validator) for more information and the [Common publishing workflows guide](/content/develop/workflows) to learn how to incorporate validation into your development strategy.
## Publishing and merging branches
**Connection Admin** or **Modeler** permissions are required to merge branches.
After you've verified your changes work as expected, you'll need to merge the branch to apply them. The steps to merge a branch will vary if the git integration is enabled.
If the integration is enabled, you'll see a **Create pull request button** in the branch header:
 Click this button to create a pull request in the connected git repository. The changes in the branch will be applied to production once the pull request is merged. If the branch includes content changes, the drafts of the impacted documents will be published.
When creating a pull request from a branch with draft content, Omni automatically adds a link to view the branch content in the pull request description. This makes it easier for reviewers to see what documents will be published when the pull request is merged, reducing the risk of stale branches overwriting newer changes.
The automatic PR description link works for GitHub and GitLab pull requests. Azure DevOps and Bitbucket do not support pre-filling pull request descriptions via URL parameters, so the link will not be added for these providers.
If git isn't enabled or pull requests aren't required, follow these instructions:
1. In the branch header at the top of the page, click **Publish content drafts** or **Merge** (which will display if the branch contains model changes).
2. You'll be prompted to confirm the merge. **Note**: If the branch contains modeling changes, you'll also see a **Delete branch after merge** box. Omni recommends leaving this checked.
Click this button to create a pull request in the connected git repository. The changes in the branch will be applied to production once the pull request is merged. If the branch includes content changes, the drafts of the impacted documents will be published.
When creating a pull request from a branch with draft content, Omni automatically adds a link to view the branch content in the pull request description. This makes it easier for reviewers to see what documents will be published when the pull request is merged, reducing the risk of stale branches overwriting newer changes.
The automatic PR description link works for GitHub and GitLab pull requests. Azure DevOps and Bitbucket do not support pre-filling pull request descriptions via URL parameters, so the link will not be added for these providers.
If git isn't enabled or pull requests aren't required, follow these instructions:
1. In the branch header at the top of the page, click **Publish content drafts** or **Merge** (which will display if the branch contains model changes).
2. You'll be prompted to confirm the merge. **Note**: If the branch contains modeling changes, you'll also see a **Delete branch after merge** box. Omni recommends leaving this checked.
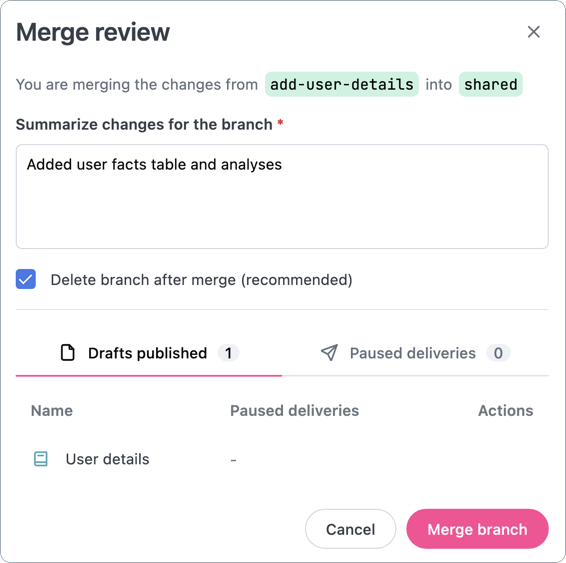 3. Click **Merge branch**.
### Working with out of date drafts
There may be times when you see the following **out of date** warning when preparing to publish content:
3. Click **Merge branch**.
### Working with out of date drafts
There may be times when you see the following **out of date** warning when preparing to publish content:
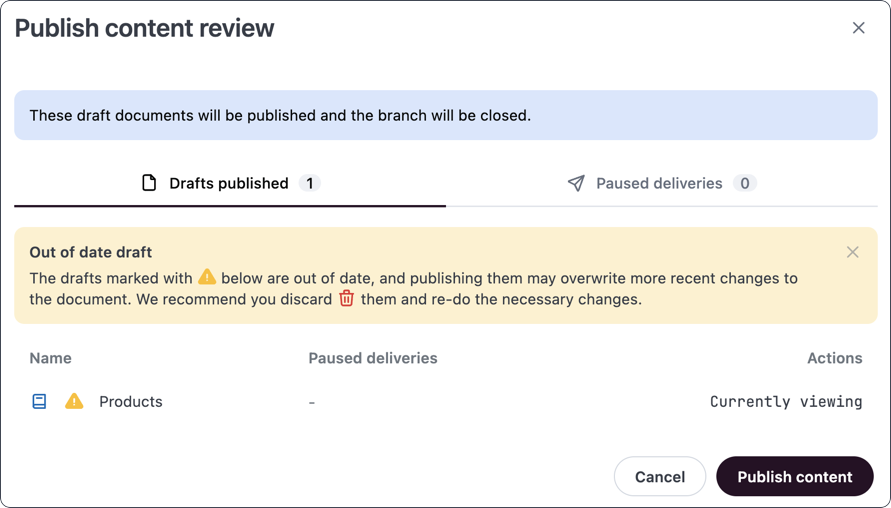 When a draft is marked out of date, it means that a new version of the document has been published since the draft was created. Publishing the outdated draft will overwrite the currently published version of the document.
1. Identify the changes in the outdated draft.
2. Discard the draft.
3. Create a new draft of the document.
4. In the new draft, redo any changes you identified in step 1.
5. When finished with all your changes, merge the branch.
When a draft is marked out of date, it means that a new version of the document has been published since the draft was created. Publishing the outdated draft will overwrite the currently published version of the document.
1. Identify the changes in the outdated draft.
2. Discard the draft.
3. Create a new draft of the document.
4. In the new draft, redo any changes you identified in step 1.
5. When finished with all your changes, merge the branch.