> ## Documentation Index
> Fetch the complete documentation index at: https://docs.omni.co/llms.txt
> Use this file to discover all available pages before exploring further.
# Connecting Microsoft SQL Server to Omni
> Learn how to retrieve connection details and connect your Microsoft SQL Server database to Omni.
export const BaseAccess = () => {
return
Select the minimum level of access users should have to models in the connection.
;
};
export const QueryTimeout = ({defaultValue}) => {
return
Maximum time in seconds before a query times out.
;
};
export const AutoGenerateRelationships = () => {
return
When enabled, Omni will automatically infer relationships between tables based on column name matching during schema refreshes. Defaults to enabled.
;
};
export const AllowUserSpecificTimezones = () => {
return
When enabled, users can override the connection timezone with their own when querying.
;
};
export const QueryTimezone = () => {
return
The timezone to use for Omni queries. If a timezone is specified, data will be converted from the Database Timezone to the selected timezone.
;
};
export const DatabaseTimezone = () => {
return
The timezone used by the database.
;
};
export const TrustServerCertificate = () => {
return
Whether to trust the server's SSL/TLS certificate without validation. Enable this option when connecting to a database that uses a self-signed certificate or a certificate signed by an internal certificate authority that Omni cannot otherwise verify.
;
};
export const Password = () => {
return
The password for database authentication.
;
};
export const Username = () => {
return
The username for database authentication.
;
};
export const Default = ({term = "Schema", required = true, defaultValue}) => {
const lower = term.toLowerCase();
return
The default {lower} for the connection.
;
};
export const TableUploads = ({label = "Schema for Table Uploads", term = "schema"}) => {
return
The name of the {term} to use for table (CSV) uploads. If left blank, you can upload tables but they won't be pushed to the database or be available for use in joins.
;
};
export const Offloaded = ({term = "Schemas"}) => {
const lower = term.toLowerCase();
return
A comma-separated list of {lower} to include in the connection, which will only load on demand. This setting is good for large {lower} or dbt dev {lower}.
;
};
export const Include = ({term = "Schemas"}) => {
const lower = term.toLowerCase();
return
A comma-separated list of {lower} to include in the connection.
;
};
export const Database = () => {
return
The database to connect to.
;
};
export const Port = ({defaultValue}) => {
return
The port number for the database connection.
;
};
export const Host = ({additionalCopy}) => {
return
The address of the database server. {additionalCopy}
;
};
export const DisplayName = () => {
return
A user-friendly name for the connection, which will be used throughout Omni.
;
};
## Requirements
To follow the steps in this guide, you'll need:
* **Organization Admin permissions in Omni**
* **Microsoft Azure Portal Admin permissions**, which are required to allowlist Omni's IP addresses
## Setup
1. Navigate to your [Microsoft Azure Portal](https://portal.azure.com/#home).
2. In the portal, navigate to the database you want to connect to Omni.
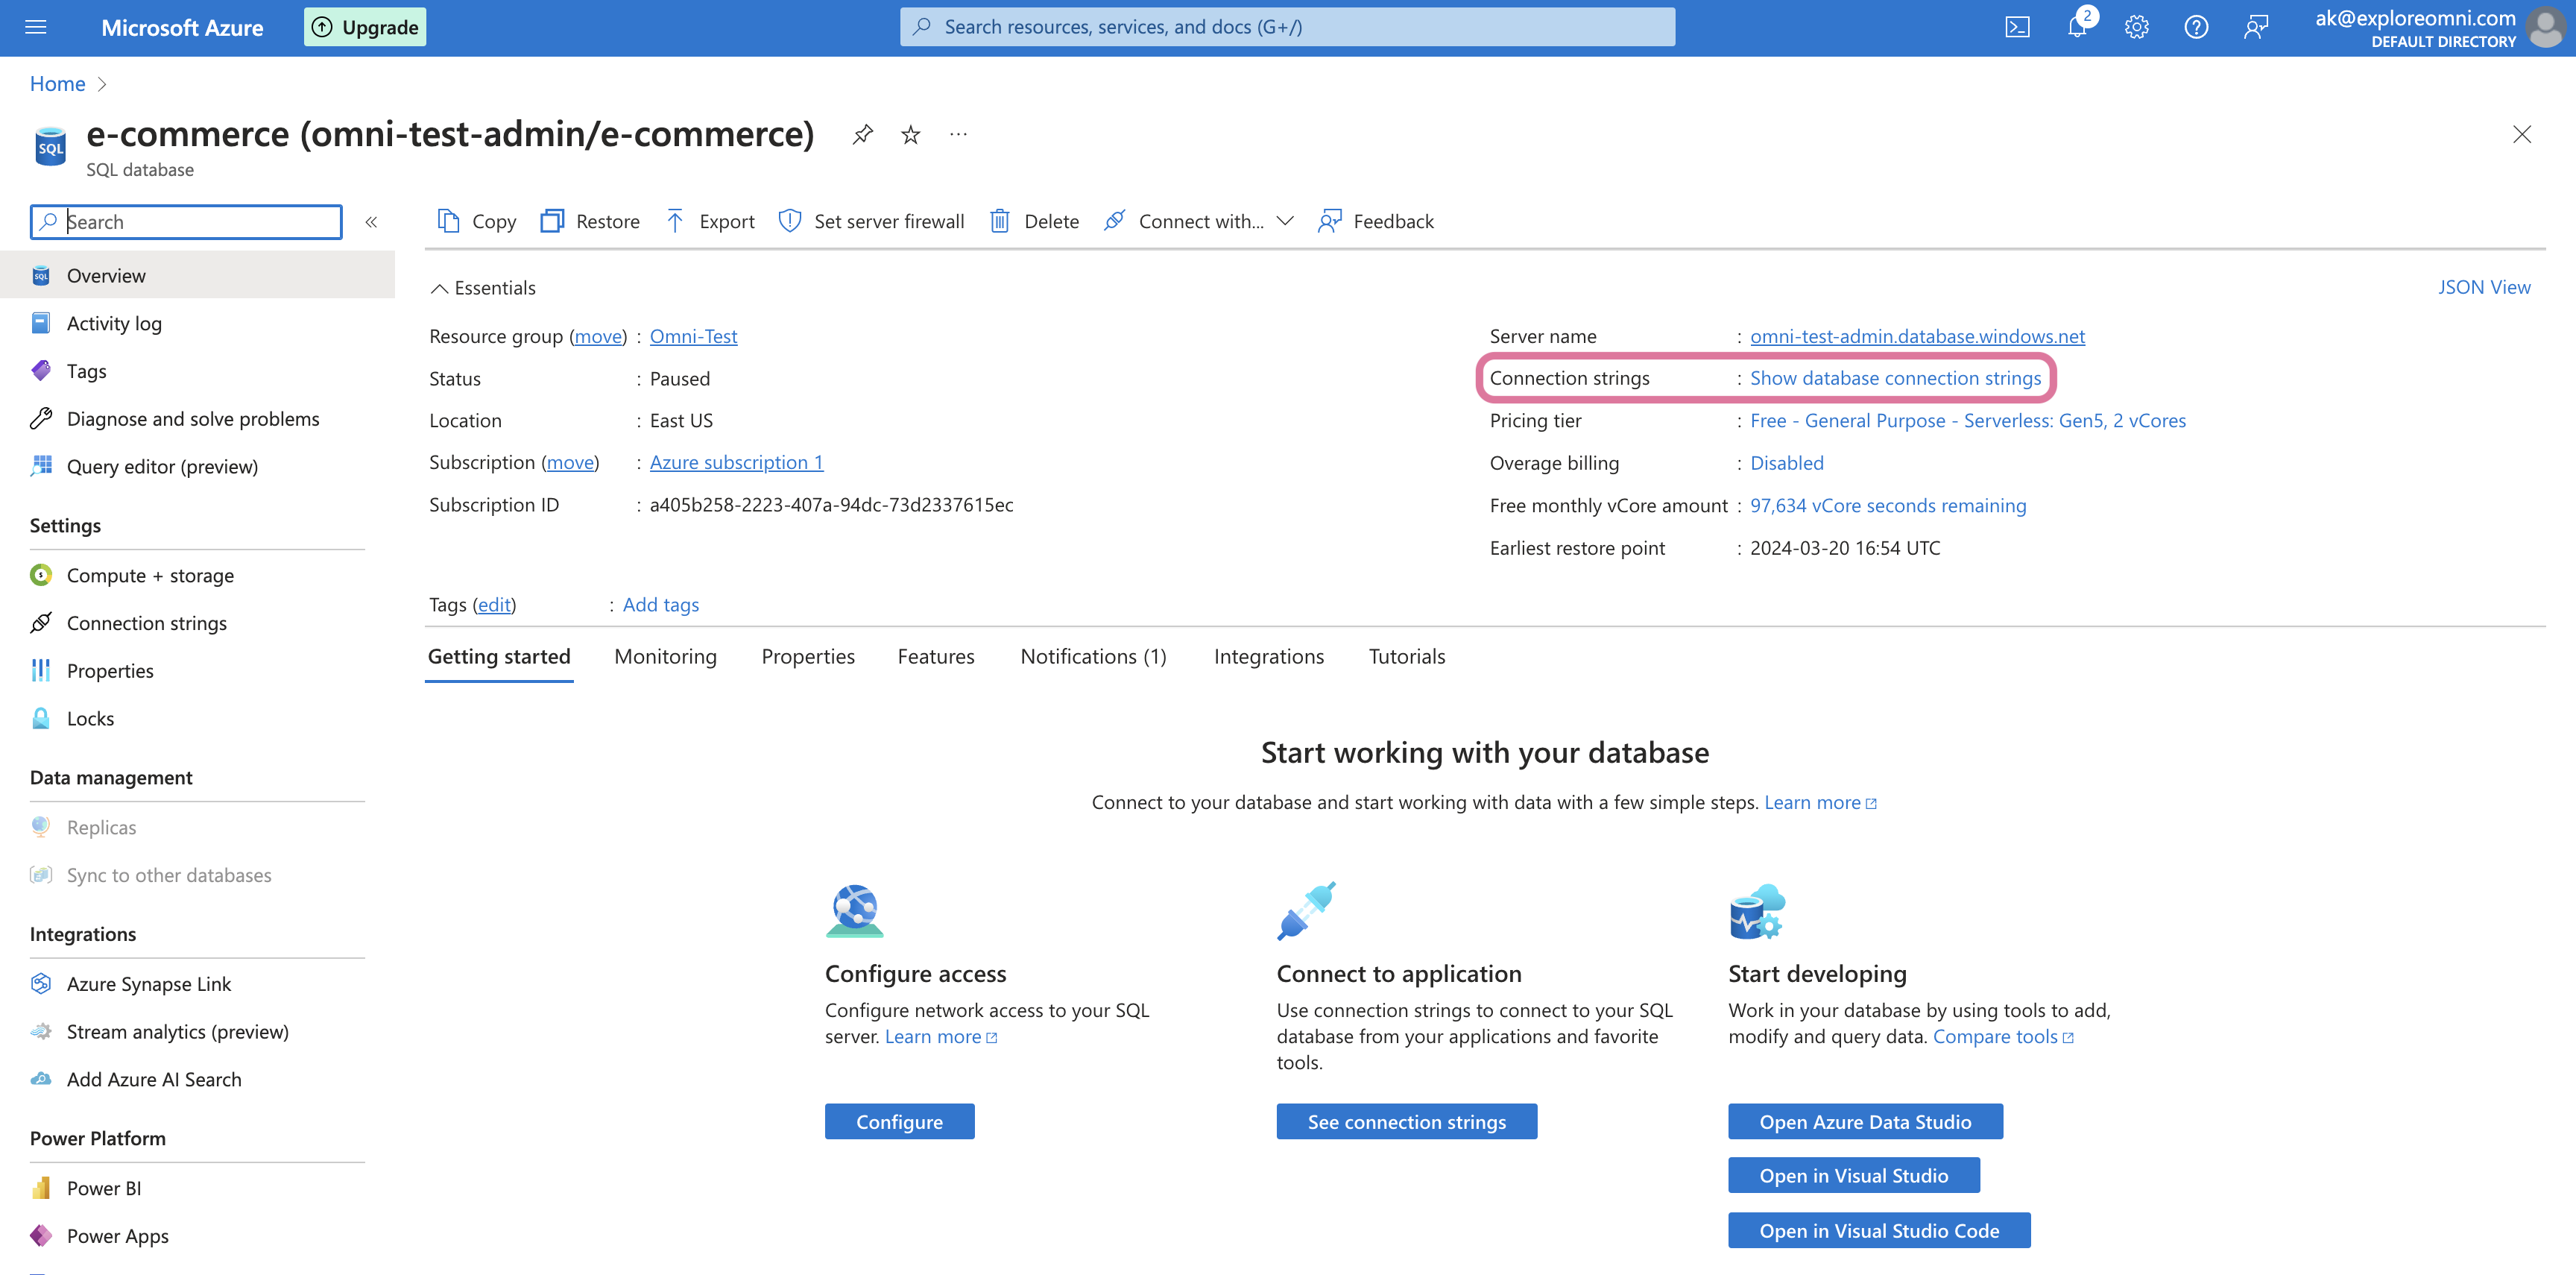
3. On the database's details page, locate the **Connection strings** field:
 4. Click the **Show database connection strings** link.
5. On the page that displays, click the **JDBC** tab:
4. Click the **Show database connection strings** link.
5. On the page that displays, click the **JDBC** tab:
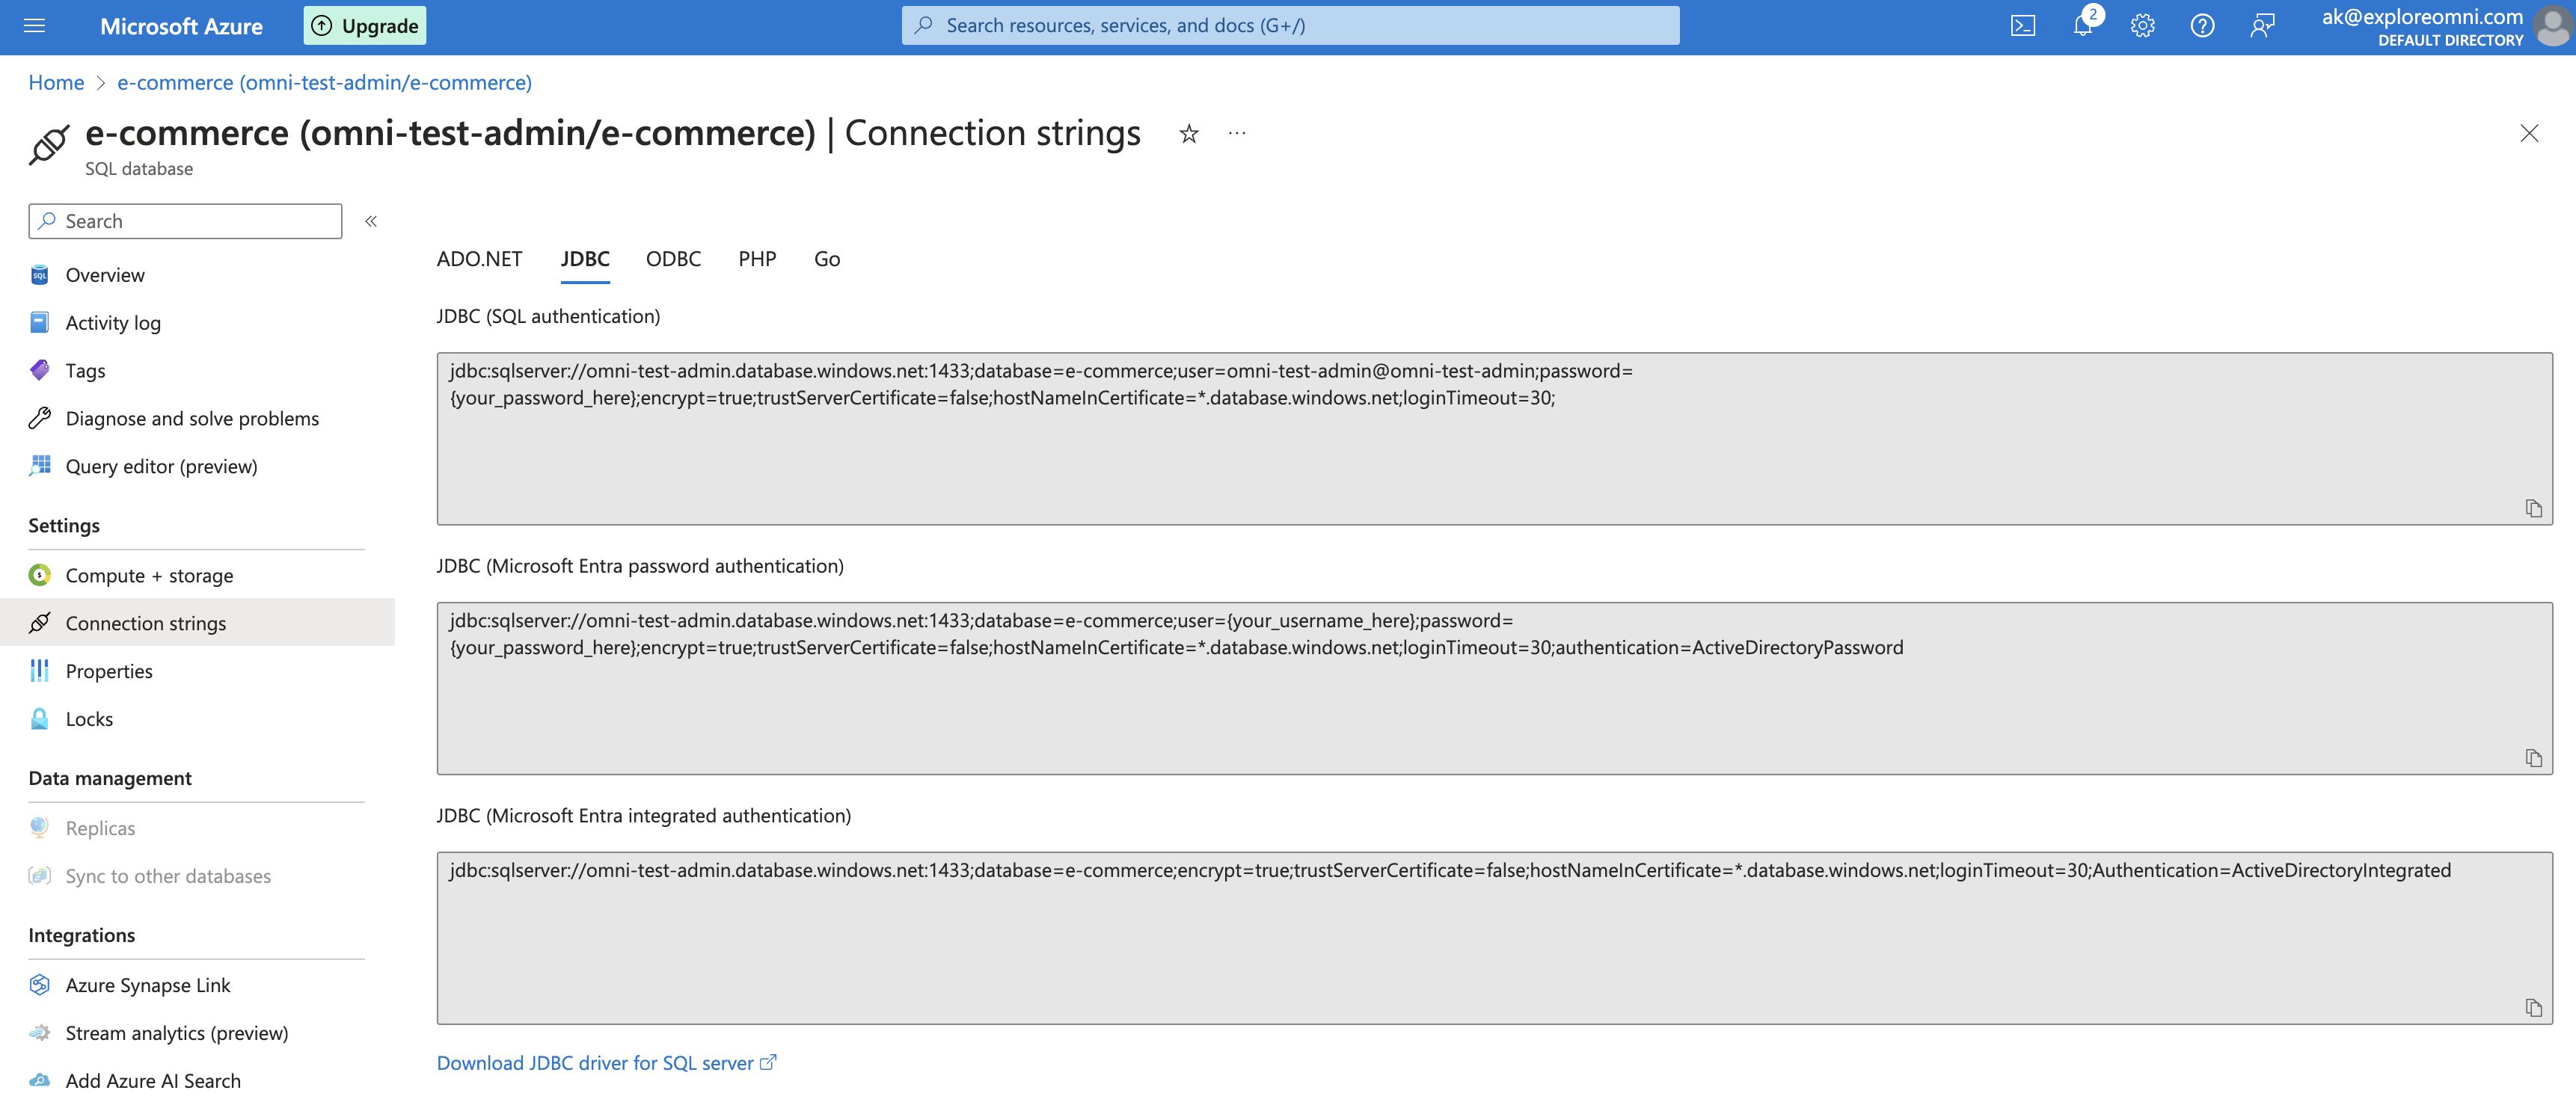 6. You should see something like the following, which will contain all the information you need:
```yaml theme={null}
jdbc:sqlserver://omni-test-admin.database.windows.net:1433;
database=e-commerce;
user=omni-test-admin@omni-test-admin;
password={your_password_here};
encrypt=true;
trustServerCertificate=false;
hostNameInCertificate=*.database.windows.net;
loginTimeout=30;
```
**This step is optional.** However, we recommend completing it as part of the initial set up or you won't be able to use uploaded files like CSVs in joins.
In this step, you'll create a dedicated schema to use for [table uploads](/analyze-explore/data-input-csvs). This schema can't be used for other modeled tables.
1. Create the schema in Microsoft SQL Server. This can be in its own database or the same database as other schemas to be used in modeling.
2. Run the following commands to grant the Omni user the required privileges:
```sql title="Grant Omni user permissions to upload schema" theme={null}
GRANT CREATE TABLE TO omni;
GRANT ALTER, INSERT, SELECT, UPDATE ON SCHEMA::upload_schema_name TO omni;
```
If access to the SQL Server database is limited by IP address, you'll need to add Omni's IPs to the allowlist before you create the database connection.
Omni's IP addresses can be found on an individual connection's page, accessed by navigating to **Settings > Connections** and clicking a connection.
1. Navigate to your [Microsoft Azure Portal](https://portal.azure.com/#home).
2. In the left navigation, click the **Networking** option under **Security**.
3. In the **Firewall rules** section, click **Add a firewall rule**:
6. You should see something like the following, which will contain all the information you need:
```yaml theme={null}
jdbc:sqlserver://omni-test-admin.database.windows.net:1433;
database=e-commerce;
user=omni-test-admin@omni-test-admin;
password={your_password_here};
encrypt=true;
trustServerCertificate=false;
hostNameInCertificate=*.database.windows.net;
loginTimeout=30;
```
**This step is optional.** However, we recommend completing it as part of the initial set up or you won't be able to use uploaded files like CSVs in joins.
In this step, you'll create a dedicated schema to use for [table uploads](/analyze-explore/data-input-csvs). This schema can't be used for other modeled tables.
1. Create the schema in Microsoft SQL Server. This can be in its own database or the same database as other schemas to be used in modeling.
2. Run the following commands to grant the Omni user the required privileges:
```sql title="Grant Omni user permissions to upload schema" theme={null}
GRANT CREATE TABLE TO omni;
GRANT ALTER, INSERT, SELECT, UPDATE ON SCHEMA::upload_schema_name TO omni;
```
If access to the SQL Server database is limited by IP address, you'll need to add Omni's IPs to the allowlist before you create the database connection.
Omni's IP addresses can be found on an individual connection's page, accessed by navigating to **Settings > Connections** and clicking a connection.
1. Navigate to your [Microsoft Azure Portal](https://portal.azure.com/#home).
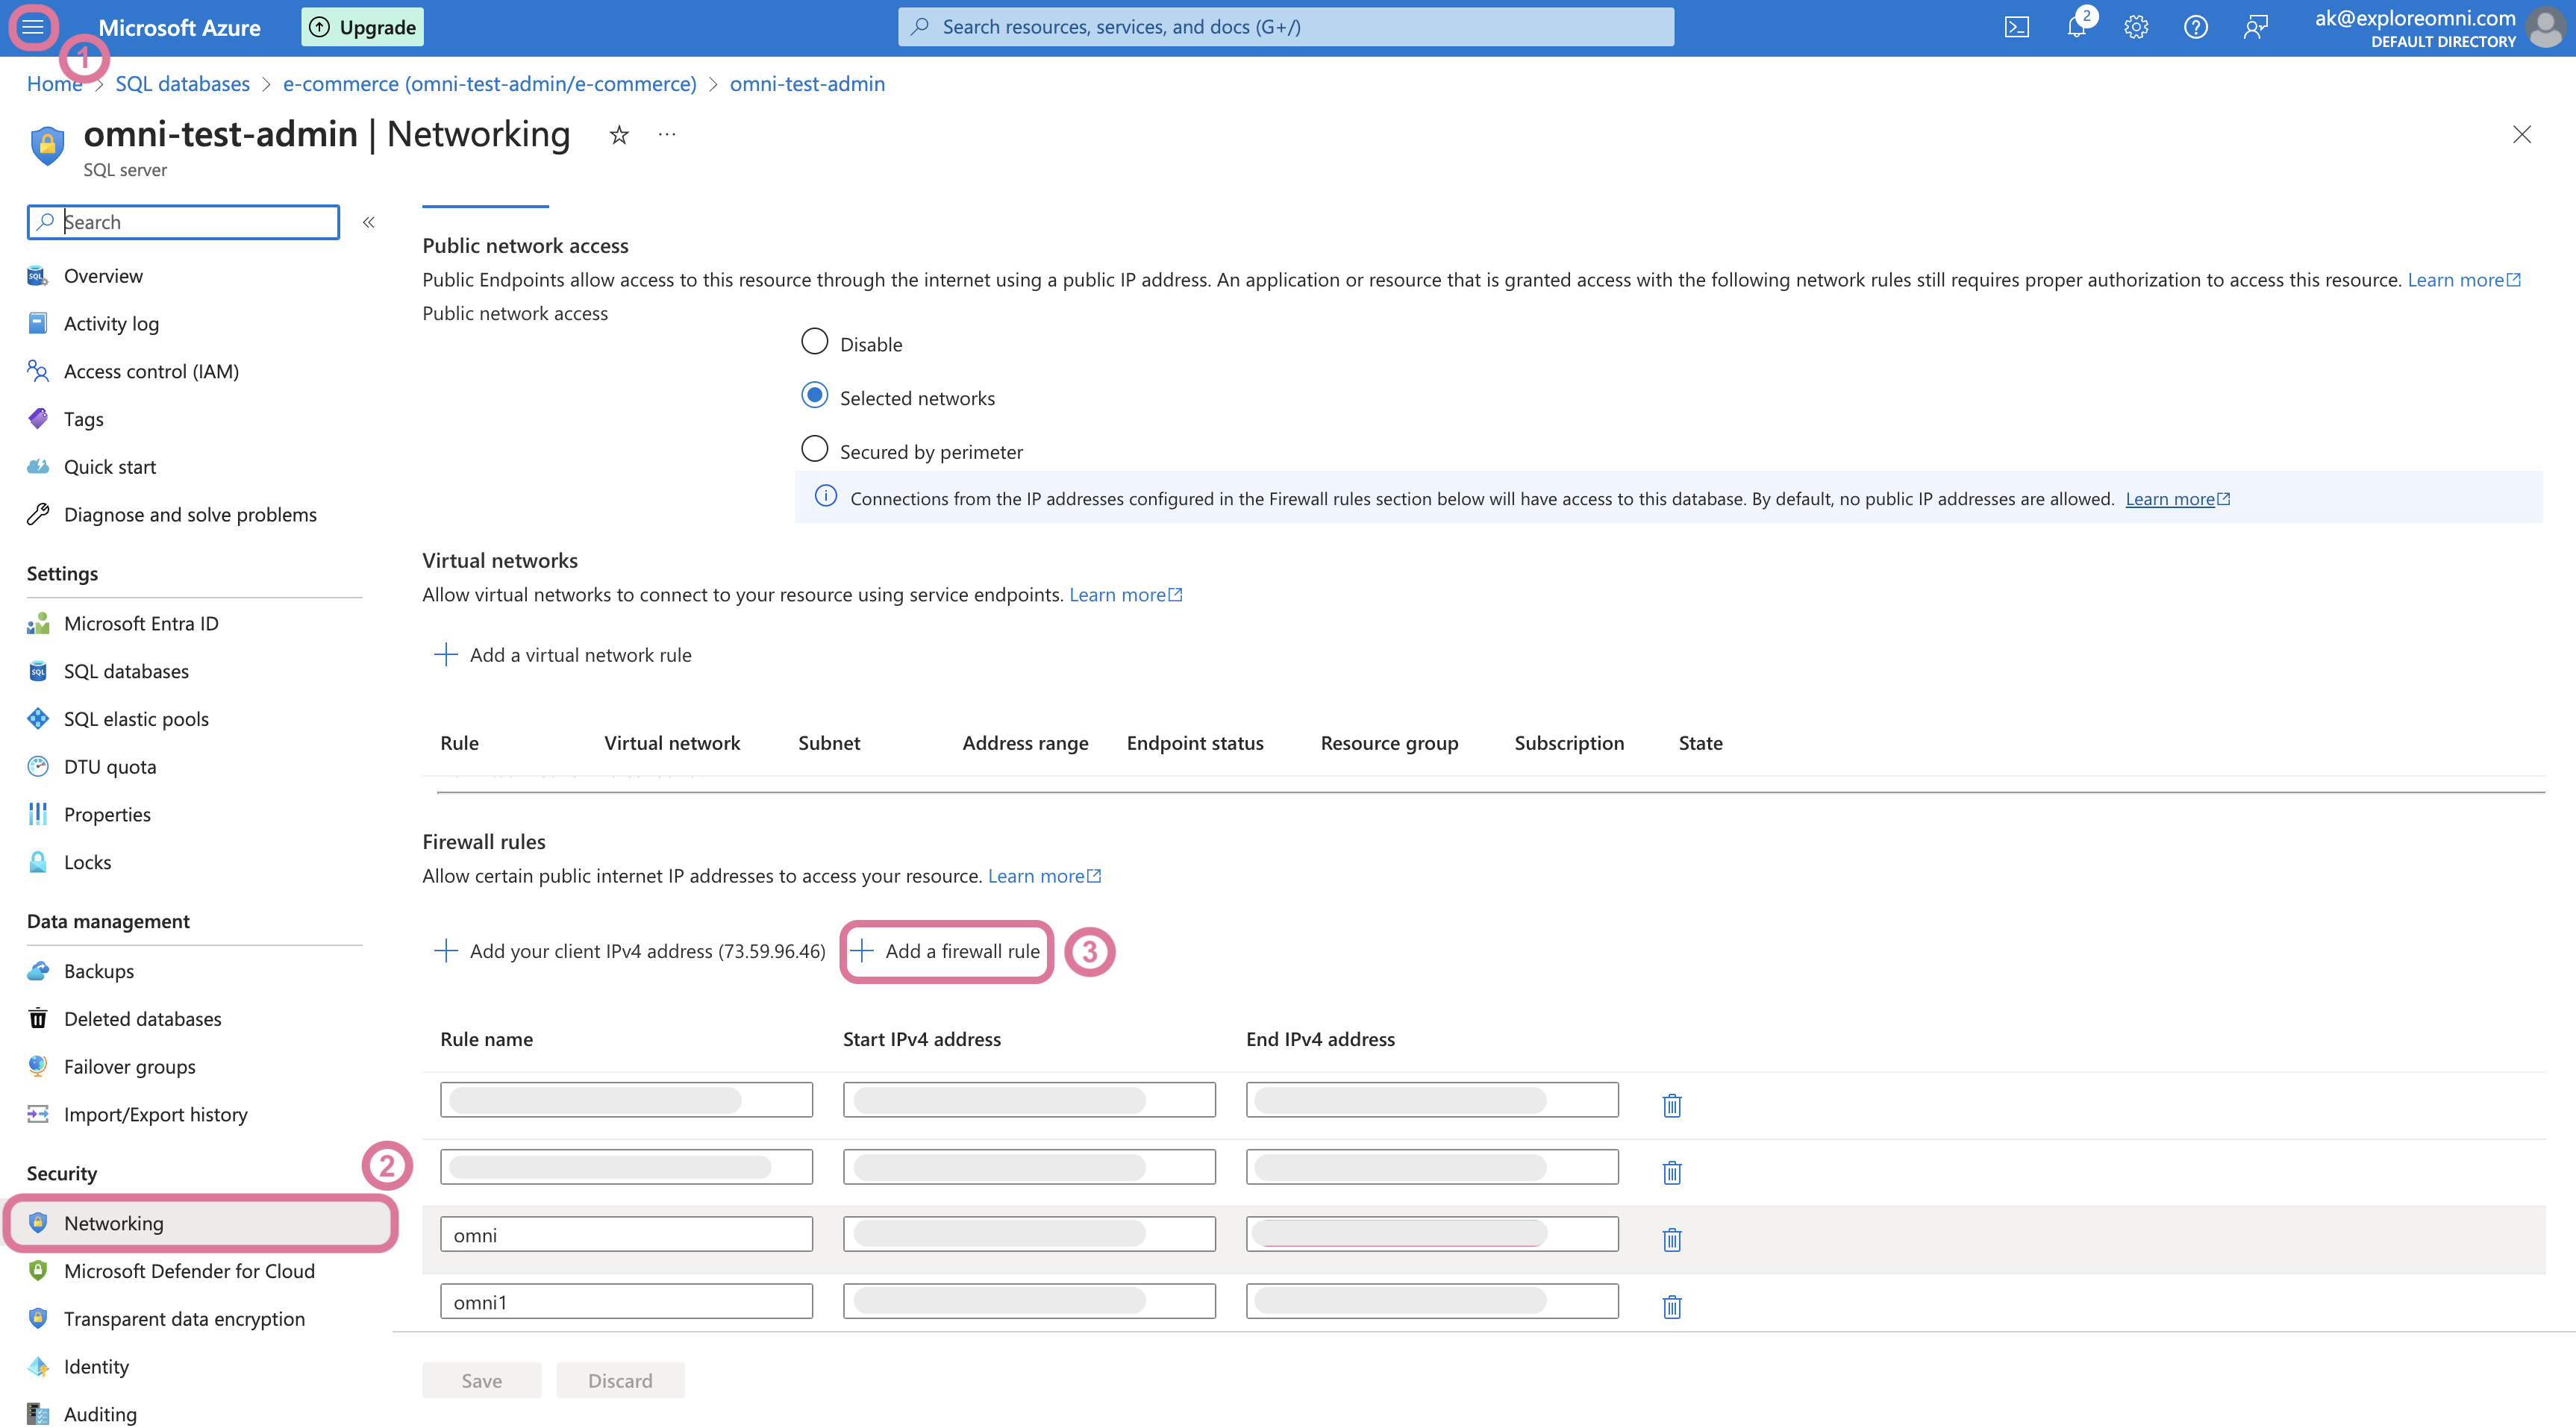
2. In the left navigation, click the **Networking** option under **Security**.
3. In the **Firewall rules** section, click **Add a firewall rule**:
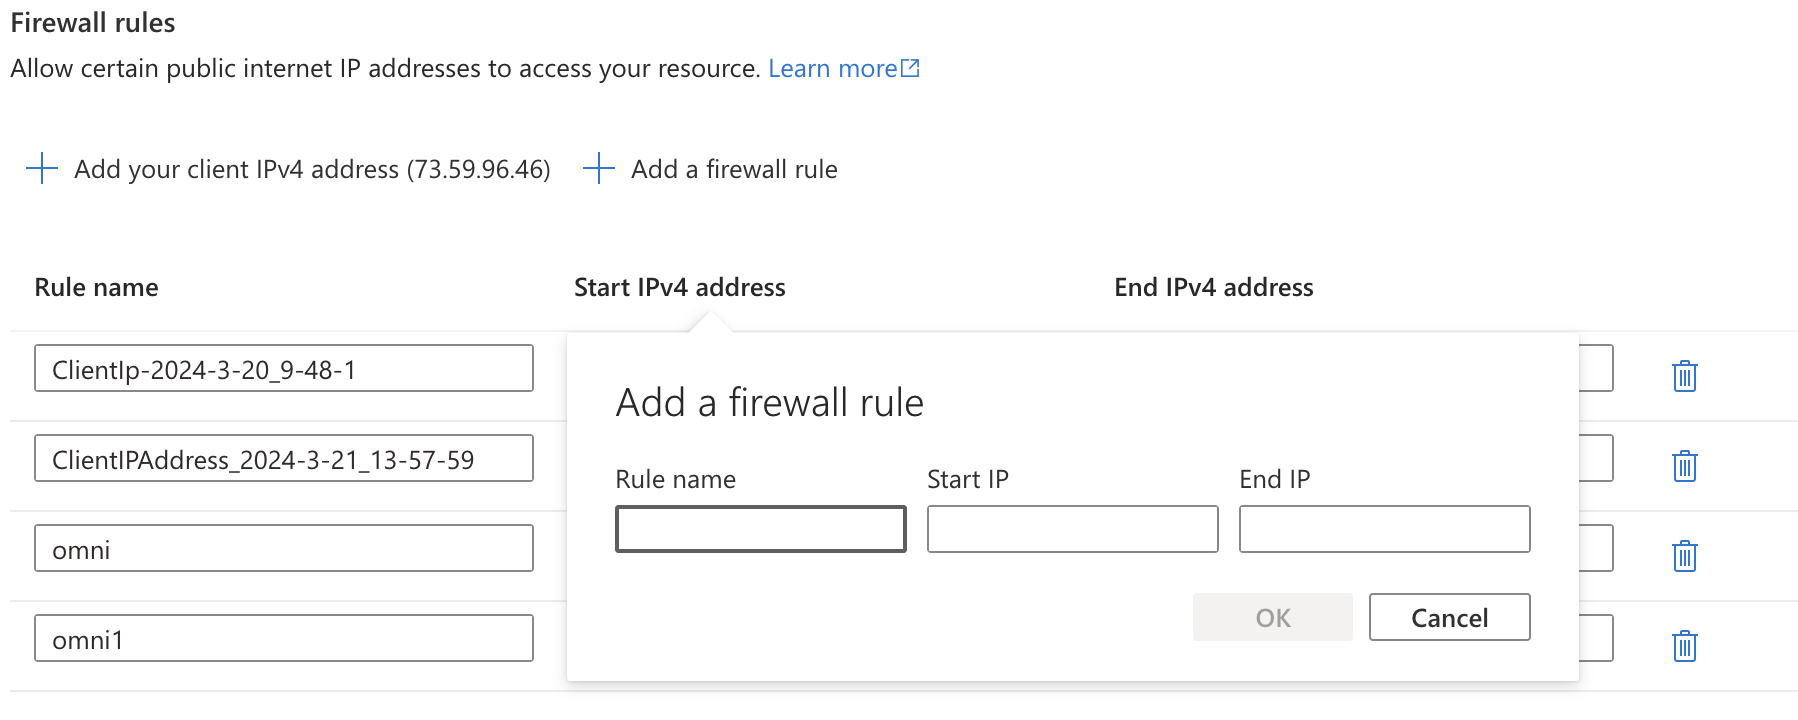
 4. Create a rule for each of Omni's IP addresses:
 1. In Omni, click **Settings > Connections**.
2. Click the **Microsoft SQL Server** option.
3. On the connection setup page, fill in the connection details:
4. When finished, click **Create connection**.
## What's next?
Now that your database is set up, you can:
* Use the Omni Agent's [quickstart skill](/modeling/topics/quickstart) to create your first topic from business questions
* Configure user permissions, [schema refreshes](/modeling/develop/schema-refreshes), [environments](/connect-data/dynamic-environments) and [timezone settings](/connect-data/timezones)
* Learn how Omni [generates the model](/modeling/develop/model-generation) associated with the connection
1. In Omni, click **Settings > Connections**.
2. Click the **Microsoft SQL Server** option.
3. On the connection setup page, fill in the connection details:
4. When finished, click **Create connection**.
## What's next?
Now that your database is set up, you can:
* Use the Omni Agent's [quickstart skill](/modeling/topics/quickstart) to create your first topic from business questions
* Configure user permissions, [schema refreshes](/modeling/develop/schema-refreshes), [environments](/connect-data/dynamic-environments) and [timezone settings](/connect-data/timezones)
* Learn how Omni [generates the model](/modeling/develop/model-generation) associated with the connection