> ## Documentation Index
> Fetch the complete documentation index at: https://docs.omni.co/llms.txt
> Use this file to discover all available pages before exploring further.
# Connecting ClickHouse to Omni
> Learn how to retrieve connection details and connect your ClickHouse database to Omni.
export const BaseAccess = () => {
return
Select the minimum level of access users should have to models in the connection.
;
};
export const AllowUserSpecificTimezones = () => {
return
When enabled, users can override the connection timezone with their own when querying.
;
};
export const QueryTimezone = () => {
return
The timezone to use for Omni queries. If a timezone is specified, data will be converted from the Database Timezone to the selected timezone.
;
};
export const DatabaseTimezone = () => {
return
The timezone used by the database.
;
};
export const TrustServerCertificate = () => {
return
Whether to trust the server's SSL/TLS certificate without validation. Enable this option when connecting to a database that uses a self-signed certificate or a certificate signed by an internal certificate authority that Omni cannot otherwise verify.
;
};
export const Password = () => {
return
The password for database authentication.
;
};
export const Username = () => {
return
The username for database authentication.
;
};
export const TableUploads = ({label = "Schema for Table Uploads", term = "schema"}) => {
return
The name of the {term} to use for table (CSV) uploads. If left blank, you can upload tables but they won't be pushed to the database or be available for use in joins.
;
};
export const Offloaded = ({term = "Schemas"}) => {
const lower = term.toLowerCase();
return
A comma-separated list of {lower} to include in the connection, which will only load on demand. This setting is good for large {lower} or dbt dev {lower}.
;
};
export const Include = ({term = "Schemas"}) => {
const lower = term.toLowerCase();
return
A comma-separated list of {lower} to include in the connection.
;
};
export const Default = ({term = "Schema", required = true, defaultValue}) => {
const lower = term.toLowerCase();
return
The default {lower} for the connection.
;
};
export const Port = ({defaultValue}) => {
return
The port number for the database connection.
;
};
export const Host = ({additionalCopy}) => {
return
The address of the database server. {additionalCopy}
;
};
export const DisplayName = () => {
return
A user-friendly name for the connection, which will be used throughout Omni.
;
};
## Requirements
To follow the steps in this guide, you'll need:
* **Organization Admin permissions in Omni**
* **Permissions in ClickHouse** that allow you to access connection credentials
## Setup
1. In ClickHouse, navigate to the warehouse you want to connect to Omni.
2. Click **Connect** in the side navigation.
3. A dialog like the following will display:
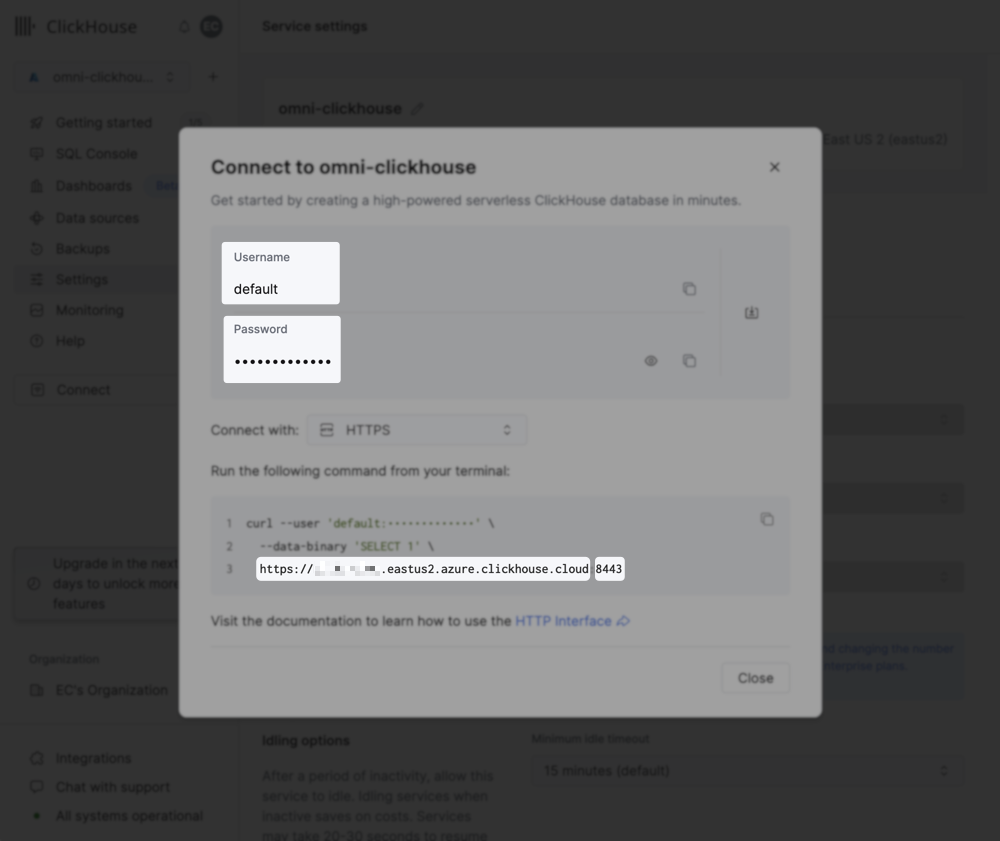 The information you need is highlighted in the above image, specifically:
* **Username** - In the above image, the username is ClickHouse's default (`default`), but this may differ for you.
If you want to use a different (non-default) Clickhouse user, verify that the user has, at a minimum, `SELECT` permissions for:
* All schemas you want to include in the Omni model
* `INFORMATION_SCHEMA.SCHEMATA`
* `INFORMATION_SCHEMA.TABLES`
* **Password**
* **Host** - This is a string similar to `https://.eastus2.azure.clickhouse.cloud`
* **Port** - In the above image, the port is `8443`
Keep this information handy - you'll need it to complete the setup.
If access to ClickHouse is [limited by IP address](https://clickhouse.com/docs/cloud/security/setting-ip-filters#create-or-modify-an-ip-access-list), you'll need to add Omni's IPs to the allowlist before you create the database connection.
Omni's IP addresses can be found on an individual connection's page, accessed by navigating to **Settings > Connections** and clicking a connection.
1. In Omni, click **Settings > Connections**.
2. Click the **ClickHouse** option.
3. On the connection setup page, fill in the connection details:
4. When finished, click **Create connection**.
## What's next?
Now that your database is set up, you can:
* Use the Omni Agent's [quickstart skill](/modeling/topics/quickstart) to create your first topic from business questions
* Configure user permissions, [schema refreshes](/modeling/develop/schema-refreshes), [environments](/connect-data/dynamic-environments) and [timezone settings](/connect-data/timezones)
* Learn how Omni [generates the model](/modeling/develop/model-generation) associated with the connection
The information you need is highlighted in the above image, specifically:
* **Username** - In the above image, the username is ClickHouse's default (`default`), but this may differ for you.
If you want to use a different (non-default) Clickhouse user, verify that the user has, at a minimum, `SELECT` permissions for:
* All schemas you want to include in the Omni model
* `INFORMATION_SCHEMA.SCHEMATA`
* `INFORMATION_SCHEMA.TABLES`
* **Password**
* **Host** - This is a string similar to `https://.eastus2.azure.clickhouse.cloud`
* **Port** - In the above image, the port is `8443`
Keep this information handy - you'll need it to complete the setup.
If access to ClickHouse is [limited by IP address](https://clickhouse.com/docs/cloud/security/setting-ip-filters#create-or-modify-an-ip-access-list), you'll need to add Omni's IPs to the allowlist before you create the database connection.
Omni's IP addresses can be found on an individual connection's page, accessed by navigating to **Settings > Connections** and clicking a connection.
1. In Omni, click **Settings > Connections**.
2. Click the **ClickHouse** option.
3. On the connection setup page, fill in the connection details:
4. When finished, click **Create connection**.
## What's next?
Now that your database is set up, you can:
* Use the Omni Agent's [quickstart skill](/modeling/topics/quickstart) to create your first topic from business questions
* Configure user permissions, [schema refreshes](/modeling/develop/schema-refreshes), [environments](/connect-data/dynamic-environments) and [timezone settings](/connect-data/timezones)
* Learn how Omni [generates the model](/modeling/develop/model-generation) associated with the connection