> ## Documentation Index
> Fetch the complete documentation index at: https://docs.omni.co/llms.txt
> Use this file to discover all available pages before exploring further.
# Connecting Google BigQuery to Omni
> Learn how to create a service account, generate a private key, and connect your Google BigQuery project to Omni.
export const BaseAccess = () => {
return
Select the minimum level of access users should have to models in the connection.
;
};
export const AlwaysScopeViewNames = () => {
return
When enabled, Omni will prefix generated view names with schema and catalog, e.g. my_catalog_public__orders instead of orders. Defaults to enabled. See View name generation for more information.
;
};
export const AllowUserSpecificTimezones = () => {
return
When enabled, users can override the connection timezone with their own when querying.
;
};
export const QueryTimezone = () => {
return
The timezone to use for Omni queries. If a timezone is specified, data will be converted from the Database Timezone to the selected timezone.
;
};
export const DatabaseTimezone = () => {
return
The timezone used by the database.
;
};
export const TableUploads = ({label = "Schema for Table Uploads", term = "schema"}) => {
return
The name of the {term} to use for table (CSV) uploads. If left blank, you can upload tables but they won't be pushed to the database or be available for use in joins.
;
};
export const Offloaded = ({term = "Schemas"}) => {
const lower = term.toLowerCase();
return
A comma-separated list of {lower} to include in the connection, which will only load on demand. This setting is good for large {lower} or dbt dev {lower}.
;
};
export const IncludeOther = ({term = "Schemas"}) => {
const lower = term.toLowerCase();
return
A comma-separated list of other {lower} to include in the connection.
;
};
export const Include = ({term = "Schemas"}) => {
const lower = term.toLowerCase();
return
A comma-separated list of {lower} to include in the connection.
;
};
export const Default = ({term = "Schema", required = true, defaultValue}) => {
const lower = term.toLowerCase();
return
The default {lower} for the connection.
;
};
export const DisplayName = () => {
return
A user-friendly name for the connection, which will be used throughout Omni.
;
};
## Requirements
To follow the steps in this guide, you'll need:
* **Organization Admin permissions in Omni**
* **Google Cloud admin permissions**, which are required to create a [service account](https://cloud.google.com/iam/docs/service-accounts) and [private key](https://cloud.google.com/storage/docs/authentication#generating-a-private-key).
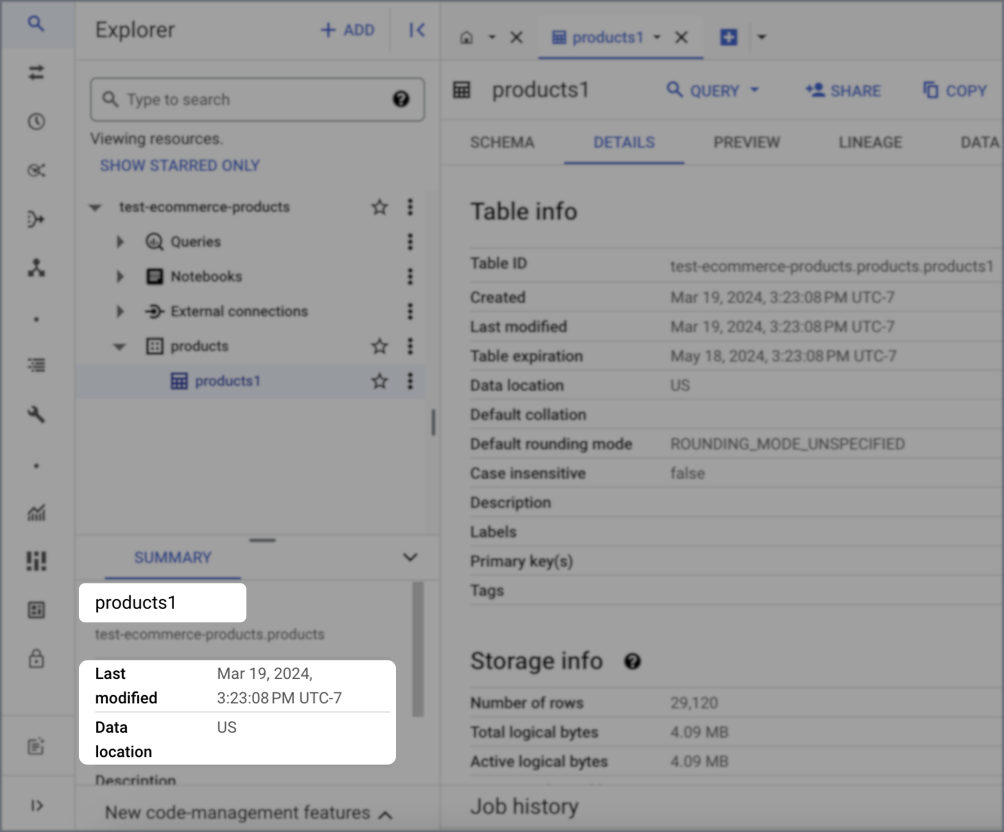
* **The following details about the default dataset in your BigQuery project:**
* The **name** of the default dataset
* Its **data location**
* Its **timezone**
1. Navigate to your BigQuery console.
2. Select the project your dataset resides in. Use the top middle drop-down menu to toggle between projects.
3. Select a dataset and the info will appear in the **Dataset info** menu. In this example:
* The dataset **name** is `products`
* The **Data location** is `US`
* The **timezone** is `UTC-7`, as indicated in the **Last modified** field
 ## Setup
1. Open the credentials page in the [Google Cloud Platform API Manager](https://console.cloud.google.com/apis/credentials) and, if necessary, select your project.
2. Click **Create credentials**, located near the top center of the page, then **Service account**.
3. In the **Service account details** section:
1. Enter a name and description for the new service account, such as `Omni BigQuery`.
2. Click **Create and continue**.
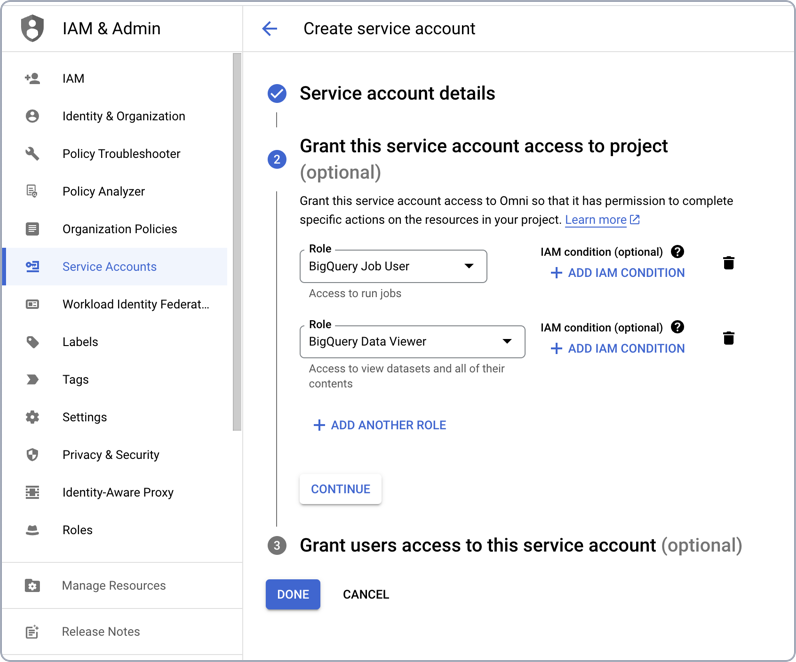
4. In the **Grant this service account access to project** section, grant the service account access to the following [BigQuery roles](https://cloud.google.com/bigquery/access-control#curated_roles_comparison_matrix):
* BigQuery Job User
* BigQuery Data Viewer
* BigQuery Metadata Viewer - This role is only required if you want to give Omni access to all views within a dataset (e.g., `project.*`) when setting up the connection in Omni. If you explicitly list specific datasets without wildcards in the [connection setup step](#create-connection), Omni will skip the project-level metadata scan and work with dataset-level permissions only.
## Setup
1. Open the credentials page in the [Google Cloud Platform API Manager](https://console.cloud.google.com/apis/credentials) and, if necessary, select your project.
2. Click **Create credentials**, located near the top center of the page, then **Service account**.
3. In the **Service account details** section:
1. Enter a name and description for the new service account, such as `Omni BigQuery`.
2. Click **Create and continue**.
4. In the **Grant this service account access to project** section, grant the service account access to the following [BigQuery roles](https://cloud.google.com/bigquery/access-control#curated_roles_comparison_matrix):
* BigQuery Job User
* BigQuery Data Viewer
* BigQuery Metadata Viewer - This role is only required if you want to give Omni access to all views within a dataset (e.g., `project.*`) when setting up the connection in Omni. If you explicitly list specific datasets without wildcards in the [connection setup step](#create-connection), Omni will skip the project-level metadata scan and work with dataset-level permissions only.
 5. After adding the roles, click **Done**. You'll be redirected to the **Credentials** page.
1. In the **Service Accounts** section, click the service account you created in the [previous step](#create-service-account).
2. On the service account details page, click the **Keys** tab near the top of the page.
3. Click **Add Key > Create new key**.
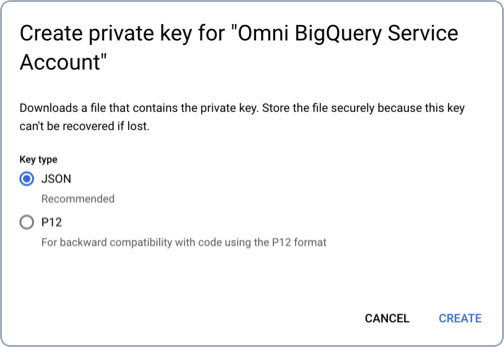
4. When prompted, select **JSON** as the key type and then click **Create**:
5. After adding the roles, click **Done**. You'll be redirected to the **Credentials** page.
1. In the **Service Accounts** section, click the service account you created in the [previous step](#create-service-account).
2. On the service account details page, click the **Keys** tab near the top of the page.
3. Click **Add Key > Create new key**.
4. When prompted, select **JSON** as the key type and then click **Create**:
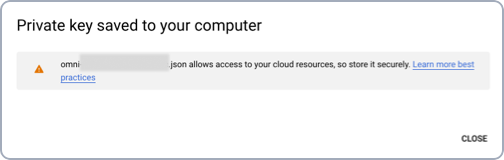
 5. The JSON key will be saved to your computer. **After noting where the key was downloaded**, click **Close**.
 **This step is optional.** However, we recommend completing it as part of the initial set up or you won't be able to use uploaded files like CSVs in joins.
In this step, you'll create a dedicated dataset to use for [table uploads](/analyze-explore/data-input-csvs). Before you create the dataset, note that:
* This dataset can't be used for other modeled tables
* This dataset must be in the same region as other projects and schemas in the connection, or you may encounter cross-region errors
To create a dataset for table uploads:
1. Navigate to your BigQuery project.
2. Create the dataset.
3. After the dataset is created, open it so that its details display.
4. Click **Sharing > Permissions**, located next to the **Copy** option near the top right corner of the page.
5. In the dialog that displays, click **Add principal**.
6. Fill in the fields as follows:
* **New principals** - Add the service account you created in [step 1](#create-service-account)
* **Role** - Add the **BigQuery Data Editor** role
**This step is optional.** However, we recommend completing it as part of the initial set up or you won't be able to use uploaded files like CSVs in joins.
In this step, you'll create a dedicated dataset to use for [table uploads](/analyze-explore/data-input-csvs). Before you create the dataset, note that:
* This dataset can't be used for other modeled tables
* This dataset must be in the same region as other projects and schemas in the connection, or you may encounter cross-region errors
To create a dataset for table uploads:
1. Navigate to your BigQuery project.
2. Create the dataset.
3. After the dataset is created, open it so that its details display.
4. Click **Sharing > Permissions**, located next to the **Copy** option near the top right corner of the page.
5. In the dialog that displays, click **Add principal**.
6. Fill in the fields as follows:
* **New principals** - Add the service account you created in [step 1](#create-service-account)
* **Role** - Add the **BigQuery Data Editor** role
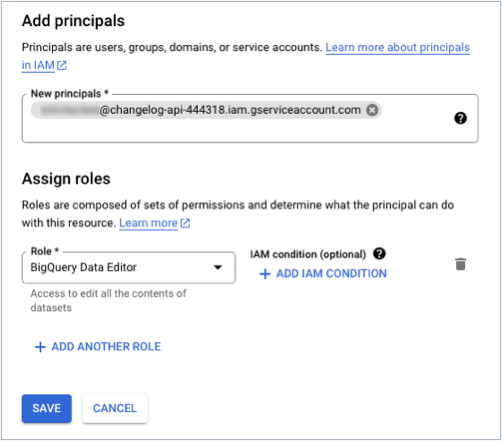 7. Click **Save**.
1. In Omni, click **Settings > Connections**.
2. Click the **BigQuery** option.
3. On the connection setup page, fill in the connection details:
When you explicitly list datasets without wildcards (no `*` characters), Omni skips the project-level metadata scan and only requires dataset-level permissions (BigQuery Data Viewer role). Using wildcards or leaving this field empty requires project-level permissions (BigQuery Metadata Viewer role).
The JSON private key you created in step 2.
The region the dataset resides in. Refer to the [Requirements](#requirements) section if you need help finding this information.
The maximum bytes billed for queries run on this connection.
4. When finished, click **Create connection**.
## What's next?
Now that your database is set up, you can:
* Use the Omni Agent's [quickstart skill](/modeling/topics/quickstart) to create your first topic from business questions
* Configure user permissions, [schema refreshes](/modeling/develop/schema-refreshes), [environments](/connect-data/dynamic-environments) and [timezone settings](/connect-data/timezones)
* Learn how Omni [generates the model](/modeling/develop/model-generation) associated with the connection
7. Click **Save**.
1. In Omni, click **Settings > Connections**.
2. Click the **BigQuery** option.
3. On the connection setup page, fill in the connection details:
When you explicitly list datasets without wildcards (no `*` characters), Omni skips the project-level metadata scan and only requires dataset-level permissions (BigQuery Data Viewer role). Using wildcards or leaving this field empty requires project-level permissions (BigQuery Metadata Viewer role).
The JSON private key you created in step 2.
The region the dataset resides in. Refer to the [Requirements](#requirements) section if you need help finding this information.
The maximum bytes billed for queries run on this connection.
4. When finished, click **Create connection**.
## What's next?
Now that your database is set up, you can:
* Use the Omni Agent's [quickstart skill](/modeling/topics/quickstart) to create your first topic from business questions
* Configure user permissions, [schema refreshes](/modeling/develop/schema-refreshes), [environments](/connect-data/dynamic-environments) and [timezone settings](/connect-data/timezones)
* Learn how Omni [generates the model](/modeling/develop/model-generation) associated with the connection