> ## Documentation Index
> Fetch the complete documentation index at: https://docs.omni.co/llms.txt
> Use this file to discover all available pages before exploring further.
# Connecting Amazon Athena to Omni as a data source
> Learn how to create an access key or IAM role and connect your Amazon Athena data source to Omni.
export const BaseAccess = () => {
return
Select the minimum level of access users should have to models in the connection.
;
};
export const AlwaysScopeViewNames = () => {
return
When enabled, Omni will prefix generated view names with schema and catalog, e.g. my_catalog_public__orders instead of orders. Defaults to enabled. See View name generation for more information.
;
};
export const AutoGenerateRelationships = () => {
return
When enabled, Omni will automatically infer relationships between tables based on column name matching during schema refreshes. Defaults to enabled.
;
};
export const AllowUserSpecificTimezones = () => {
return
When enabled, users can override the connection timezone with their own when querying.
;
};
export const QueryTimezone = () => {
return
The timezone to use for Omni queries. If a timezone is specified, data will be converted from the Database Timezone to the selected timezone.
;
};
export const DatabaseTimezone = () => {
return
The timezone used by the database.
;
};
export const Default = ({term = "Schema", required = true, defaultValue}) => {
const lower = term.toLowerCase();
return
The default {lower} for the connection.
;
};
export const Offloaded = ({term = "Schemas"}) => {
const lower = term.toLowerCase();
return
A comma-separated list of {lower} to include in the connection, which will only load on demand. This setting is good for large {lower} or dbt dev {lower}.
;
};
export const DisplayName = () => {
return
A user-friendly name for the connection, which will be used throughout Omni.
;
};
export const XCircleIcon = ({label}) => {
return
{label && ` ${label}`}
;
};
export const CheckIcon = ({label}) => {
return
{label && ` ${label}`}
;
};
Omni's Athena integration supports two types of authentication:
* [**Access key**](#access-key) - Uses an IAM user to authenticate to Amazon Web Services (AWS) by providing Omni with the user's **Access key ID** and **Secret access key**
* [**Cross-account role**](#cross-account-role) - Enables Omni services to assume an IAM role in your account
## Requirements
To follow the steps in this guide, you'll need:
* **An existing Athena database**. Additionally, this database should have an S3 bucket configured to store query results. Refer to the [AWS documentation](https://docs.aws.amazon.com/athena/latest/ug/setting-up.html) to get started.
* **Omni Organization Admin permissions.** This is required to create the Athena connection in Omni.
Depending on the type of authentication you want to use, you'll also need permissions in AWS that:
* Allow you to create access keys
* Allow you to create IAM permission policies and roles
Option 1: Access key authentication
To use this method of authentication, you'll need to create an [access key](https://docs.aws.amazon.com/IAM/latest/UserGuide/id_credentials_access-keys.html) in the AWS console and then add it to the Athena configuration in Omni.
To complete this step, you need permissions in AWS that allow you to create access keys.
In the AWS console, [follow these instructions](https://docs.aws.amazon.com/IAM/latest/UserGuide/access-keys-admin-managed.html#admin-create-access-key) to create an access key. **Note**: The key will only display once after it's created - make sure to copy it immediately.
1. In Omni, click **Settings > Connections**.
2. Click the **Athena** option.
3. On the connection setup page, fill in the connection details:
The Amazon S3 bucket used to store query results for the Athena database
The lowercase name of the data catalog to connect to
A comma-delimited list of data catalogs you want to generate models for, ex: `catalog1`, `catalog2`
Select **AWS Access Key**
The ID of the AWS access key, which you created in the previous step
The secret access key for AWS authentication, which you created in the previous step
The AWS region the database is in. Defaults to `us-east-1`.
4. When finished, click **Create connection**.
Option 2: Cross-account role authentication
Cross-account role authentication allows you to specify an IAM role for Omni to assume when connecting to Athena.
Leave this page open for now - you'll need it in the next step.
To complete this step, you need permissions in AWS that allow you to create IAM policies.
In this step, you'll create an IAM policy that grants the required permissions to the IAM role Omni will assume.
1. Sign into your AWS console.
2. Navigate to **IAM**, then click **Roles** in the left navigation.
3. On the page that displays, click **Create policy**.
4. In the **Policy editor** section, click the toggle to **JSON**:
 5. In the policy editor, paste the following policy. Replace `` with the name of the S3 bucket used to store Athena query results:
```json expandable highlight={28} theme={null}
{
"Version": "2012-10-17",
"Statement": [
{
"Sid": "BasePermissionsForAllS3Buckets",
"Effect": "Allow",
"Action": [
"s3:ListAllMyBuckets",
"s3:ListBucket",
"s3:GetBucketLocation"
],
"Resource": "*"
},
{
"Sid": "BaseAndQueryPermissionsForQueryResultBucket",
"Effect": "Allow",
"Action": [
"s3:GetObject",
"s3:ListBucket",
"s3:GetBucketLocation",
"s3:ListBucket",
"s3:ListBucketMultipartUploads",
"s3:ListMultipartUploadParts",
"s3:AbortMultipartUpload",
"s3:PutObject"
],
"Resource": [
"arn:aws:s3:::",
"arn:aws:s3:::/*"
]
},
{
"Sid": "GluePermissions",
"Effect": "Allow",
"Action": [
"glue:GetTables",
"glue:GetDatabases",
"glue:GetDatabase",
"glue:GetTable"
],
"Resource": "*"
},
{
"Sid": "AthenaPermissions",
"Effect": "Allow",
"Action": [
"athena:StartQueryExecution",
"athena:GetQueryResults",
"athena:GetQueryResultsStream",
"athena:ListDatabases",
"athena:GetQueryExecution",
"athena:ListTableMetadata"
],
"Resource": "*"
}
]
}
```
If your data is stored in a separate bucket than the query results, you'll need to add an additional permissions block to the policy.
Replace `` with the name of the bucket that contains the data:
```json title="Additional permissions for different data & query buckets" highlight={9-10} theme={null}
{
"Sid": "S3AccessForDataBuckets",
"Effect": "Allow",
"Action": [
"s3:GetObject",
"s3:ListBucket"
],
"Resource": [
"arn:aws:s3:::",
"arn:aws:s3:::/*"
]
}
```
6. Click **Next**.
7. On the **Policy details** page, enter a name and description for the policy.
8. When finished, click **Create policy**.
To complete this step, you need permissions in AWS that allow you to create IAM roles.
In this step, you'll create the IAM role and attach the permissions policy you created in step 2 to it.
1. You should still be in the **IAM** section of the AWS console. If not, navigate there.
2. Click **Roles** in the left navigation.
3. On the page that displays, click **Create role**.
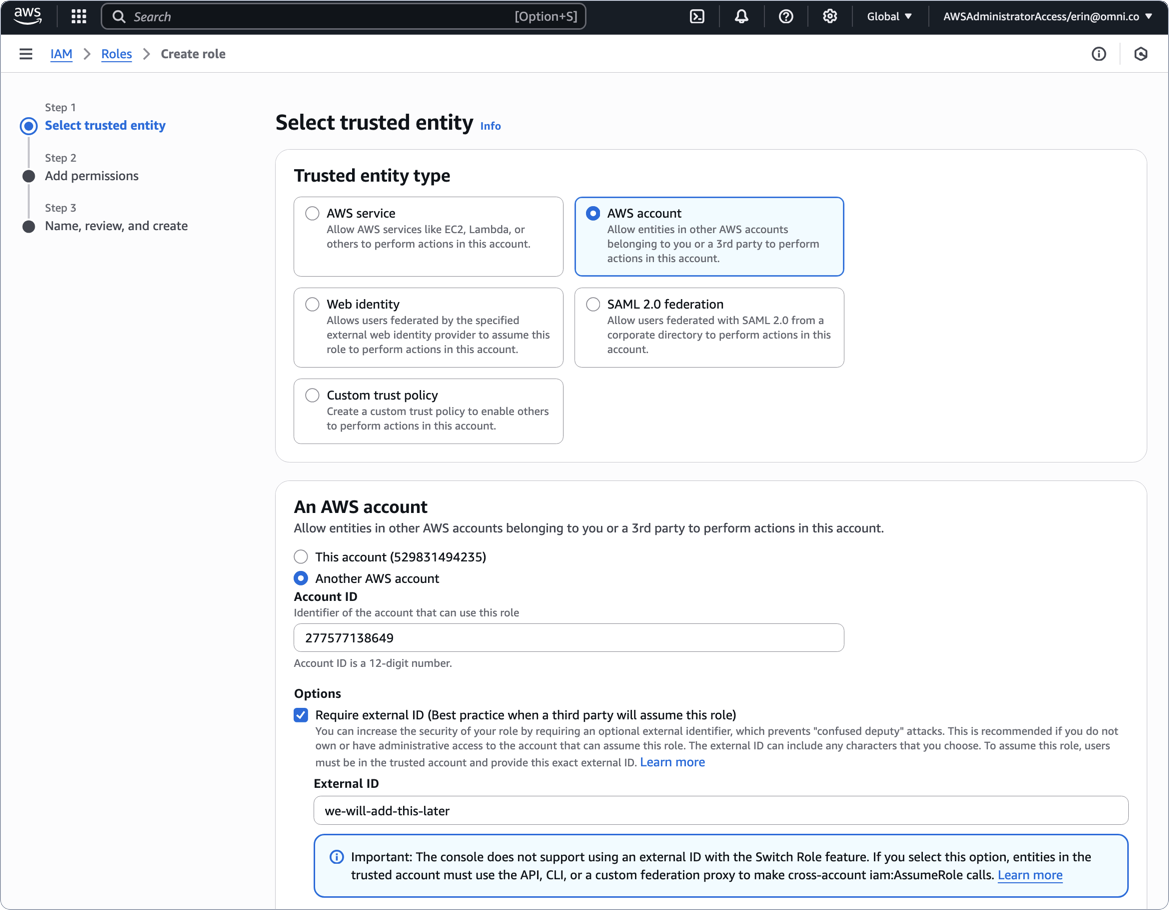
4. Define the trusted entity for the role as follows:
* **Trusted entity type** - Select **AWS account**
* In **An AWS account**, click **Another AWS account**
* **Account ID** field - Paste the **AWS Account ID** value from the Omni setup page
* In **Options**, check **Require external ID**
* **External ID** - Enter a placeholder value - we used `we-will-add-this-later` in the below image. **You will update this after you save the connection in Omni!**
At this point, the page should look like this:
5. In the policy editor, paste the following policy. Replace `` with the name of the S3 bucket used to store Athena query results:
```json expandable highlight={28} theme={null}
{
"Version": "2012-10-17",
"Statement": [
{
"Sid": "BasePermissionsForAllS3Buckets",
"Effect": "Allow",
"Action": [
"s3:ListAllMyBuckets",
"s3:ListBucket",
"s3:GetBucketLocation"
],
"Resource": "*"
},
{
"Sid": "BaseAndQueryPermissionsForQueryResultBucket",
"Effect": "Allow",
"Action": [
"s3:GetObject",
"s3:ListBucket",
"s3:GetBucketLocation",
"s3:ListBucket",
"s3:ListBucketMultipartUploads",
"s3:ListMultipartUploadParts",
"s3:AbortMultipartUpload",
"s3:PutObject"
],
"Resource": [
"arn:aws:s3:::",
"arn:aws:s3:::/*"
]
},
{
"Sid": "GluePermissions",
"Effect": "Allow",
"Action": [
"glue:GetTables",
"glue:GetDatabases",
"glue:GetDatabase",
"glue:GetTable"
],
"Resource": "*"
},
{
"Sid": "AthenaPermissions",
"Effect": "Allow",
"Action": [
"athena:StartQueryExecution",
"athena:GetQueryResults",
"athena:GetQueryResultsStream",
"athena:ListDatabases",
"athena:GetQueryExecution",
"athena:ListTableMetadata"
],
"Resource": "*"
}
]
}
```
If your data is stored in a separate bucket than the query results, you'll need to add an additional permissions block to the policy.
Replace `` with the name of the bucket that contains the data:
```json title="Additional permissions for different data & query buckets" highlight={9-10} theme={null}
{
"Sid": "S3AccessForDataBuckets",
"Effect": "Allow",
"Action": [
"s3:GetObject",
"s3:ListBucket"
],
"Resource": [
"arn:aws:s3:::",
"arn:aws:s3:::/*"
]
}
```
6. Click **Next**.
7. On the **Policy details** page, enter a name and description for the policy.
8. When finished, click **Create policy**.
To complete this step, you need permissions in AWS that allow you to create IAM roles.
In this step, you'll create the IAM role and attach the permissions policy you created in step 2 to it.
1. You should still be in the **IAM** section of the AWS console. If not, navigate there.
2. Click **Roles** in the left navigation.
3. On the page that displays, click **Create role**.
4. Define the trusted entity for the role as follows:
* **Trusted entity type** - Select **AWS account**
* In **An AWS account**, click **Another AWS account**
* **Account ID** field - Paste the **AWS Account ID** value from the Omni setup page
* In **Options**, check **Require external ID**
* **External ID** - Enter a placeholder value - we used `we-will-add-this-later` in the below image. **You will update this after you save the connection in Omni!**
At this point, the page should look like this:
 When finished, click **Next**.
5. On the **Add permissions** page, locate and select the policy you created in the previous section.
6. Click **Next**.
7. In the **Role details** section, enter a name for the role.
8. Review the selections and click **Create role** when finished.
After the role is created, open its details page in AWS and locate the **ARN** near the top of the page:
When finished, click **Next**.
5. On the **Add permissions** page, locate and select the policy you created in the previous section.
6. Click **Next**.
7. In the **Role details** section, enter a name for the role.
8. Review the selections and click **Create role** when finished.
After the role is created, open its details page in AWS and locate the **ARN** near the top of the page:
 Leave this page open - you'll need it to complete the setup.
Navigate back to the Athena setup page in Omni and fill in the connection details:
The Amazon S3 bucket used to store query results for the Athena database
The lowercase name of the data catalog to connect to
A comma-delimited list of data catalogs you want to generate models for, ex: `catalog1`, `catalog2`
Select **AWS Cross Account Role**
The ARN of the IAM role for Omni to assume, which you created in step 3
The AWS region the database is in. Defaults to `us-east-1`.
When finished, click **Create connection**.
After you save the connection, you'll likely see an error similar to `System message: AWS Role must be configured to check for an External ID` - don't worry! You're going to address this in the next step.
1. In AWS, navigate back to the IAM role page.
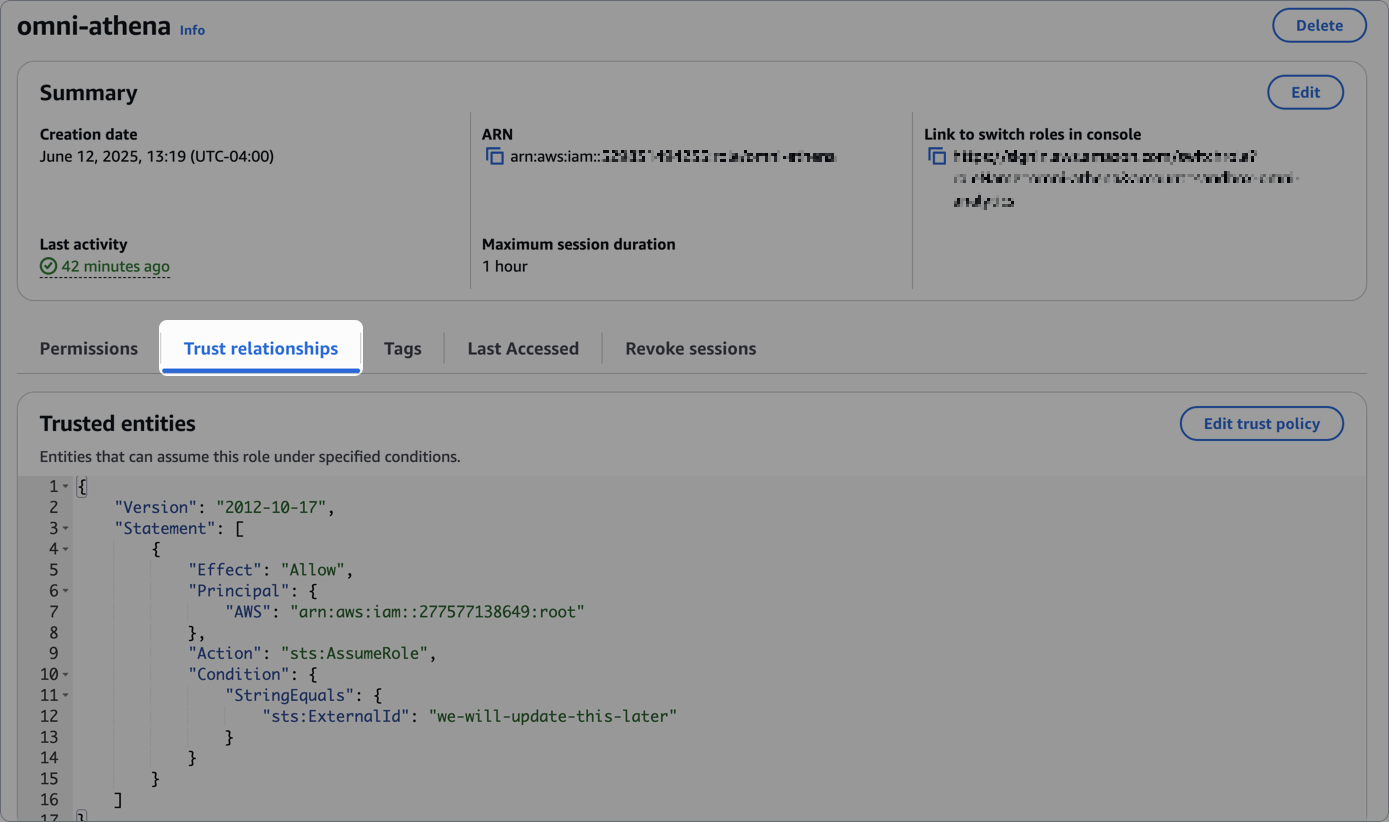
2. On the role's details page, click the **Trust relationships** tab in the middle of the page:
Leave this page open - you'll need it to complete the setup.
Navigate back to the Athena setup page in Omni and fill in the connection details:
The Amazon S3 bucket used to store query results for the Athena database
The lowercase name of the data catalog to connect to
A comma-delimited list of data catalogs you want to generate models for, ex: `catalog1`, `catalog2`
Select **AWS Cross Account Role**
The ARN of the IAM role for Omni to assume, which you created in step 3
The AWS region the database is in. Defaults to `us-east-1`.
When finished, click **Create connection**.
After you save the connection, you'll likely see an error similar to `System message: AWS Role must be configured to check for an External ID` - don't worry! You're going to address this in the next step.
1. In AWS, navigate back to the IAM role page.
2. On the role's details page, click the **Trust relationships** tab in the middle of the page:
 3. Click **Edit trust policy**.
4. Locate the `sts:ExternalId` property. Replace its value with the **AWS External ID** value from the Omni setup page:
```json title="Add AWS external ID from Omni" highlight={12} theme={null}
{
"Version": "2012-10-17",
"Statement": [
{
"Effect": "Allow",
"Principal": {
"AWS": "arn:aws:iam::277577138649:root"
},
"Action": "sts:AssumeRole",
"Condition": {
"StringEquals": {
"sts:ExternalId": ""
}
}
}
]
}
```
5. Click **Update policy** when finished.
Lastly, navigate back to the Omni setup page and click **Update and test connection**. At this point, the connection should return a **Success!** message.
## What's next?
Now that your database is set up, you can:
* Use the Omni Agent's [quickstart skill](/modeling/topics/quickstart) to create your first topic from business questions
* Configure user permissions, [schema refreshes](/modeling/develop/schema-refreshes), [environments](/connect-data/dynamic-environments) and [timezone settings](/connect-data/timezones)
* Learn how Omni [generates the model](/modeling/develop/model-generation) associated with the connection
## Troubleshooting
**Applicable if using cross-account role authentication.** If the S3 bucket containing your data is different than the bucket Athena is configured to use for query results, you may encounter an error in Omni.
Adding a block like the following to the IAM permissions policy attached to the IAM role you created can help resolve the issue.
Replace `` with the name of the bucket that contains the data:
```json title="Additional permissions for different data & query buckets" highlight={9-10} theme={null}
{
"Sid": "S3AccessForDataBuckets",
"Effect": "Allow",
"Action": [
"s3:GetObject",
"s3:ListBucket"
],
"Resource": [
"arn:aws:s3:::",
"arn:aws:s3:::/*"
]
}
```
3. Click **Edit trust policy**.
4. Locate the `sts:ExternalId` property. Replace its value with the **AWS External ID** value from the Omni setup page:
```json title="Add AWS external ID from Omni" highlight={12} theme={null}
{
"Version": "2012-10-17",
"Statement": [
{
"Effect": "Allow",
"Principal": {
"AWS": "arn:aws:iam::277577138649:root"
},
"Action": "sts:AssumeRole",
"Condition": {
"StringEquals": {
"sts:ExternalId": ""
}
}
}
]
}
```
5. Click **Update policy** when finished.
Lastly, navigate back to the Omni setup page and click **Update and test connection**. At this point, the connection should return a **Success!** message.
## What's next?
Now that your database is set up, you can:
* Use the Omni Agent's [quickstart skill](/modeling/topics/quickstart) to create your first topic from business questions
* Configure user permissions, [schema refreshes](/modeling/develop/schema-refreshes), [environments](/connect-data/dynamic-environments) and [timezone settings](/connect-data/timezones)
* Learn how Omni [generates the model](/modeling/develop/model-generation) associated with the connection
## Troubleshooting
**Applicable if using cross-account role authentication.** If the S3 bucket containing your data is different than the bucket Athena is configured to use for query results, you may encounter an error in Omni.
Adding a block like the following to the IAM permissions policy attached to the IAM role you created can help resolve the issue.
Replace `` with the name of the bucket that contains the data:
```json title="Additional permissions for different data & query buckets" highlight={9-10} theme={null}
{
"Sid": "S3AccessForDataBuckets",
"Effect": "Allow",
"Action": [
"s3:GetObject",
"s3:ListBucket"
],
"Resource": [
"arn:aws:s3:::",
"arn:aws:s3:::/*"
]
}
```