> ## Documentation Index
> Fetch the complete documentation index at: https://docs.omni.co/llms.txt
> Use this file to discover all available pages before exploring further.
# Dynamic connection environments
> Allow users to switch database environments while modeling or building analyses.
Using database environments, you can allow users to easily switch environments in an Omni branch or assign defaults by using [user attributes](/administration/users/attributes).
This can be useful for:
* **Development workflows** that test and validate changes against a non-production database
* **Embedded instances with multi-tenant data** where each customer must be restricted to only their own data
For model-level tenant isolation — where each customer sees a tailored version of the same base model — see [shared extension models](/modeling/develop/shared-extensions).
To let users choose an environment themselves — rather than switching in a branch or being routed by a user attribute — see [user-selected environments](/connect-data/user-selected-environments).
## Limitations
**The schemas in each database connection should be as close to identical as possible.**
When a connection is switched, the [schema model](/modeling/develop/model-generation) - meaning the available tables, views, and so on - is swapped, but the overarching model remains the same.
For example, if a model utilizes an object that exists in one connection but not in another, modeling errors will arise.
## Requirements
To follow the steps in this guide, you'll need **Omni Organization Admin** permissions.
## Setup
The first step is to create the primary connection which will be used to build the shared model. Refer to the [Database setup guides](/connect-data/setup) for instructions specific to different database types.
In this guide, the primary connection is a Snowflake database named **Snowflake (production)** that has an associated data model with the same name.
1. Create another connection, which must be the same database type as the primary connection in step 1.
2. Navigate back to the details page for the primary connection.
3. Click the **Environments** tab.
4. Click the **New Environment** button, which will open a dialog like the following:
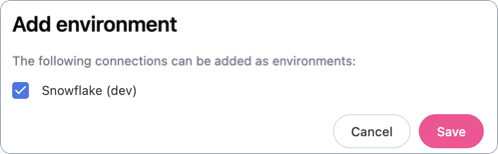 5. Select the secondary connection. In this example, the connection is named **Snowflake (dev)**.
6. Click **Save**.
At this point, you can use the connections in workbooks. Creating a new branch will display an option to change the connection environment from the primary connection (**Snowflake (production)**) to other environments (**Snowflake (dev)**):
5. Select the secondary connection. In this example, the connection is named **Snowflake (dev)**.
6. Click **Save**.
At this point, you can use the connections in workbooks. Creating a new branch will display an option to change the connection environment from the primary connection (**Snowflake (production)**) to other environments (**Snowflake (dev)**):
 If you want to dynamically assign an environment based on user attributes, continue to step 3.
This step is required only if you want to dynamically assign database environments.
In this step, you'll create a user attribute that will be used to determine the connection a given user should be assigned to.
1. Navigate to **Settings > Attributes**.
2. Click **New Attribute**.
3. Fill in the fields to create the attribute, including the **Default Value** field. This will set a default value for users that don't have a value directly assigned:
If you want to dynamically assign an environment based on user attributes, continue to step 3.
This step is required only if you want to dynamically assign database environments.
In this step, you'll create a user attribute that will be used to determine the connection a given user should be assigned to.
1. Navigate to **Settings > Attributes**.
2. Click **New Attribute**.
3. Fill in the fields to create the attribute, including the **Default Value** field. This will set a default value for users that don't have a value directly assigned:
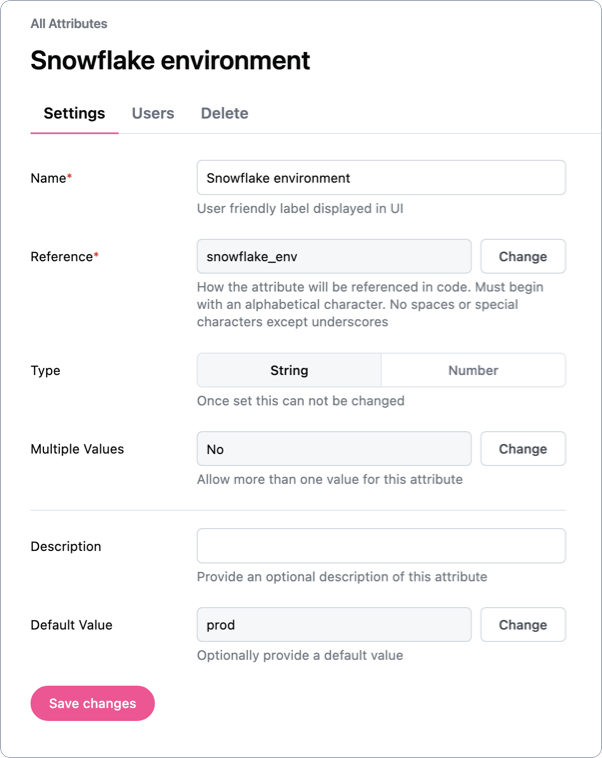 In this example, users will be assigned to `prod` unless their `snowflake_env` attribute is specifically set to `dev`.
4. When finished, click **Save**.
This step is required only if you want to dynamically assign database environments.
The last step is to configure the primary connection to dynamically assign environments using the user attribute you created in step 3.
1. Navigate to the **primary connection** you created in step 1 of this guide.
2. Click the **Environments** tab.
3. Toggle **Allow environments to be assigned dynamically** to **on**. Fill in the fields that display as follows:
* **User attribute** - Enter the **reference name** of the user attribute you created in step 3. In this example, that would be `snowflake_env`.
* **Values for the default connection** - Enter the value to be used for the default connection. In this example, that would be `prod`:
In this example, users will be assigned to `prod` unless their `snowflake_env` attribute is specifically set to `dev`.
4. When finished, click **Save**.
This step is required only if you want to dynamically assign database environments.
The last step is to configure the primary connection to dynamically assign environments using the user attribute you created in step 3.
1. Navigate to the **primary connection** you created in step 1 of this guide.
2. Click the **Environments** tab.
3. Toggle **Allow environments to be assigned dynamically** to **on**. Fill in the fields that display as follows:
* **User attribute** - Enter the **reference name** of the user attribute you created in step 3. In this example, that would be `snowflake_env`.
* **Values for the default connection** - Enter the value to be used for the default connection. In this example, that would be `prod`:
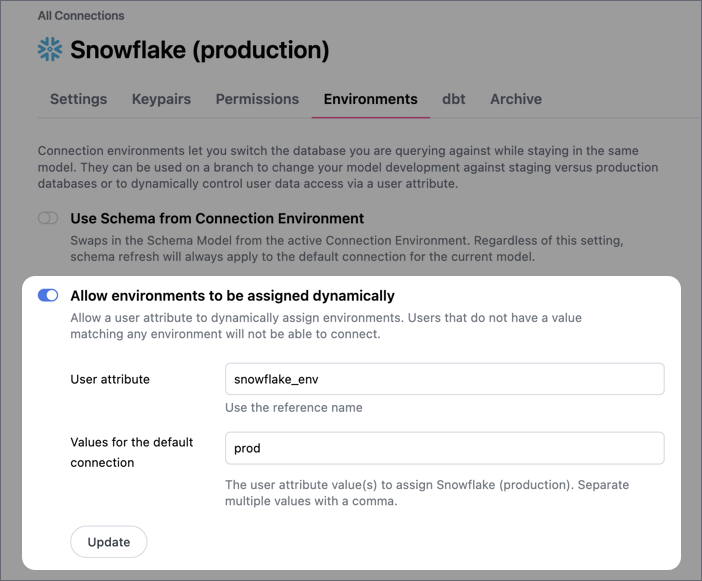 4. Click **Update**.
5. After clicking **Update**, a new field will display next to the connection in the **Environments** section. Use this field to assign a value to the connection, which will route users with this user attribute value to the connection.
In this example, users with a `dev` value for the `snowflake_env` user attribute will be routed to the **Snowflake (dev)** connection:
4. Click **Update**.
5. After clicking **Update**, a new field will display next to the connection in the **Environments** section. Use this field to assign a value to the connection, which will route users with this user attribute value to the connection.
In this example, users with a `dev` value for the `snowflake_env` user attribute will be routed to the **Snowflake (dev)** connection:
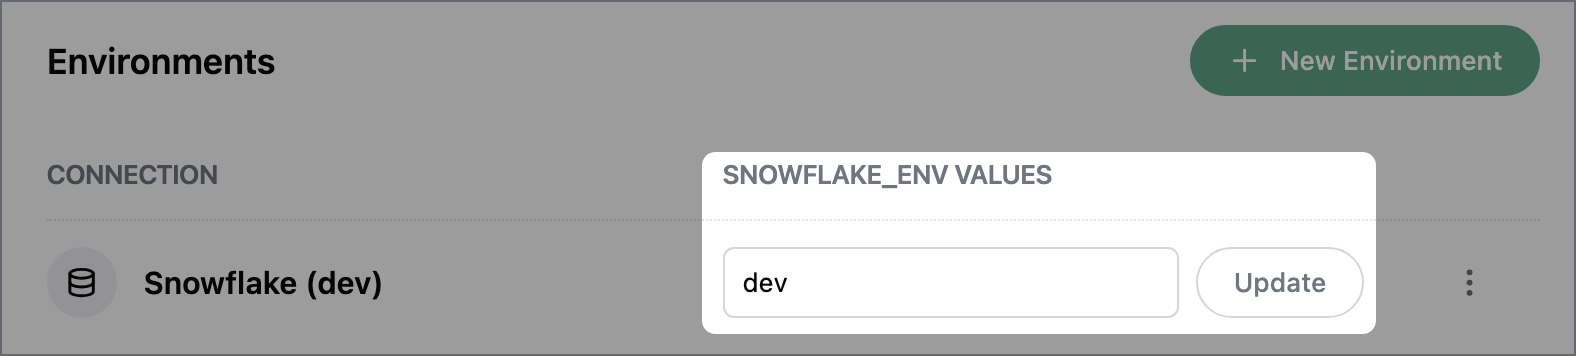 6. Click **Update**.
## What's next?
That's it! Users will now be able to use the same data model but change connections based on how their user attributes are defined.
If specific users need access to a connection other than the default, the next step is to assign them the appropriate user attribute value. Refer to the [User attributes guide](/administration/users/attributes) for more information.
6. Click **Update**.
## What's next?
That's it! Users will now be able to use the same data model but change connections based on how their user attributes are defined.
If specific users need access to a connection other than the default, the next step is to assign them the appropriate user attribute value. Refer to the [User attributes guide](/administration/users/attributes) for more information.