> ## Documentation Index
> Fetch the complete documentation index at: https://docs.omni.co/llms.txt
> Use this file to discover all available pages before exploring further.
## Submitting Feedback
If you encounter incorrect, outdated, or confusing documentation on this page, submit feedback:
POST https://docs.omni.co/feedback
```json
{
"path": "/analyze-explore/workbook-basics",
"feedback": "Description of the issue"
}
```
Only submit feedback when you have something specific and actionable to report.
# Build analyses in workbooks
> Learn Omni workbook basics: create tabs, query data with point-and-click or SQL, save versions, and share analyses with your team.
Omni's workbook UI is focused on asking any question of both modeled and un-modeled data in your databases. Each workbook contains one or more tabs, where data can be queried either using a UI-driven pivot-table experience or by writing SQL.
The URL will update with each user action, allowing easy back and forward motions in your browser, and instant shareability of results (across all of the tabs in your workbook). The URL is structured such that each tab is encoded individually, for easy portability. The URL structure will contain a reference to each tab, and a final reference to the active tab.
For example:
 Tabs can be renamed and rearranged for additional organization.
Saving a new workbook
Workbooks can optionally be named and saved. When a workbook is saved, it will appear alongside other dashboards and workbooks in the [content system](/content/navigate).
To save a workbook:
In the workbook, click **File > Save**.
Give the document a **Name** and an optional **Description**:
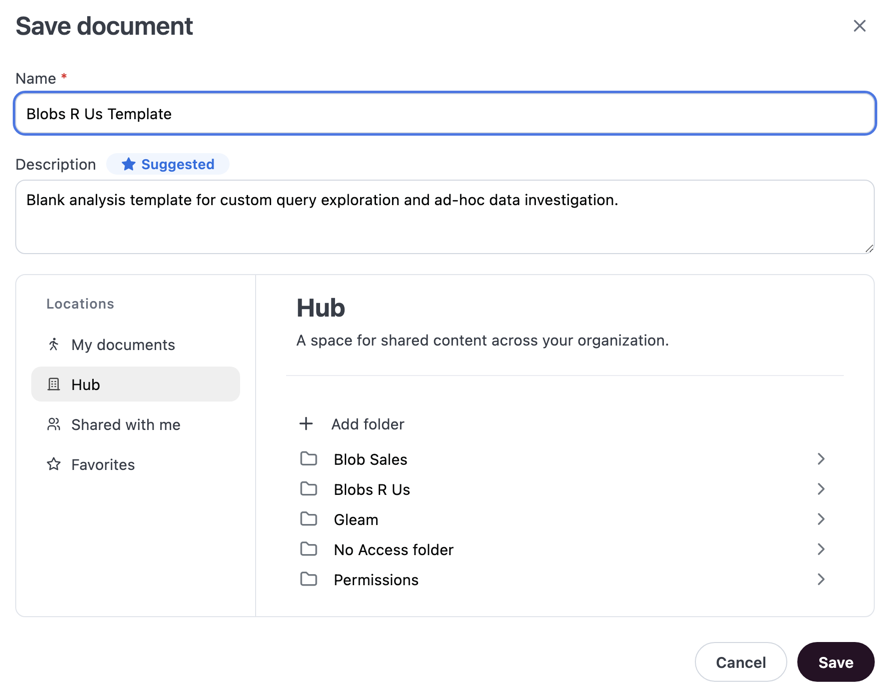 By default, Omni will automatically suggest a title and description based on your analysis. These AI-generated suggestions will have a Suggested badge. You can change or remove them as needed.
Use the **Locations** browser to find and select the [folder](/content/organize#folders) you want to save the document to. The document can be moved after saving if needed.
**Document location determines content access**! For example, if you save a document in **My documents**, it will only be accessible to other users if you explicitly share it with them. See [Sharing content](/share) for more information.
Click **Save** to save the document.
## Workbook states
A workbook can be in either **View** or **Edit (draft)** mode.
When **viewing**, you're looking at the latest saved version of the workbook.
When **editing**, you're changing the workbook and changes will auto-save as you work. Changes made in draft mode will also impact the dashboard that attached to the workbook.
## Workbook versions
To view a history of all changes to the workbook, click **File > Version History** to open the **Version History** panel. You can also use this panel to restore a previous version of the workbook.
By default, Omni will automatically suggest a title and description based on your analysis. These AI-generated suggestions will have a Suggested badge. You can change or remove them as needed.
Use the **Locations** browser to find and select the [folder](/content/organize#folders) you want to save the document to. The document can be moved after saving if needed.
**Document location determines content access**! For example, if you save a document in **My documents**, it will only be accessible to other users if you explicitly share it with them. See [Sharing content](/share) for more information.
Click **Save** to save the document.
## Workbook states
A workbook can be in either **View** or **Edit (draft)** mode.
When **viewing**, you're looking at the latest saved version of the workbook.
When **editing**, you're changing the workbook and changes will auto-save as you work. Changes made in draft mode will also impact the dashboard that attached to the workbook.
## Workbook versions
To view a history of all changes to the workbook, click **File > Version History** to open the **Version History** panel. You can also use this panel to restore a previous version of the workbook.
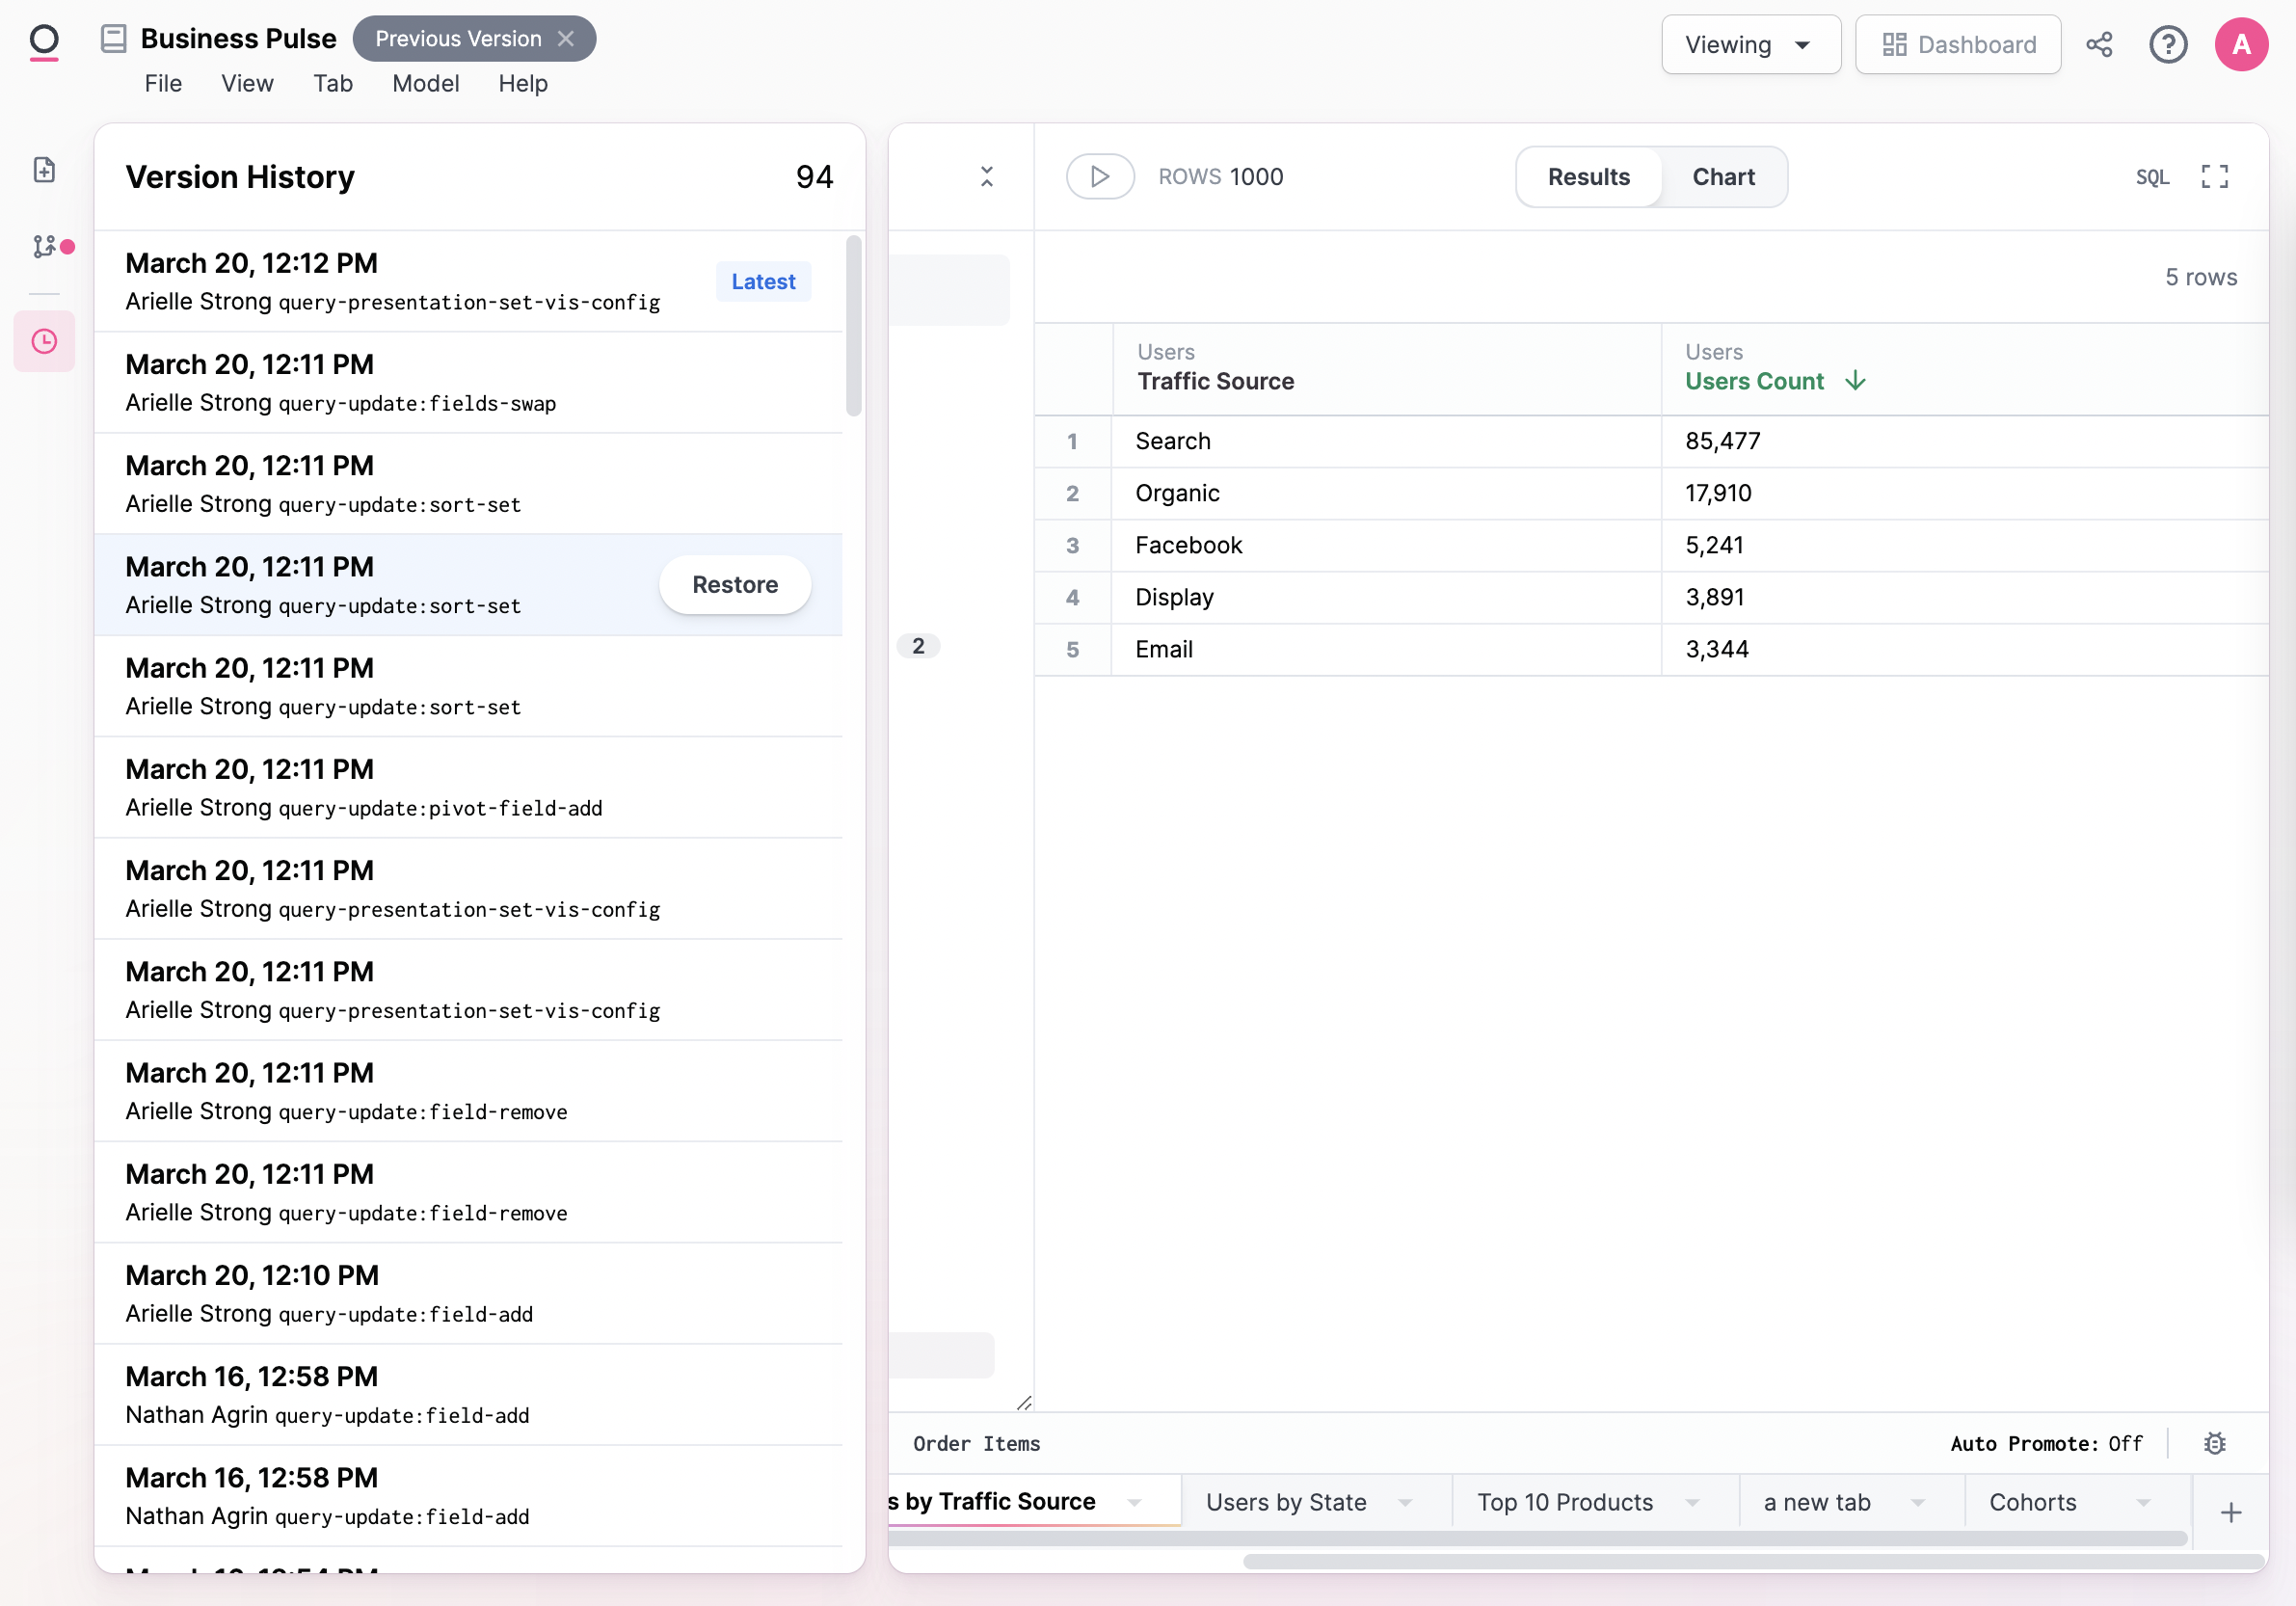 The **Version History** panel only contains changes to the workbook itself, not the workbook model or the dashboard. Open the model IDE (**Model > Model layers > Workbook**) to view workbook model changes.
## Exploring a workbook
To explore or iterate on an analysis without impacting the saved version, click **Explore** near the top-right corner of the page. This will create a new copy of the workbook that you can safely work in.
## Moving queries between workbooks
Workbook tabs can be duplicated inside workbooks, or copied to an existing workbook, or create an entirely new workbook.
### Duplicate a tab in the same workbook
From the workbook, enter edit mode, right click on the tab and select 'Duplicate'.
### Copy a tab to an existing workbook
Copying workbook tabs requires the [Duplicate content permission](/administration/content-permissions#default-document-abilities) to be set to **On**.
This permission only applies if your organization has the **Duplicate** feature enabled by support — if it isn't enabled, you can copy tabs without restriction.
Copying an existing tab allows you to share a query between workbooks.
In the workbook with the query you want to copy:
1. Enter draft mode.
2. Right-click on the tab you want to copy.
3. Select **Copy to**.
4. Click the button to copy the query ID.
Then, in the workbook you want to copy the query to:
1. Enter draft mode.
2. Click **Edit > Import tab**. In the Import Tab dialog, you can paste either:
* The query ID (e.g., `abc123def456`)
* The full widget URL (e.g., `https://yourinstance.omni.co/workbooks/123?w=abc123def456`)
Omni will automatically extract the query ID from the full URL if provided.
There are a couple of caveats to copying to an existing workbook:
1. A tab can only be copied to a workbook with the same connection and shared model
2. If there are changes to the workbook model in the tab you are copying over, those will be copied into the existing workbook as well. In the event of a conflict (e.g. the same field exists on both workbooks with different definitions), the workbook copied to should win.
3. If the source workbook contains query views with names that match query views in the destination workbook, the import will be refused with an error message identifying the conflicting view(s).
To proceed, rename the conflicting query view in the source workbook before importing the tab. This prevents data corruption where an imported tab would incorrectly read an unrelated view from the destination workbook.
### Create a new workbook with a new tab
From the dashboard, right click on the tile and click Explore. From the workbook, right click on the tab and click Explore.
### Linked tabs
From the workbook, enter edit mode, right click on the tab and select `Create linked tab`. Save the linked tab, and you can now build multiple visualizations from the same query in a workbook. This also means changing one query, you do not need repeat that change for each linked query.
* Dashboard filters can only be mapped to the source tab.
* When you delete a source tab, may either delete the linked tabs or unlink them and turn them into independent queries.
The **Version History** panel only contains changes to the workbook itself, not the workbook model or the dashboard. Open the model IDE (**Model > Model layers > Workbook**) to view workbook model changes.
## Exploring a workbook
To explore or iterate on an analysis without impacting the saved version, click **Explore** near the top-right corner of the page. This will create a new copy of the workbook that you can safely work in.
## Moving queries between workbooks
Workbook tabs can be duplicated inside workbooks, or copied to an existing workbook, or create an entirely new workbook.
### Duplicate a tab in the same workbook
From the workbook, enter edit mode, right click on the tab and select 'Duplicate'.
### Copy a tab to an existing workbook
Copying workbook tabs requires the [Duplicate content permission](/administration/content-permissions#default-document-abilities) to be set to **On**.
This permission only applies if your organization has the **Duplicate** feature enabled by support — if it isn't enabled, you can copy tabs without restriction.
Copying an existing tab allows you to share a query between workbooks.
In the workbook with the query you want to copy:
1. Enter draft mode.
2. Right-click on the tab you want to copy.
3. Select **Copy to**.
4. Click the button to copy the query ID.
Then, in the workbook you want to copy the query to:
1. Enter draft mode.
2. Click **Edit > Import tab**. In the Import Tab dialog, you can paste either:
* The query ID (e.g., `abc123def456`)
* The full widget URL (e.g., `https://yourinstance.omni.co/workbooks/123?w=abc123def456`)
Omni will automatically extract the query ID from the full URL if provided.
There are a couple of caveats to copying to an existing workbook:
1. A tab can only be copied to a workbook with the same connection and shared model
2. If there are changes to the workbook model in the tab you are copying over, those will be copied into the existing workbook as well. In the event of a conflict (e.g. the same field exists on both workbooks with different definitions), the workbook copied to should win.
3. If the source workbook contains query views with names that match query views in the destination workbook, the import will be refused with an error message identifying the conflicting view(s).
To proceed, rename the conflicting query view in the source workbook before importing the tab. This prevents data corruption where an imported tab would incorrectly read an unrelated view from the destination workbook.
### Create a new workbook with a new tab
From the dashboard, right click on the tile and click Explore. From the workbook, right click on the tab and click Explore.
### Linked tabs
From the workbook, enter edit mode, right click on the tab and select `Create linked tab`. Save the linked tab, and you can now build multiple visualizations from the same query in a workbook. This also means changing one query, you do not need repeat that change for each linked query.
* Dashboard filters can only be mapped to the source tab.
* When you delete a source tab, may either delete the linked tabs or unlink them and turn them into independent queries.