> ## Documentation Index
> Fetch the complete documentation index at: https://docs.omni.co/llms.txt
> Use this file to discover all available pages before exploring further.
# Uploading CSVs with data input tables
> Upload CSV or Excel files to Omni as data input tables for enrichment and ad-hoc analysis without modifying your data pipelines.
Sometimes you may want to utilize data in an analysis that isn't already in a [database](/connect-data/setup) schema, whether it's for data enrichment or an initial exploration. Creating a data input table allows you to add data to Omni, whether by manually entering data or uploading a CSV or XLSX, without needing to touch your data pipelines.
## Requirements
To add data input tables, you'll need:
* A configured Omni [connection](/connect-data/setup) that supports upload tables
* **Restricted Querier**, **Querier**, or **Connection Admin** permissions
* **To enable the [Upload data ability](/share#controlling-document-interactivity)**. This setting must be enabled for the [organization](/administration/content-permissions) and, if a document is shared with others, also in the [document's settings](/share#controlling-document-interactivity).
We recommend creating a schema in your database where Omni can write the CSV files. See the [setup guide for your database](/connect-data/setup) for more instructions on write backs.
## Limitations
Currently, data input tables:
* **Must be added in a workbook**
* **Are limited to 500,000 rows**
* **Can't be used in joins unless the table is pushed to a database.** Setting the connection's **Schema for table upload** property enables this functionality. Refer to the [setup guide for your database](/connect-data/setup) for more information.
* **Data types for each column can't be explicitly selected in Omni.** column type will be inferred based on the values in the upload. Generally it is best to correct this in the source rather than casting/fixing in the model layer after saving. For dates especially getting the format right in the upload will save you time.
## Adding a data input table to a workbook
Data input tables can be added in the workbook of any document.
In a workbook, navigate to **Edit > New blank table**. A new tab with a blank data input table will display.
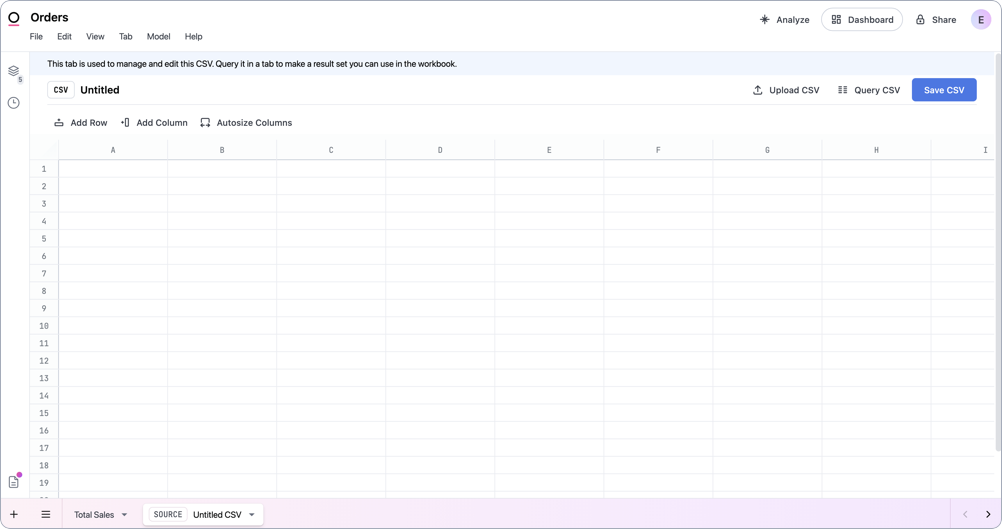 To get data into the table, you can manually enter it or upload a CSV or XLSX:
In the first row, add the names of the columns. The first row must be a header row to allow Omni to generate a schema for the table.
Enter data into the cells. To add line breaks, use `Ctrl + Enter`.
To add rows or columns, use the **Add Row** and **Add Column** options.
When you're finished editing the table, click **Save CSV** near the top right corner of the page.
Enter a name for the table and click **Save**.
To upload a CSV or XLSX:
* The first row must be a header row
* The file can't exceed 500,000 rows
Additionally, if the XLSX file contains multiple tabs, only the first sheet will be uploaded.
Click the **Upload CSV** option near the top right corner of the page.
Browse for or drag the file you want to upload into the upload dialog.
If you have [**Querier**, **Modeler**, or **Connection Admin** permissions](/administration/users/permissions), you'll see a **Create topic** checkbox. Checking this box will create a topic from the uploaded file. If you're a **Restricted Querier**, a topic will automatically be created from the file.
Click **Upload** to upload the file.
Once there's data in the table, click **Query CSV** to create a query using the data. The table will also become available in the field picker in other queries.
## Querying and joining data input tables
Data input tables can be queried like any other table, including using the field picker, [SQL editor](/analyze-explore/sql), or working with [calculations and formulas](/analyze-explore/calculations).
To get data into the table, you can manually enter it or upload a CSV or XLSX:
In the first row, add the names of the columns. The first row must be a header row to allow Omni to generate a schema for the table.
Enter data into the cells. To add line breaks, use `Ctrl + Enter`.
To add rows or columns, use the **Add Row** and **Add Column** options.
When you're finished editing the table, click **Save CSV** near the top right corner of the page.
Enter a name for the table and click **Save**.
To upload a CSV or XLSX:
* The first row must be a header row
* The file can't exceed 500,000 rows
Additionally, if the XLSX file contains multiple tabs, only the first sheet will be uploaded.
Click the **Upload CSV** option near the top right corner of the page.
Browse for or drag the file you want to upload into the upload dialog.
If you have [**Querier**, **Modeler**, or **Connection Admin** permissions](/administration/users/permissions), you'll see a **Create topic** checkbox. Checking this box will create a topic from the uploaded file. If you're a **Restricted Querier**, a topic will automatically be created from the file.
Click **Upload** to upload the file.
Once there's data in the table, click **Query CSV** to create a query using the data. The table will also become available in the field picker in other queries.
## Querying and joining data input tables
Data input tables can be queried like any other table, including using the field picker, [SQL editor](/analyze-explore/sql), or working with [calculations and formulas](/analyze-explore/calculations).
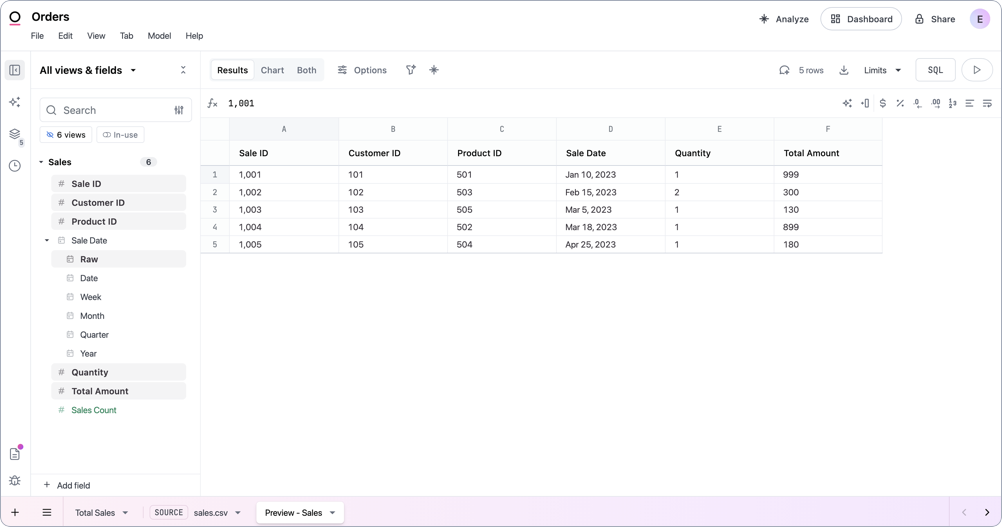 **Note**: To make the data available outside of the workbook, you'll need to [promote it to the shared model](#modeling-and-promoting-data-input-tables).
How you join data from a data input table to other data depends on whether table uploads are enabled for the database connection used by the workbook:
**Note**: To make the data available outside of the workbook, you'll need to [promote it to the shared model](#modeling-and-promoting-data-input-tables).
How you join data from a data input table to other data depends on whether table uploads are enabled for the database connection used by the workbook:
Traditional joins (Requires database uploads)
If database uploads are enabled for the connection, you can use [traditional joins](/analyze-explore/point-click-queries#joining-tables) - whether via the UI or in SQL - to create relationships between data input tables and other data.
Workbook tab joins with XLOOKUP
If database uploads aren't enabled for the connection, you won't be able to use traditional joins with data input tables. You can, however, use [`XLOOKUP`](/analyze-explore/calculations/position#xlookup) to perform cross-tab analysis in a workbook:
```
=XLOOKUP(lookup_value, !, !)
```
For example, you have a workbook with two tabs: `Sales`, which is backed by a topic, and `Products Upload`, which is a query on a data input table. You want to include the names of products purchased in an order alongside other sales data. To join the data in the `Products Upload` tab to your sales, you could use an `XLOOKUP` formula like the following to create a new calculation in the `Sales` tab:
```
=XLOOKUP(A1,'Products Upload'!B:B, 'Products Upload'!C:C)
```
## Modeling and promoting data input tables
When a data input table is added to a workbook, a few things will happen in the [workbook model](/modeling/develop/promotion#reviewing-and-promoting-workbook-changes). To make the changes available outside of the workbook, [they must be promoted to the shared model](/modeling/develop/promotion).
* **A [view](/modeling/views) representing the data input table will be created**. These views can be identified by the presence of an `uploaded_table_name` parameter:
```yaml title="products.view" theme={null}
# Reference this view as products
uploaded_table_name: products.csv::1a3497f5-cba8-47c0-bab9-b2df84d1b141
```
* **A [topic](/modeling/topics) based on the view representing the data input table will be created if**:
* **Create topic** was selected while uploading a CSV or XLSX, or
* A Restricted Querier performed the upload
Topics created from CSV uploads automatically receive empty `required_access_grants`, meaning they don't inherit model-level `default_topic_required_access_grants` and are accessible to all users by default.
Views and topics created from data input tables can be modeled like any other view or topic. However, if the data input table hasn't been pushed to the connection's database, attempting to use the data input table in a join in the IDE will result in the following content validation error:
```bash theme={null}
View "" references an uploaded table. Uploaded tables cannot be used in joins.
```
If data from a data input table hasn't been pushed to a database, only `XLOOKUP` can be used to perform joins to other tabs in a workbook. Refer to the [Querying & joining data](#querying-and-joining-data-input-tables) section for more information and examples.
## Updating data input table data
When making updates to a data input table, keep the following in mind:
* **Changes must be promoted to the shared model to be accessible outside the workbook**. This is necessary even if the table was previously promoted to the shared model.
* **If table uploads (writebacks) are enabled for the connection**, Omni will create a new table in the database each time the table is saved. You can manage previous versions of the table in the [**Upload management** page](#managing-previous-table-versions).
To update a data input table's data:
1. In a workbook, locate the table in a query tab.
2. Click the options menu next to the table's name, then **Edit Table**:
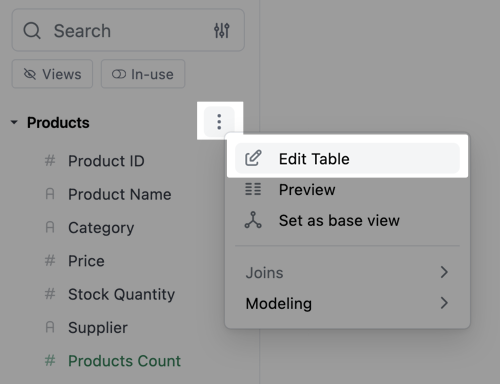 3. The data input table will open in a new tab where you can edit the data as needed.
4. Click **Save changes** when finished.
Upon a successful save, the updated table will immediately become available in the workbook. Omni will also log a new version of the table in the [**Upload management** page](#managing-previous-table-versions).
## Managing previous table versions
Every time you [create](#adding-a-data-input-table-to-a-workbook) or [update](#updating-data-input-table-data) a data input table, Omni adds an entry in the **Upload management** page. Each item in the list represents a version of the table. Entries are sorted by the time they were created, beginning with the most recent.
Navigate to **Settings > Uploads** to access this page:
3. The data input table will open in a new tab where you can edit the data as needed.
4. Click **Save changes** when finished.
Upon a successful save, the updated table will immediately become available in the workbook. Omni will also log a new version of the table in the [**Upload management** page](#managing-previous-table-versions).
## Managing previous table versions
Every time you [create](#adding-a-data-input-table-to-a-workbook) or [update](#updating-data-input-table-data) a data input table, Omni adds an entry in the **Upload management** page. Each item in the list represents a version of the table. Entries are sorted by the time they were created, beginning with the most recent.
Navigate to **Settings > Uploads** to access this page:
 ### Querying previous table versions
To create a query using a specific version of a table, click the **Explore** button next to the table version. This will open a new workbook that uses the specified version of the table.
**Note**: If you promote the changes from an older version of the table, it will overwrite the data currently in the shared model.
### Deleting table versions
**Deleting a table version can't be undone**. Before continuing, note that:
* The version of the table will be permanently deleted from your Omni instance. If table uploads (writebacks) are enabled, the version of the table will also be deleted from the database.
* Queries, views, and topics built on the version will result in an error after the deletion
The **Upload management** page can be used to delete previous versions of a data input table. **Note**: Table versions are listed in the order they were created, meaning that the most recent version of a table will be higher in the list.
1. Navigate to **Settings > Uploads**.
2. Locate the version you want to remove and click **Delete**.
After the deletion is complete, you'll also need to:
* Remove views and topics built on the version from the model
* Update or remove queries using the version
### Querying previous table versions
To create a query using a specific version of a table, click the **Explore** button next to the table version. This will open a new workbook that uses the specified version of the table.
**Note**: If you promote the changes from an older version of the table, it will overwrite the data currently in the shared model.
### Deleting table versions
**Deleting a table version can't be undone**. Before continuing, note that:
* The version of the table will be permanently deleted from your Omni instance. If table uploads (writebacks) are enabled, the version of the table will also be deleted from the database.
* Queries, views, and topics built on the version will result in an error after the deletion
The **Upload management** page can be used to delete previous versions of a data input table. **Note**: Table versions are listed in the order they were created, meaning that the most recent version of a table will be higher in the list.
1. Navigate to **Settings > Uploads**.
2. Locate the version you want to remove and click **Delete**.
After the deletion is complete, you'll also need to:
* Remove views and topics built on the version from the model
* Update or remove queries using the version