> ## Documentation Index
> Fetch the complete documentation index at: https://docs.omni.co/llms.txt
> Use this file to discover all available pages before exploring further.
# Using the MCP Server in Claude Code
> Connect your Omni data to Claude Code with Omni's MCP Server.
Claude Code is the command line version of Anthropic's AI assistant, Claude. Once successfully connected to Omni, you can interact with your Omni data right in your Claude Code session.
**Looking for the Omni agent skills for Claude Code?** See the [Agent skills documentation](/developers/agent-skills) for a broader set of skills beyond querying.
**Looking for Claude Desktop?** Check out the [Claude Desktop guide](/ai/mcp/claude-desktop).
## Requirements
Every person who wants to use the MCP Server must complete the setup.
To follow the steps in this guide, you'll need:
* To install Claude Code
* To have the following enabled in Omni:
* **The MCP Server AI setting**. An Organization Admin can enable this setting by navigating to [**AI Hub > Setup > General**](/ai/settings/features#mcp-server).
* **Personal access tokens (PATs)**. An Organization Admin can activate them by going to [**Settings > API Keys > Personal tokens**](/api/authentication#token-types).
## Setup
The official Omni connector for Claude provides the fastest setup experience with no manual configuration required.
Visit the [Omni Analytics connector](https://claude.com/connectors/omni-analytics) page and click **Add to Claude** to install the connector. This adds the Omni MCP server to both Claude Desktop and Claude Code.
Run `claude` to start a new session. The Omni MCP server will be available automatically.
1. Claude Code will detect the Omni connector and prompt you to authenticate.
2. Your browser will open and redirect you to an Omni authorization page.
3. Review the requested permissions and click **Authorize**.
Omni will automatically create a [Personal access token](/api/authentication#token-types) and link it to your Omni user account.
At this point, you should be able to use the Omni MCP server in your Claude Code sessions:
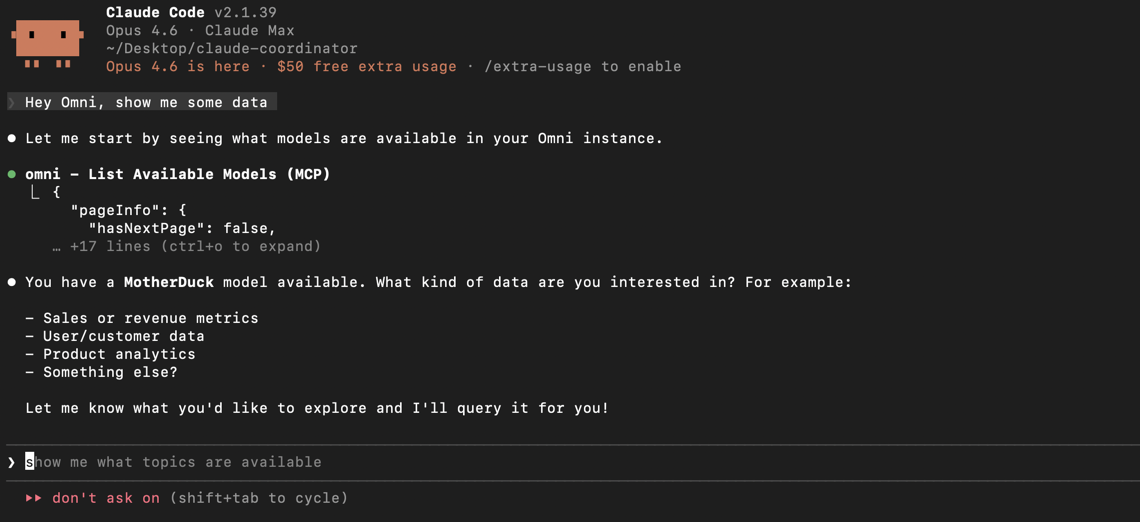 You can also add the Omni MCP server manually via the Claude Code CLI.
In your terminal, run the following command:
```bash theme={null}
claude mcp add --transport http omni https://callbacks.omniapp.co/callback/mcp
```
Run `claude` to start a new session.
1. Run `/mcp` to open the MCP servers list:
You can also add the Omni MCP server manually via the Claude Code CLI.
In your terminal, run the following command:
```bash theme={null}
claude mcp add --transport http omni https://callbacks.omniapp.co/callback/mcp
```
Run `claude` to start a new session.
1. Run `/mcp` to open the MCP servers list:
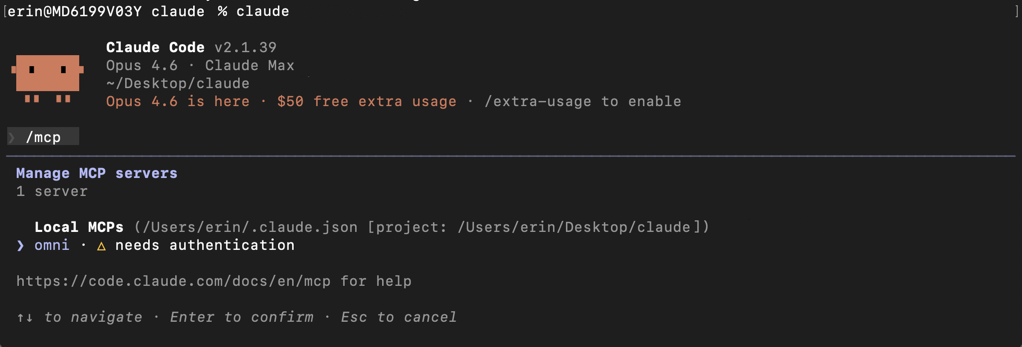 2. Navigate to and select the Omni MCP server:
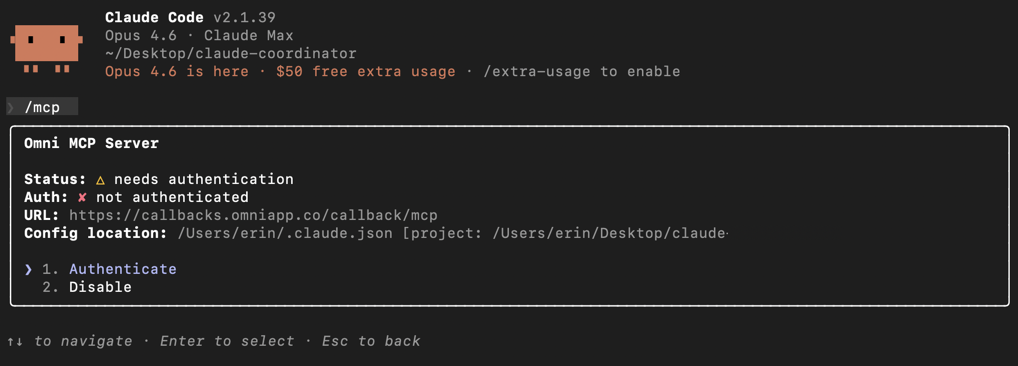 3. Press **Enter** to select the **Authenticate** option.
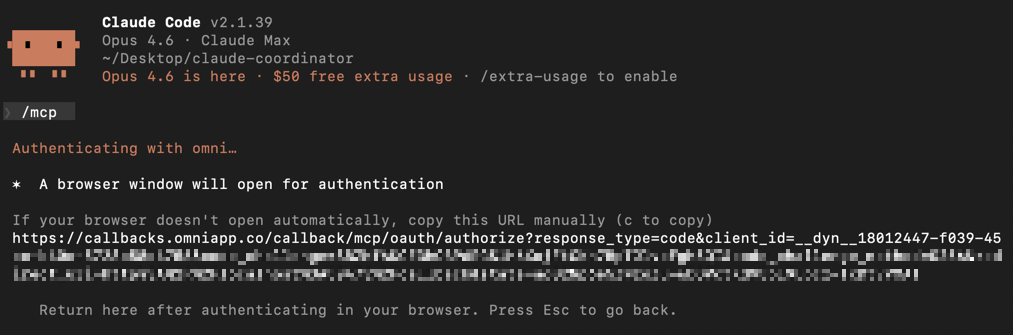 4. Your browser will open and redirect you to an Omni authorization page.
5. Review the requested permissions and click **Authorize**.
Omni will automatically create a [Personal access token](/api/authentication#token-types) and link it to your Omni user account.
At this point, you should be able to use the Omni MCP server in your Claude Code sessions:
Claude Code Cloud runs agents on your repositories in the cloud. MCP servers are configured by committing a `.mcp.json` file to the root of any repository where you want Omni available.
You'll need an Omni API key for this setup. See [API authentication](/api/authentication) if you need to create one.
In the root of your repository, create a file named `.mcp.json`:
```json title=".mcp.json" theme={null}
{
"mcpServers": {
"Omni MCP": {
"type": "http",
"url": "https:///mcp/https",
"headers": {
"Authorization": "Bearer ",
"X-MCP-Model-ID": "",
"X-MCP-Topic-Name": "",
"X-MCP-User-Required": "",
"X-MCP-User-ID": "",
"X-MCP-Query-All-Views": ""
}
}
}
}
```
Replace the placeholder values:
* `` - **Required**. Your Omni URL
* `` - **Required**. Your [Omni API key](/api/authentication)
* `` - **Optional**. Scope the MCP to a specific model
* `` - **Optional**. Scope the MCP to a specific topic
* `` - **Optional**. Require a User ID to execute queries with that user's permissions (default: `false`)
* `` - **Optional**. Execute queries as this user. Get IDs from the [List Users API](/api/users/list-users)
* `` for `X-MCP-Query-All-Views` - **Optional**. Set to `true` to enable all-views-and-fields mode, allowing the AI to query any view in the model (not just topics). Requires the model's `query_all_views_and_fields` setting to be enabled. Default: `false`.
Commit `.mcp.json` to your repository. When you start a new Claude Code Cloud session on that repository, the MCP server will be loaded automatically.
**To keep credentials out of version control**, reference environment variables using `${VAR}` syntax instead of hardcoding values:
```json title=".mcp.json" theme={null}
{
"mcpServers": {
"Omni MCP": {
"type": "http",
"url": "https://${OMNI_INSTANCE}/mcp/https",
"headers": {
"Authorization": "Bearer ${OMNI_API_KEY}",
"X-MCP-Model-ID": "${OMNI_MODEL_ID}",
"X-MCP-Topic-Name": "${OMNI_TOPIC_NAME}",
"X-MCP-User-Required": "false",
"X-MCP-Query-All-Views": "${OMNI_QUERY_ALL_VIEWS}"
}
}
}
}
```
If you used `${VAR}` references in your `.mcp.json`, add the corresponding values to your Cloud Environment variables (e.g., `OMNI_API_KEY=key`). These are injected at runtime and never stored in your repository.
Start a new Claude Code Cloud session from [claude.ai/code](https://claude.ai/code) or the Claude desktop app. When prompted, select the GitHub repository where you committed `.mcp.json`. Claude Code Cloud will detect the file and load the Omni MCP server automatically.
## Troubleshooting
Claude Code may sometimes return an error similar to:
```bash wrap theme={null}
Permission to use mcp__omni__pickModel has been denied because Claude Code is running in don't ask mode
```
This mode automatically blocks tools that aren't pre-approved rather than prompting you for approval. To resolve this issue, you have a few options:
* **Restart Claude Code with the tools allowed**:
```bash theme={null}
claude --allowed-tools 'mcp__omni__*'
```
* **Update your permission settings** to allow MCP tools. Add `mcp__omni__*` to your allowed tools in your Claude Code settings or `.claude/settings.json`
* **Switch out of 'don't ask' mode**, which will ensure you are prompted to approve tool calls
4. Your browser will open and redirect you to an Omni authorization page.
5. Review the requested permissions and click **Authorize**.
Omni will automatically create a [Personal access token](/api/authentication#token-types) and link it to your Omni user account.
At this point, you should be able to use the Omni MCP server in your Claude Code sessions:
Claude Code Cloud runs agents on your repositories in the cloud. MCP servers are configured by committing a `.mcp.json` file to the root of any repository where you want Omni available.
You'll need an Omni API key for this setup. See [API authentication](/api/authentication) if you need to create one.
In the root of your repository, create a file named `.mcp.json`:
```json title=".mcp.json" theme={null}
{
"mcpServers": {
"Omni MCP": {
"type": "http",
"url": "https:///mcp/https",
"headers": {
"Authorization": "Bearer ",
"X-MCP-Model-ID": "",
"X-MCP-Topic-Name": "",
"X-MCP-User-Required": "",
"X-MCP-User-ID": "",
"X-MCP-Query-All-Views": ""
}
}
}
}
```
Replace the placeholder values:
* `` - **Required**. Your Omni URL
* `` - **Required**. Your [Omni API key](/api/authentication)
* `` - **Optional**. Scope the MCP to a specific model
* `` - **Optional**. Scope the MCP to a specific topic
* `` - **Optional**. Require a User ID to execute queries with that user's permissions (default: `false`)
* `` - **Optional**. Execute queries as this user. Get IDs from the [List Users API](/api/users/list-users)
* `` for `X-MCP-Query-All-Views` - **Optional**. Set to `true` to enable all-views-and-fields mode, allowing the AI to query any view in the model (not just topics). Requires the model's `query_all_views_and_fields` setting to be enabled. Default: `false`.
Commit `.mcp.json` to your repository. When you start a new Claude Code Cloud session on that repository, the MCP server will be loaded automatically.
**To keep credentials out of version control**, reference environment variables using `${VAR}` syntax instead of hardcoding values:
```json title=".mcp.json" theme={null}
{
"mcpServers": {
"Omni MCP": {
"type": "http",
"url": "https://${OMNI_INSTANCE}/mcp/https",
"headers": {
"Authorization": "Bearer ${OMNI_API_KEY}",
"X-MCP-Model-ID": "${OMNI_MODEL_ID}",
"X-MCP-Topic-Name": "${OMNI_TOPIC_NAME}",
"X-MCP-User-Required": "false",
"X-MCP-Query-All-Views": "${OMNI_QUERY_ALL_VIEWS}"
}
}
}
}
```
If you used `${VAR}` references in your `.mcp.json`, add the corresponding values to your Cloud Environment variables (e.g., `OMNI_API_KEY=key`). These are injected at runtime and never stored in your repository.
Start a new Claude Code Cloud session from [claude.ai/code](https://claude.ai/code) or the Claude desktop app. When prompted, select the GitHub repository where you committed `.mcp.json`. Claude Code Cloud will detect the file and load the Omni MCP server automatically.
## Troubleshooting
Claude Code may sometimes return an error similar to:
```bash wrap theme={null}
Permission to use mcp__omni__pickModel has been denied because Claude Code is running in don't ask mode
```
This mode automatically blocks tools that aren't pre-approved rather than prompting you for approval. To resolve this issue, you have a few options:
* **Restart Claude Code with the tools allowed**:
```bash theme={null}
claude --allowed-tools 'mcp__omni__*'
```
* **Update your permission settings** to allow MCP tools. Add `mcp__omni__*` to your allowed tools in your Claude Code settings or `.claude/settings.json`
* **Switch out of 'don't ask' mode**, which will ensure you are prompted to approve tool calls