> ## Documentation Index
> Fetch the complete documentation index at: https://docs.omni.co/llms.txt
> Use this file to discover all available pages before exploring further.
# Auto-provisioning Omni users with Okta SCIM
> Automatically manage Omni accounts for your users with Okta SCIM provisioning.
When SCIM (System for Cross-domain Identity Management) is enabled, you can automatically provision and de-provision Omni accounts for your users and synchronize Omni user groups with groups in Okta.
## Requirements
To follow the steps in this guide, you'll need:
* **To have Okta SAML authentication set up**. If you don't, refer to the [Okta SAML authentication setup guide](/administration/authentication/okta/saml) before proceeding.
* **Omni Organization Admin permissions**
* **Permissions in Okta that allow you to:**
* Access the Admin console
* Modify Okta applications
## Limitations
* Omni [system user attributes](/administration/users/attributes#default-system-user-attributes) are read-only and cannot be assigned via SCIM
* Omni does not currently support the following Okta provisioning features:
* Sync password
* Enhanced group push
Additionally, pushing an Okta group to Omni will **not** automatically provision accounts for users who are group members. You'll need to use the **Assignments** tab to assign the group to the users. Refer to the [Okta SAML setup guide](/administration/authentication/okta/saml) for more information.
## Steps
Omni users created via SCIM will have **Organization Member** permissions. Organization Admins must be created in **Settings > Users** or have their permissions [manually upgraded](/administration/users/permissions).
1. Follow [these steps](/api/authentication) to create a new API key named **Okta SCIM**.
2. Copy the key somewhere handy - you'll need it to complete the setup.
This guide assumes that you have an existing Omni application in Okta. If you don't, make sure you've finished setting up [Okta SAML authentication](/administration/authentication/okta/saml) before continuing.
1. Log in to the Okta Admin console.
2. Navigate to the Omni application.
3. Click the **Provisioning** tab.
4. In the **Integration** tab, click the **Configure API Integration** button.
5. Check the **Enable API Integration** box.
6. In the **API Token** field, paste your Omni API key: 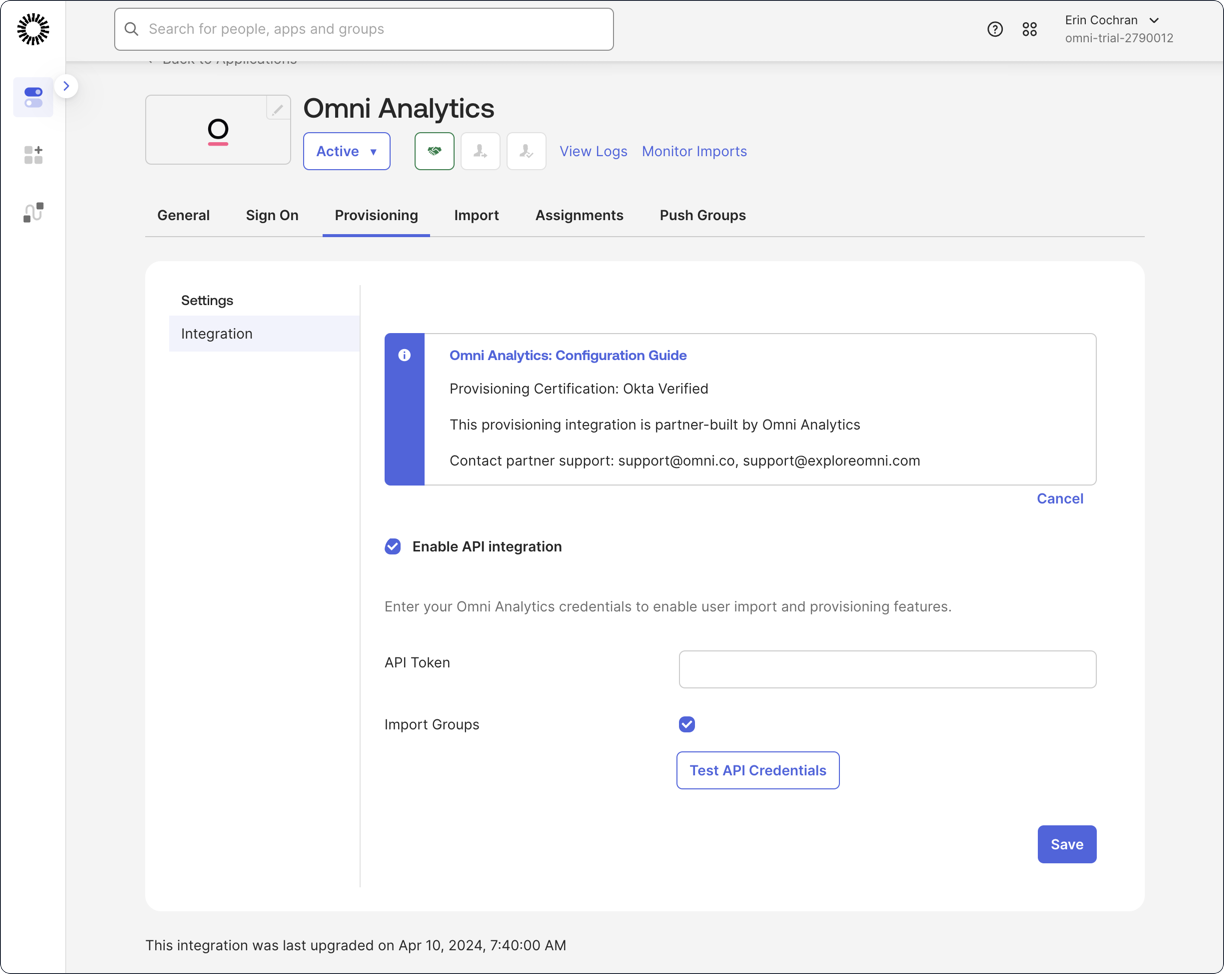 7. Click **Test credentials** to verify the setup.
If the API credential test is successful, additional options will display in the application's **Provisioning** tab.
1. In the **Provisioning** tab, click the **To app** option. Then:
2. Click the **Edit** link to the right of the **Provisioning to app** heading.
3. Check the **Enable** boxes for **Create users**, **Deactivate users**, and **Update user attributes**.
4. Click **Save**.
5. Navigate to the **Sign on** tab. Then:
6. Locate the **Credentials details** section.
7. Set the **Application username format** to **Email**. To change this setting, click the **Edit** link near the top of the tab:
7. Click **Test credentials** to verify the setup.
If the API credential test is successful, additional options will display in the application's **Provisioning** tab.
1. In the **Provisioning** tab, click the **To app** option. Then:
2. Click the **Edit** link to the right of the **Provisioning to app** heading.
3. Check the **Enable** boxes for **Create users**, **Deactivate users**, and **Update user attributes**.
4. Click **Save**.
5. Navigate to the **Sign on** tab. Then:
6. Locate the **Credentials details** section.
7. Set the **Application username format** to **Email**. To change this setting, click the **Edit** link near the top of the tab: 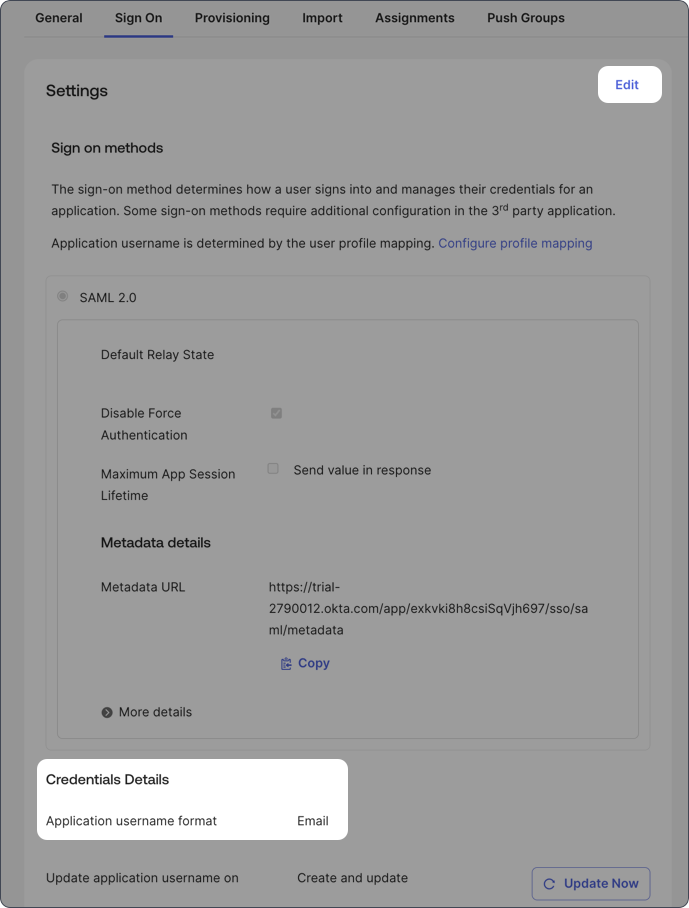 8. Click **Save** when finished.
After provisioning is set up, [users that have the Omni application assigned to them in Okta](https://help.okta.com/en-us/content/topics/users-groups-profiles/usgp-assign-apps.htm) will be provisioned in Omni. This process may take a few minutes to complete.
In Omni:
1. Navigate to **Settings > Authentication**.
2. Enable **Automatically provision new users on first login from this SAML provider**.
3. Click **Save SAML changes**.
This setting ensures that users assigned to the Omni app in Okta are automatically created in Omni when they first log in via SAML.
Pushing an Okta group to Omni will **not** automatically provision accounts for users who are group members. You'll need to use the **Assignments** tab to assign the group to the users. Refer to the [Okta SAML setup guide](/administration/authentication/okta/saml) for more information.
This step enables Okta's **Push groups** functionality, which allows you to push your Okta user groups to Omni.
1. In the Omni application, navigate to the **Push Groups** tab.
2. Click the **Push Groups** button, then select **Find groups by name**:
8. Click **Save** when finished.
After provisioning is set up, [users that have the Omni application assigned to them in Okta](https://help.okta.com/en-us/content/topics/users-groups-profiles/usgp-assign-apps.htm) will be provisioned in Omni. This process may take a few minutes to complete.
In Omni:
1. Navigate to **Settings > Authentication**.
2. Enable **Automatically provision new users on first login from this SAML provider**.
3. Click **Save SAML changes**.
This setting ensures that users assigned to the Omni app in Okta are automatically created in Omni when they first log in via SAML.
Pushing an Okta group to Omni will **not** automatically provision accounts for users who are group members. You'll need to use the **Assignments** tab to assign the group to the users. Refer to the [Okta SAML setup guide](/administration/authentication/okta/saml) for more information.
This step enables Okta's **Push groups** functionality, which allows you to push your Okta user groups to Omni.
1. In the Omni application, navigate to the **Push Groups** tab.
2. Click the **Push Groups** button, then select **Find groups by name**: 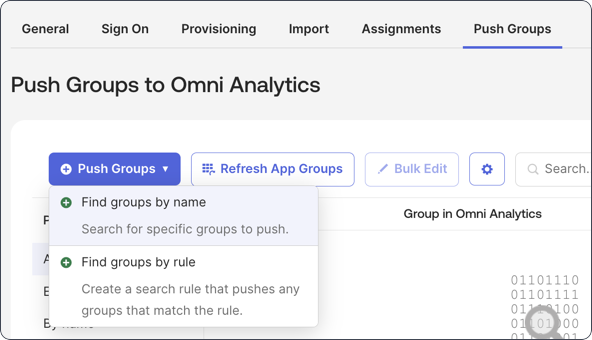 3. Use the search field to find and select an Okta group to push to Omni.
4. Click **Save**.
Once pushed, Omni will begin provisioning the user group. This process may take a few minutes to complete.
**Note**: when users are removed from Okta they will be automatically de-provisioned and revoked in Omni which has implications for the schedules and content they own. See the [Revoke Membership](/administration/users/delete) page for more details.
## What's next?
After you finish setting up SCIM, you can go a step further and sync your custom user attributes from Okta to Omni.
Refer to the [Syncing Okta user attributes guide](/administration/authentication/okta/user-attributes) for more information.
3. Use the search field to find and select an Okta group to push to Omni.
4. Click **Save**.
Once pushed, Omni will begin provisioning the user group. This process may take a few minutes to complete.
**Note**: when users are removed from Okta they will be automatically de-provisioned and revoked in Omni which has implications for the schedules and content they own. See the [Revoke Membership](/administration/users/delete) page for more details.
## What's next?
After you finish setting up SCIM, you can go a step further and sync your custom user attributes from Okta to Omni.
Refer to the [Syncing Okta user attributes guide](/administration/authentication/okta/user-attributes) for more information.